Table of Contents Show
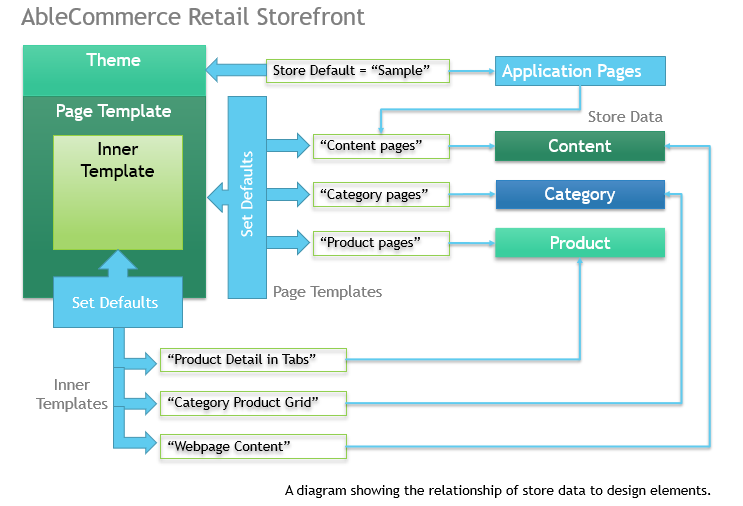
The AbleCommerce Retail Storefront combines design elements and data
to create an extremely versatile system for page design. Refer to the
diagram below.
The three main design elements include a Theme, Page Template and Inner Template. For each of these, a default setting is shown. This enables you to easily manage content on a massive scale. For each data element, Content, Categories, and Products, their values use the default display settings, but you can also over-ride any of the three design elements on a page-per-page basis.
So, if you wish to change the page template for all product pages, it's a simple one-selection change. But you may also want to create a unique product page and apply that to a group of products, or just one. That can also be easily accomplished.
The application pages are a little different because each one serves a particular purpose, like the pages that make up the checkout system. These pages are for advanced users, but you are still able to change the theme, page template, and inner template for each. The application pages also use the store's default theme and a page template's default theme for content pages. However, changing the inner template should be done with extreme caution. These pages have a pre-determined configuration and changing them could break the storefront.
From the menu, go to Website > Store Design > Page Templates.
In a new installation, there will be a total of ten Page Templates
defined. A sample is shown below.
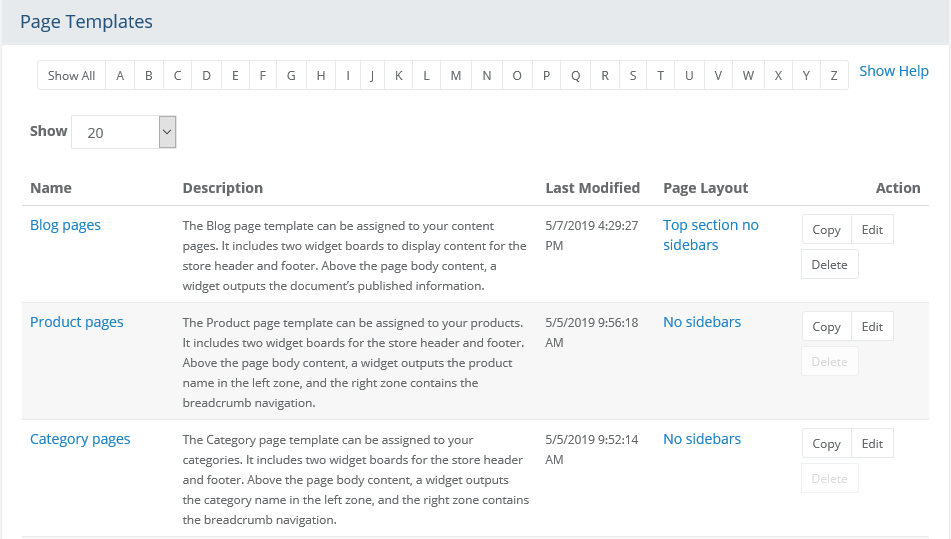
At the top of the Page Templates listing is a Quick Search filter. You can use this tool to filter results by name.
Paging and the number of items to show per page is available when the total number of records exceeds 5.
The first column displays the Name of each template. You can click the link to edit. Click the column heading to sort the list alphabetically.
A Description of each page template is provided. This explains what content is being output outside of the inner body content.
The Last Modified date is shown in the third column. You can click the column heading to sort the list by date changed.
The Page Layout column displays a link to the layout that is being used. Be careful when changing a layout that is in use.
The Assignment column shows an indicator with the number of objects that are currently in use by the template. If the number is 1 or greater, you can click on the indicator to display a report page.
In the last Action column,
there are buttons to Copy, Edit, or Delete.
Note:
You will not be able to delete a page template while it is being used.
Page templates are assigned to the store data, such as products, categories,
and content.
From the Page Template listing, click the button in the upper-right
corner to Set Defaults.

In a new installation, there will be three Page Template default selections available for each corresponding data object: Products, Categories, and Content.
The template selection for Product pages applies to all products in the catalog unless a product has a different Page Template assigned, in which case it will override this setting.
The template selection for Category pages applies to all categories in the catalog unless a category has a different Page Template assigned, in which case it will override this setting.
The template selection for Content pages applies to all content pages and application pages, unless it has a different Page Template assigned in which case it will override this setting.
After making changes, click the Save button.
A Page Template is used to add and design content using the selected Page Layout. The Page Template uses the content Zones that were defined within the Layout to create a design area that allows you to drag-and-drop widgets, widget boards, and HTML Snippets. The page template is used to display content that will surround the body of the page. The inner body of any page has its own template, called the Inner Template. For information on this feature, see Inner Templates.
Before getting started, take a look at the following diagram.

Creating a new Page Template is easy.
Using the menu, go to Website > Store Design > Page Templates. This will bring you to the Page Templates listing.
Click the button in the upper-right corner to Add
Page Template. A page similar to the one below is displayed.
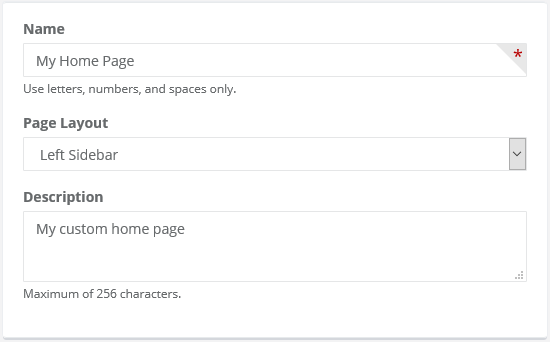
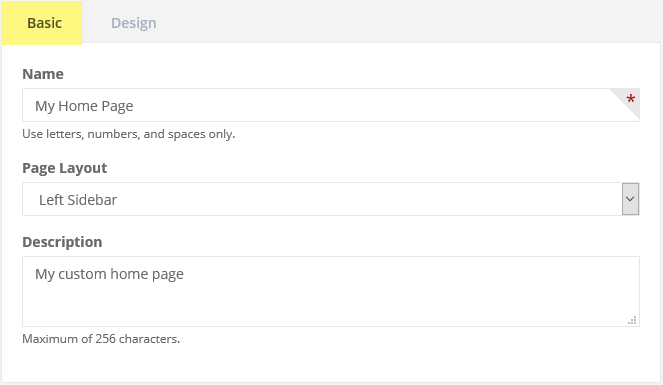
In the first field, enter a Name
for your new Page Template (e.g. My Home Page). The name must
only include letters, numbers, or spaces.
Note:
The Page Template name is for internal purposes only. This should
be kept as short as possible.
Select a Page Layout
from one of the existing layouts available. To create new ones, see
Page Layouts.
Warning:
After a layout is selected for the template, you cannot switch to
a different layout once content has been added to this page. If the
layout is changed, then all content added to the page template will
be removed and the page will be
reset for the new layout.
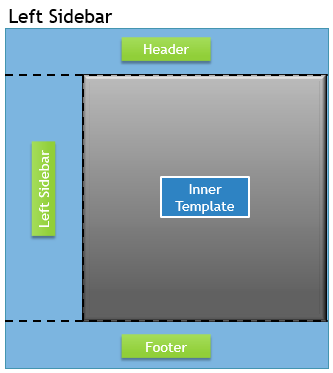
Left Sidebar - The left sidebar layout includes a responsive
left column and zones for the header, body, and footer.
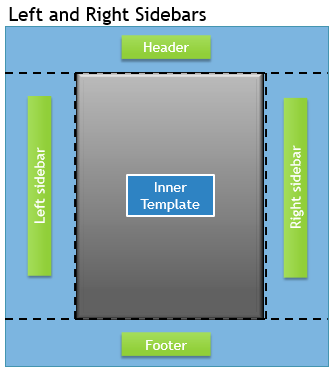
Left and right sidebars - This layout has left and right
responsive columns with zones for the header, body, and footer.
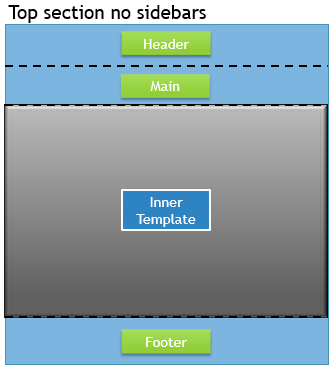
Top section no sidebars - This layout includes zones for
the header, body, and footer. There is an additional row placed
above the body.
Split top section no sidebars - This layout includes zones
for the header, body, and footer. Above the body, there is a row
split in half to form two columns.

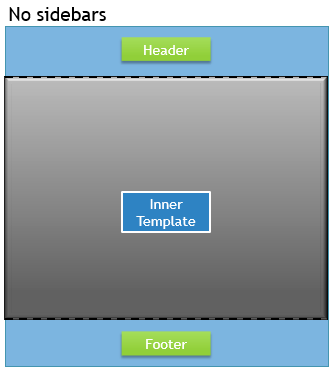
No sidebars - The no sidebars layout has zones for the header,
body, and footer. There are no columns in this layout.
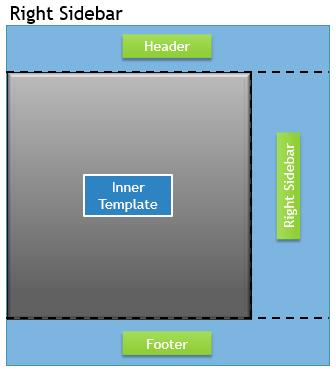
Right Sidebar - The right sidebar layout includes a responsive
right column and zones for the header, body, and footer.
After selecting a layout, enter a Description for the page template. This is used for internal purposes only. A maximum of 256 characters is allowed.
If you want to add content later, click the Save and Close button. To continue editing the new page template, click the Save button.
The page will refresh with two tabs for Basic and Design. Continue to next section, "Edit a Page Template".
To edit a page template, go to Website > Store Design > Page Templates using the menu.
Find the template you would like to change and click the Edit button from the Action column.
The Edit Page Template
page is composed of two sections denoted by the tabs for Basic
and Design.
Refer to the sample screenshot above. A name and layout are required in order to create the page template. Prior to accessing this editing area, the information has already been entered while creating or copying a new page template.
Changing the Name will update it for all places it is shown.
Changing the Layout will reset the Page Template. If any content has been added, then it will be removed from the template upon saving.
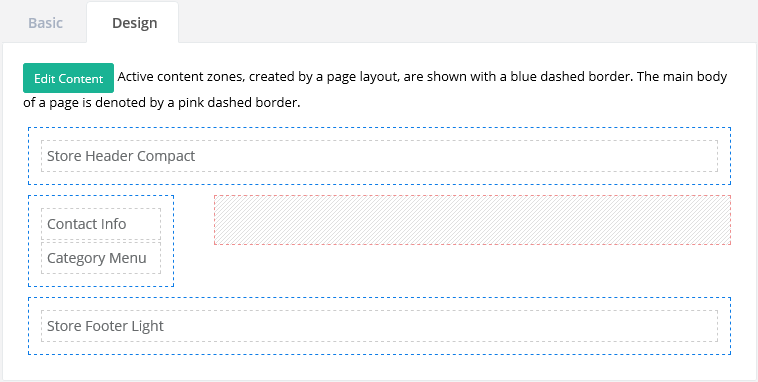
Click the Design tab
to begin. Reference the sample below.
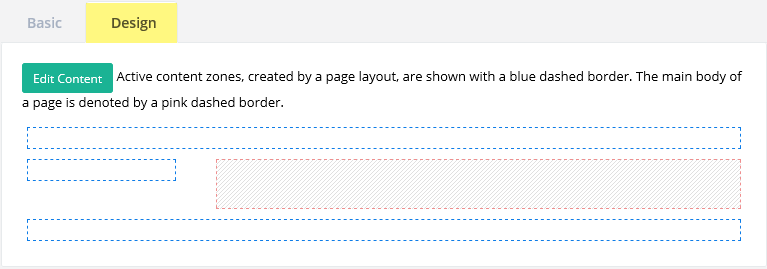
The blue-dashed border represents the active
zones ready for new content.
The pink-dashed section is reserved for the Inner
Template and has its own designer.
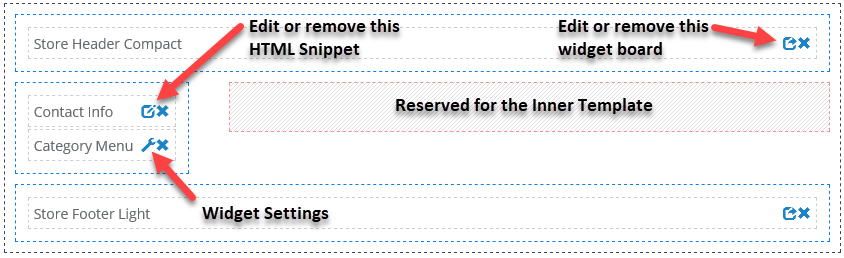
Click the Edit Content
button to activate design mode.
Note:
A full-size PC monitor is recommended when using design mode.
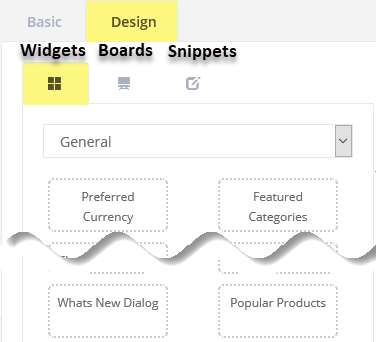
The left section of the page will have the types
of content that can be added to the page template's content
zones. These are widgets, boards, and snippets.
For additional information on each type of the content and its design
features, see:
- Website > Store Design > Widgets
(code that displays data and features with settings to control display)
- Website > Store Design > Boards
(combines widgets and HTML Snippets into a custom layout)
- Website > HTML Snippets (create
custom HTML content for reuse)
In the next steps, we will be creating an example
Page Template. Use this information to learn how to customize and
create your own.
For our first step, let's add a widget to the page template. Make sure
you are on the Widgets tab
before beginning.
Using the select list, choose a widget category that corresponds with the page area you want to design.
General - these widgets work on most pages.
Header - widgets designed for the store header area; also used with the widget boards for a store header.
Footer - widgets designed for the store footer area; also used with the widget boards for a store footer.
Sidebar - these widgets work in a sidebar, but they can also work in most pages with a setting change.
Product - these widgets need to reference a product, so they should only be used with template that will be assigned to products.
Category - these widgets need to reference a category, so they should only be used with template that will be assigned to categories.
Checkout - widgets designed to be used within the checkout system.
Account - these widgets are used to create the customer's account system.
For this example, select the Sidebar category.
Drag-and-drop the Category
Menu widget into the sidebar of the design area, as shown in
this example.
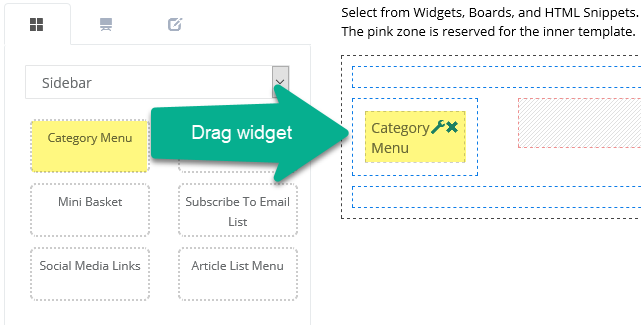
Note:
Drag as many widgets into the blue-dashed sections as you like. In
the upcoming instructions, we'll also show you how to add HTML content
and edit the widget settings.
Now let's give this page a header and footer. Click the Boards tab.
Drag-and-drop the Store Header
Compact widget board into the upper blue-dashed design area
as shown below.
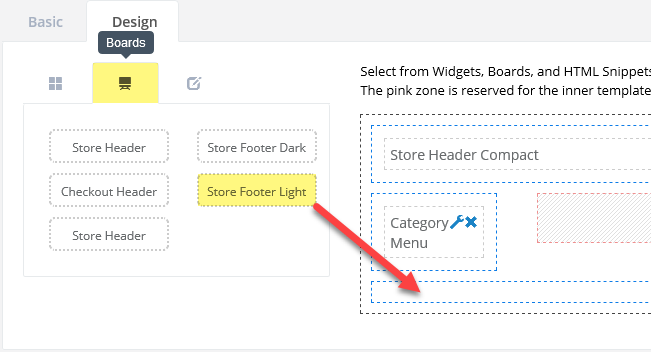
Drag-and-drop the Store Footer Light widget board into the lower blue-dashed design area as shown above.
To add some custom HTML, click the HTML Snippets tab.
Drag-and-drop the Contact Info
snippet into the left-column as shown.
When you are finished adding widgets, boards, and HTML, click the Save button from the admin footer.
Now that you have a Page Template, you will need to apply it to a page. If you plan to use the template for a single page, you can apply it directly to a page in the retail storefront. However, if you want to use the template for multiple pages, then you should apply it to any product, category, or content page by using of the following methods.
To change a category's Page Template, find a category to edit by going to Catalog > Categories.
The Page Template selection is found in the first section, as
shown in the example below.
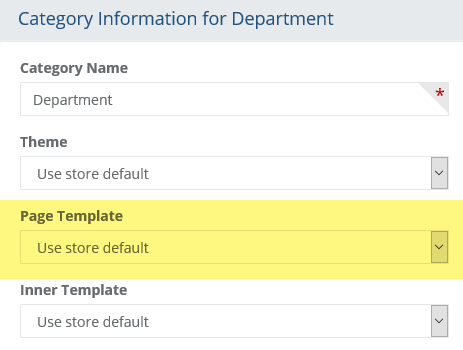
Change the selection for Page Template and Save.
To change a product's Page Template, find a product to edit by going to Catalog > Products.
Expand the Additional Settings
section as shown in this example.
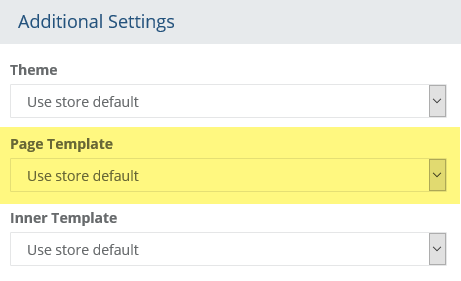
Change the selection for Page Template and Save.
To change the Page Template for your content, find a page by going to Website > Content Pages.
From the Basic tab,
find the section as shown in the example below.
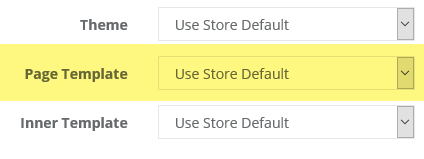
Change the selection for Page Template and Save.
A report page is provided so you can easily find all the objects that are currently in use by any particular page template.
To view the report, find the Assignment column from the Page Template listing page.
Click the assignment counter for any template that shows a value
of 1 or greater.

This will bring you to a report page where you can view and
edit all the objects that are currently in use by the page template.
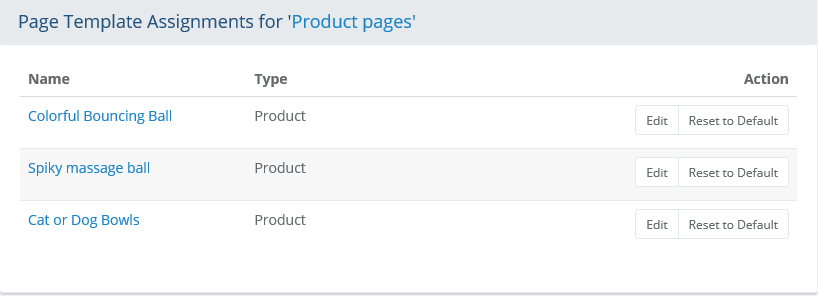
The first column shows the Name of the object with a link to edit it directly.
The second column indicates the Type of the object, which can be any of the following types:
Content Page
Application Page
Category
Product
The last column provides two possible actions:
Click the Edit button to go directly to the object, or
Click the Reset
to Default button which will remove the current assignment
and use the store's default value set for page template.
Note:
Application pages do not use a store default value. The button
will be disabled for this type of object.
Return to the Page Template listing by clicking the Back button in the admin footer.
This section describes the process of changing the template for an individual page. If you would like to set the Page Template for multiple pages, then you can use the Catalog > Batch Edit features. The section above describes setting the Page Template for each of categories, products, and content.
Page Templates are assigned to products, categories, content, and application pages; the objects that make up the entirety of the storefront. A Page Template includes all the content outside of the Inner Template.
Inner Template - Every Page Layout must include a defined content area that will be used exclusively for the Inner Template. Like Page Templates, the Inner Template is assigned to products, categories, content pages, and application pages for the entire storefront.
From the retail side, make sure you are logged in with an account that has administrator access.
Locate the page that you want to change the Page Template for.
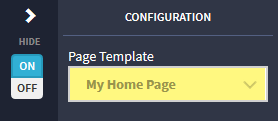
Turn ON design mode
using the control found along the right
margin of any page.
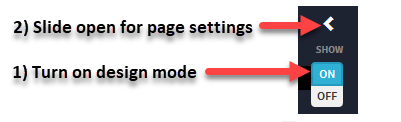
Expand the design mode tool by clicking <
SHOW.
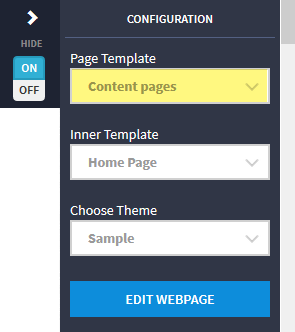
For Page Template, select a different one from the list. The page will refresh with the template selected.
Confirm the change and click the SAVE
button in the page footer before leaving design mode. If you are not
happy with the change, click CANCEL
to revert.

To continue with the documented
example, change the Page Template selection to "My Home
Page" and the save the change.
Once you have your content in place, it is time to make the final adjustments. Hopefully, by now, you have assigned the Page Template to a page that can be viewed. This will allow you to see how the actual content will be displayed for a particular page, or pages.
Important Editing Info:
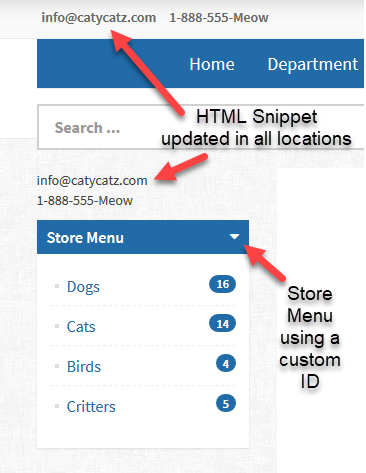
When you edit from the Retail storefront, most changes will only apply to the page you are editing. For example, if you edit the properties of a widget that has been placed on the home page, and you are editing directly from the home page, then those changes will apply to the home page - and only to the home page.
Likewise, if you are editing a widget from the admin, then it will update all locations where that widget is used. This makes the system highly flexible because you can change the default properties of all widgets from the admin, and then you can still override those settings on a page-per-page basis.
However, keep in mind that once you begin editing a Page Template from the retail side, you must continue editing from the retail designer. You cannot mix custom changes taking place from the retail and admin designer for the same Page Template. That said, if you plan to use a template on more than one page, then it is usually best to customize that template from the admin side.
Very Important: Once you've started customizing a retail page, then you must continue editing from the retail side.
There are, however, some shared design elements that will be updated in all locations that they are used. This includes the HTML Snippets and Widget Boards (including their settings). For example, if you have inserted the HTML Snippet named "Contact Info" into several pages, and you modify the content of that snippet for any location, it will automatically update all the locations that the snippet is used. This is also true for the Widget Boards that are used in the header and footer. If you would like to use different headers or footers on pages, then create a copy of the Widget Board and modify as needed.
NEW FEATURE
in AbleCommerce 9.0.7: You can now edit from the retail side and
apply those changes to all applicable templates. When editing from the
retail side, there will be a button to SAVE
ALL located in the bottom right of the footer.

Before saving, a confirmation dialog will appear so you can confirm before saving to multiple templates.

This section describes the process of editing a page template from the Merchant Administration. You can edit a page template that is used on a single page by referring to the section below, "Retail Changes". When editing from the admin, any changes that take place will affect all pages that are using the template.
Using the menu, return again to Website > Store Design > Page Templates listing.
Select the example template, "My Home Page", or any
other that you would like to change.
Notice that any Widgets, Boards, or HTML Snippets that were added directly from the retail design side are not shown. This is because any editing that takes place on the Retail side only affects the page you are changing, whereas editing on the Admin side will change the template for all pages that use it.
Click the Edit Content
button. Example of My Home Page
template shown below.
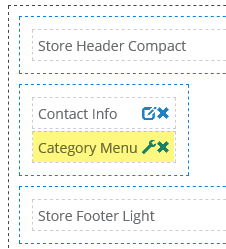
Click the wrench icon
for the Category Menu widget.
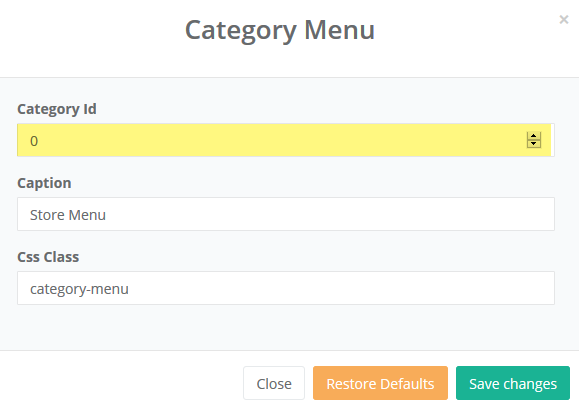
Editing a widget here will change the value for its use, but only within this page template. The default properties of a widget can be changed directly by editing the widget from the Widgets page listing.
For this example, let's change the Category Id to 6. Click to
Save Changes.
Note:
At any time, you can use the button to Restore Defaults and remove
all custom overrides from the widget. However, resetting the defaults
applies only to the custom changes that are made either from the admin
or retail side on a particular page where it is used - not for the
entire store.
To save the changes and exit the design area, click the Save and Close button.
Let's take another look at the home page using "My Home
Page" template.
For additional information on editing the Page Template in admin, see the section above, "Edit a Page Template".
Since this example involves editing the home page, you can just as easily make design changes directly from the retail storefront. If you want to edit a page template that is used on several pages, then you should do that from the admin side. Refer to the section above, "Admin Changes".
To make changes for an individual Page Template, make sure you are logged in as an admin user.
Go to the retail storefront and find a page using the template. If we want to continue using the documented example, go to your home page.
Turn ON design mode
using the control found along the right
margin.
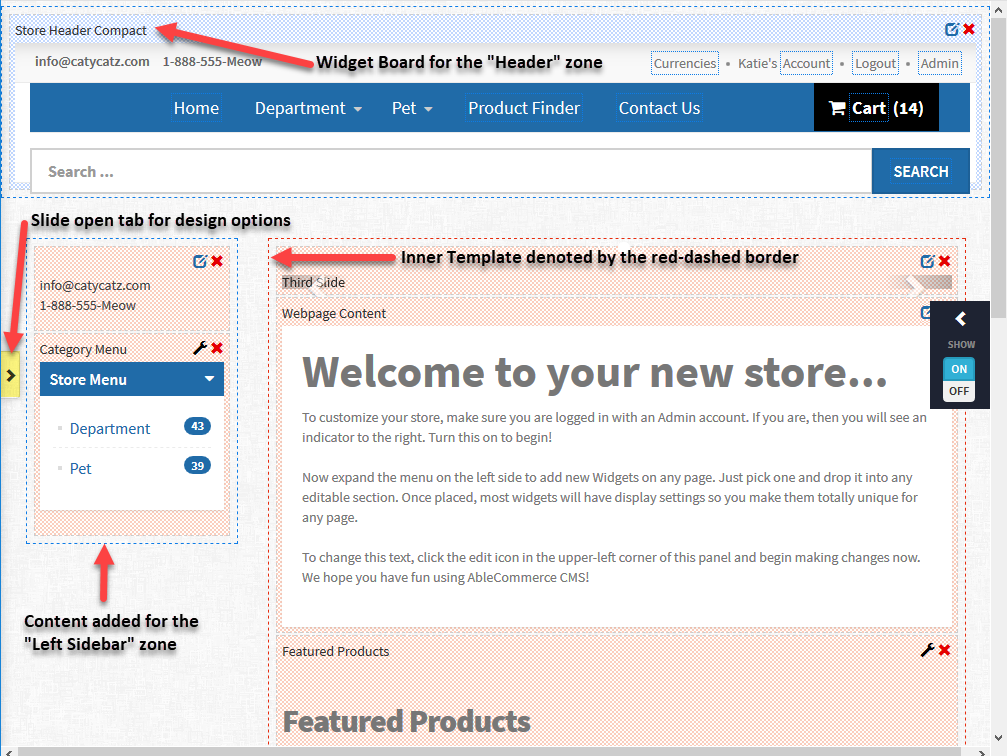
In the example above, the layout used for this Page Template
included zones for the header, footer, and left sidebar. The layout
and zones will define the outer content areas that can be edited.
A Widget Board will have its
own layout and content. As demonstrated by the "Store Header
Compact" widget, it combines HTML and/or code (Widgets) to output
things like the Store Logo, Menu, and Search form, etc. Each of these
widgets can be used individually as well. Creating boards makes it
easier to make updates affecting multiple locations. See Widget
Boards for more information.
The content for Inner Template
is shown within the red-dashed border. The container for this data
is also defined by the layout. See Page Layouts
for more information.
Open the page designer
by clicking the > tab found along the left
margin.
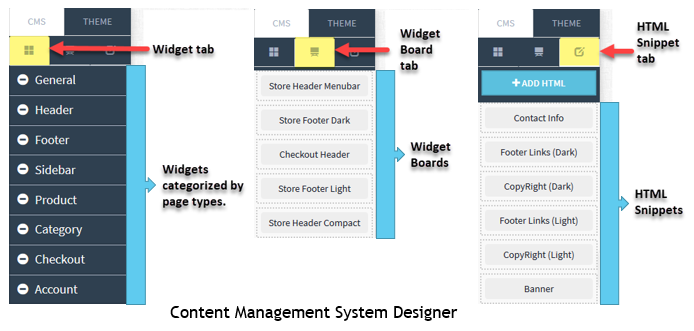
The diagram above displays the three Content Management System areas within the retail page designer. All of these are found under the CMS tab.
To add a Widget to a
Page Template, expand an applicable widget
category.
Note:
Widget categories are used to keep the widgets organized. Although
some widgets can be used interchangeably on any page, there are those
widgets that are designed to work with a specific page type. For example,
widgets within the Product group must be used on product detail pages.
Category widgets must be used on category pages, and widgets within
the Checkout and Account groups are each made for very specific purposes.
To add a widget to the home page, expand
the General category within the Widget tab as shown in the
example below.
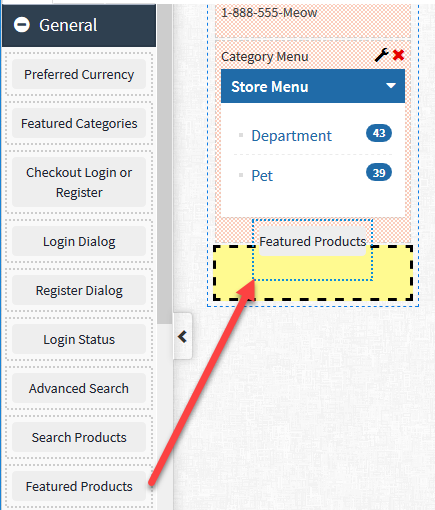
Drag-and-drop (click and hold) a widget into the Left Sidebar content zone. As you drag the widget into a valid position, the area will be highlighted. When this happens, drop the widget into the desired location.
After the widget is added, it may need further adjustment. For
this example, using the Feature Products widget, click the wrench
icon.
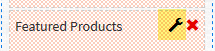
A settings panel for the "Featured Products" widget
will appear in a pop-up screen. Make changes as needed.
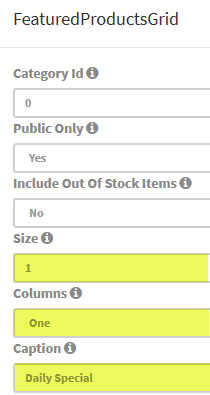
The "Featured Products" widget is versatile enough that it can be used in the sidebar or in other portions of the page. For this example, we are going to place it in the Left Sidebar, and change the function and display of the widget:
Change Columns
setting from Four to One.
Note:
The widget settings vary depending on which one is selected. Some
widgets, like this one, have several settings available, while
others only have a few. Make as many adjustments as needed. They
will be saved as setting-override values for the page where they
are changed. Click the Restore Defaults button to revert all custom
override values. See Widgets for more
information.
Change the Size value to limit the number of items to display to 1
Change the Caption to "Daily Special".
After making changes, click the SAVE CHANGES button on the Widget's settings screen.
Be sure to click the SAVE
button in the footer.
Note:
If you accidentally insert a widget where it isn't designed to work,
there is a chance it could break the page. If this should happen,
return to the Merchant Administration. Go to Website > Customized
Pages and select one of the page types (Content, Product, or Category).
Find the page you were editing; it should appear at the top of the
list if you check the Last Modified date and time. From the Action
column, click the Cancel Last
button to revert the last action. You can also click the Reset All
button to remove all changes that were made to the page from the Retail
side.
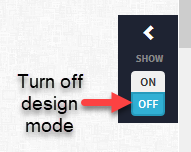
To view the final result, turn OFF
design mode using the control found along the right
margin of any page.
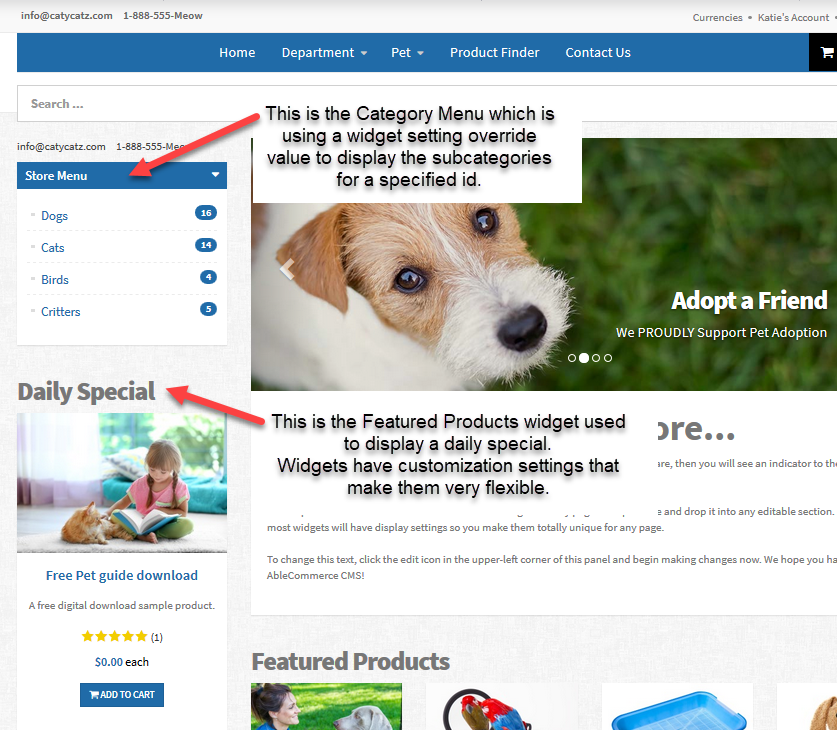
Take a look at the example Home Page below using the customized
Page Template:
There are two ways to remove customizations from a page. The first is through the retail side, and the second is through the admin side. Both methods are described below.
From the retail side, find the page you want to remove customizations for. Make sure you are logged in as a store administrator.
Turn ON design mode using the control found along the right margin of any page.
In the bottom footer, you will see a RESET button if the page
has any custom overrides.

Click RESET to confirm.
Click OK to continue.
You can perform the same process from the admin side.
Using the menu, go to Website
> Customized Pages > Content Pages listing.
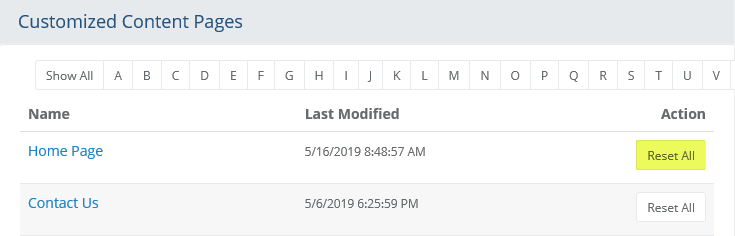
Our working example is using a Page Template that is assigned to a content object (e.g. Home Page), so that is why we need to look under the Content Pages listing. Otherwise, you may need to find a category or product page.
You can check the Last Modified date to make sure that you are on the desired page.
From the Action column, click the Reset All button.
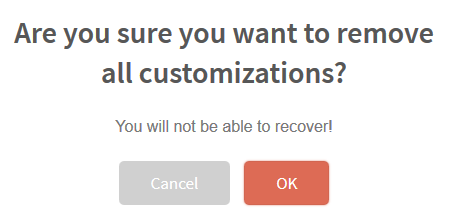
A confirmation screen will pop-up. Click OK
to confirm removal of all customizations. This action cannot be undone!
Note:
Removing customizations only applies to the individual overrides that
have taken place on the retail side. If you have modified a page template
from the admin side, then it cannot be reset back to the default values
because these ARE the default values for that page. Only changes taking
place on the retail side can be removed using this method.