
Table of Contents Show
Before adding an Inner Template, it's important to understand the difference between this and a Page Template. The Page Template uses the content Zones that were defined within a Layout to create a design area that is outside of the inner template. The page template is used to display content that will surround the body of the page, while the inner body of any page has its own template.
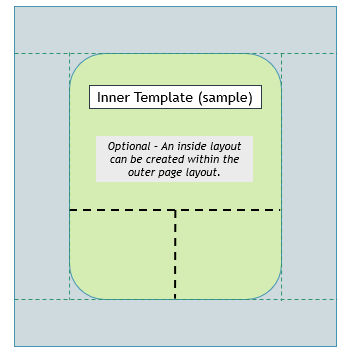
Before getting started, take a look at the following two diagrams. The first picture represents the Page Template with a layout that has defined content zones.
This next diagram represents the Inner Template. Notice that the inner template has its own layout within the outer page layout.
From the menu, go to Website > Store Design > Widget Boards.
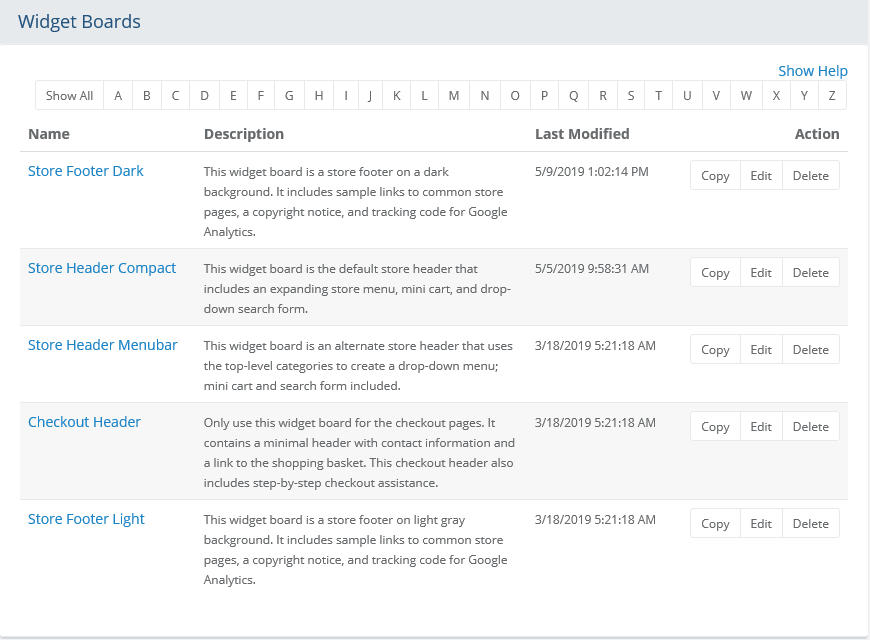
In a new installation, there will be five Widget Boards defined.
A sample is shown below.
At the top of the Widget Board listing is a Quick Search filter. You can use this tool to filter results by name.
Paging and the number of items to show per page is available when the total number of records exceeds 5.
The first column displays the Name of each widget board. You can click the link to edit. Click the column heading to sort the list alphabetically.
A Description of each widget board is provided. This explains what content will be output.
The Last Modified date is shown in the third column. You can click the column heading to sort the list by date changed.
In the last Action column, there are buttons to Copy, Edit, or Delete.
To create a new widget board, follow the instructions given below. The next section describes the process of designing and adding content to a widget board.
Using the menu, go to Website > Store Design > Widget Boards. This will bring you to the Widget Boards listing.
Click the button in the upper-right corner to Add
Widget Board. A popup similar to the one below is displayed.
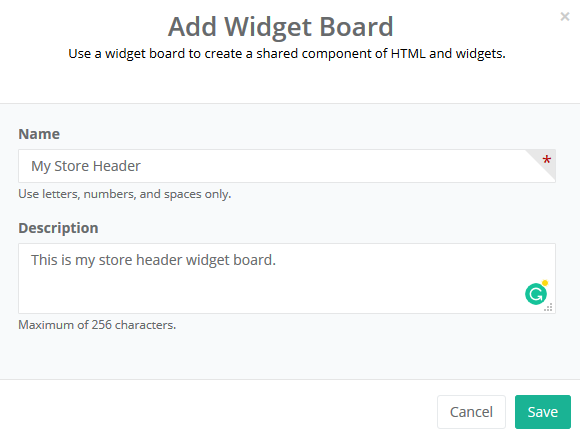
In the first field, enter a Name
for your new Widget Board. The name must only include letters,
numbers, or spaces.
Note:
The Widget Board name is for internal purposes only. This should be
kept as short as possible.
Enter a Description for the widget board. This is used for internal purposes only. A maximum of 256 characters is allowed.
Click the Save button when finished.
The listing page will refresh. Continue to next section, "Edit a Widget Board".
To edit a widget board, go to Website > Store Design > Widget Boards using the menu.
Find the widget board that you would like to change, and click the Edit button from the Action column. You can also Copy an existing widget board to avoid creating one from scratch.
The Edit Widget Board
page is composed of three sections denoted by the tabs for Basic,
Layout and Content.
Refer to the sample screenshot below.
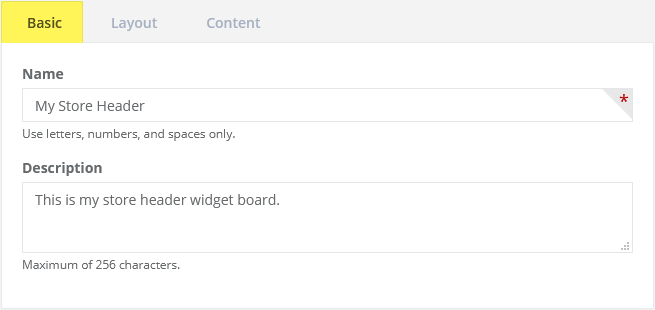
Changing the Name will update it for all places it is shown.
Click the Layout tab
to begin. Reference the sample below.
![]()
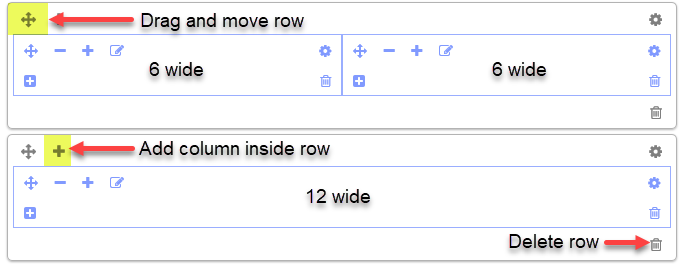
Use the green + icons to add row(s) using the preset column
values.
For this example, we will add two rows: click +12,
then +6-6.
Note:
Before adding additional columns, realize that 12 is the maximum number
of columns that can be created in a responsive website. Each column
will contract or expand to fit the screen width for any size device
(phone, laptop, desktop computer, etc.) viewing the page.
To make a column narrower, click the - icon as shown in the following
example. To make a column wider, click the + icon.

For this example, drag the two (6x6) column row so it is below the one column row.
Click the Save button.
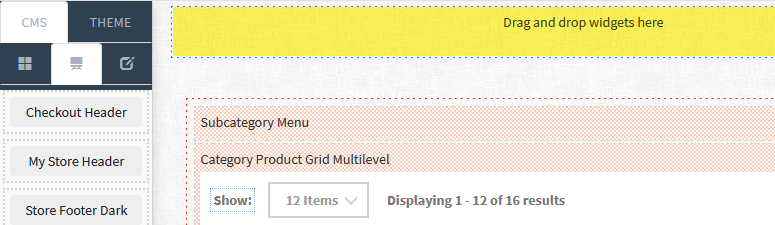
Add Content Zones to each section by clicking the edit
icon as shown below.

A pop-up will be displayed.
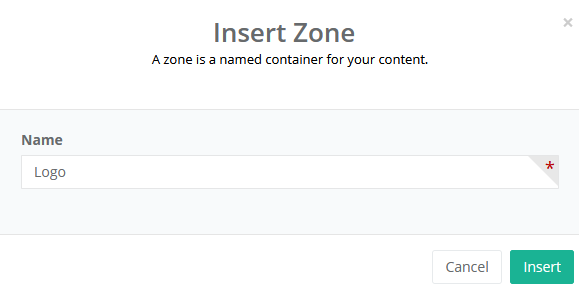
The Insert Zone form
supports the addition of existing zones or you can create a new one.
For this example, we are going to create a new zones for each of the
three content areas.
You can start typing characters into the form and it will display existing
zones which can be used within the board's layout.
Note:
Zones are effectively containers that are named. The zone names are
completely arbitrary, but should be short and named according to their
proposed content.
Click the Insert button to finish. Repeat for each section as needed. You can have multiple zones per section.
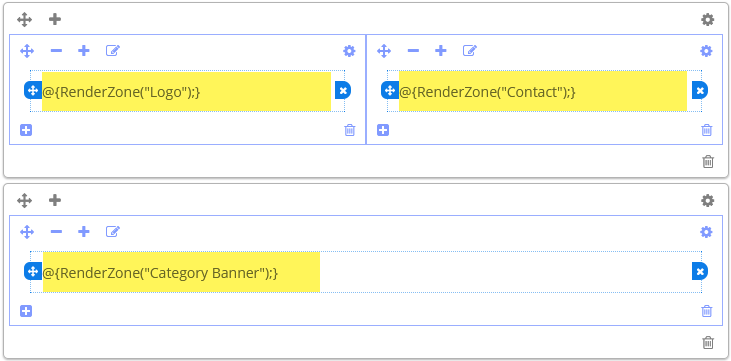
The new zone is added. The name of the zone is also shown. As
needed, create additional zones for each section.
Click the SAVE button in the admin footer.
Click the Content tab.
The zones are empty but represented by the blue-dashed border.
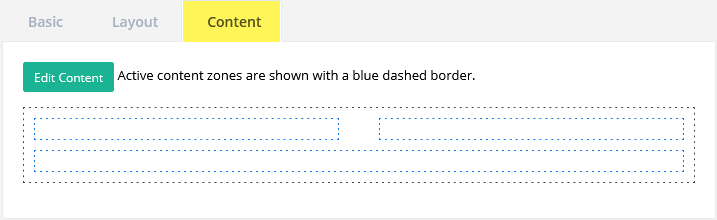
Now click the Edit Content
button to activate design mode.
Note:
A full size PC monitor is recommended when using design mode.
The left section of the page will have the types
of content that can be added to the widget board's content
zones. These are widgets and HTML snippets.
For additional information on each type of the content and its design
features, see:
- Website > Store Design > Widgets
(code that displays data and features with settings to control display)
- Website > HTML Snippets (create
custom HTML content for reuse)
In the next steps, we will be creating an example
Widget Board. Use this information to learn how to customize and create
your own.
For our first step, let's add a widget to the board. Make sure you
are on the Widgets tab before
beginning.
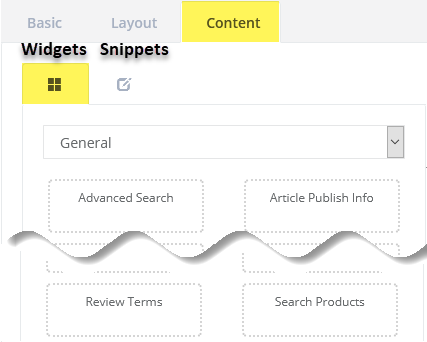
Using the select list, choose a widget category that corresponds with the page area you want to design.
General - these widgets work on most pages.
Header - widgets designed for the store header area; also used with the widget boards for a store header.
Footer - widgets designed for the store footer area; also used with the widget boards for a store footer.
Sidebar - these widgets work in a sidebar, but they can also work in most pages with a setting change.
Product - these widgets need to reference a product, so they should only be used with template that will be assigned to products.
Category - these widgets need to reference a category, so they should only be used with template that will be assigned to categories.
Checkout - widgets designed to be used within the checkout system.
Account - these widgets are used to create the customer's account system.
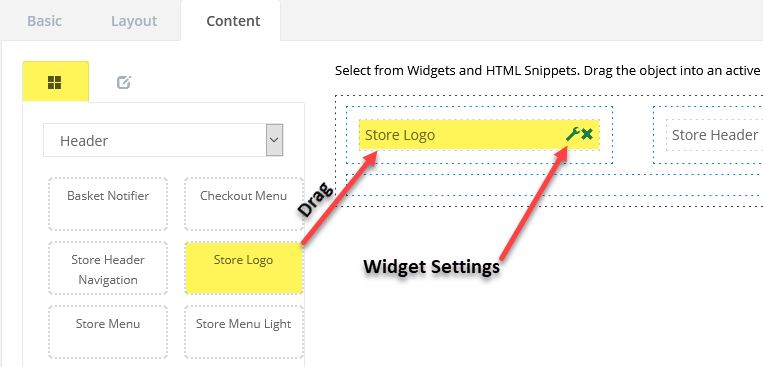
For this example, drag-and-drop the "Store Logo" widget,
shown within the Header category,
into the top-left zone as shown.
Note:
Drag as many widgets into the blue-dashed sections as you like.
To continue with the working example, drag the "Store Header Navigation" widget into the upper-right zone.
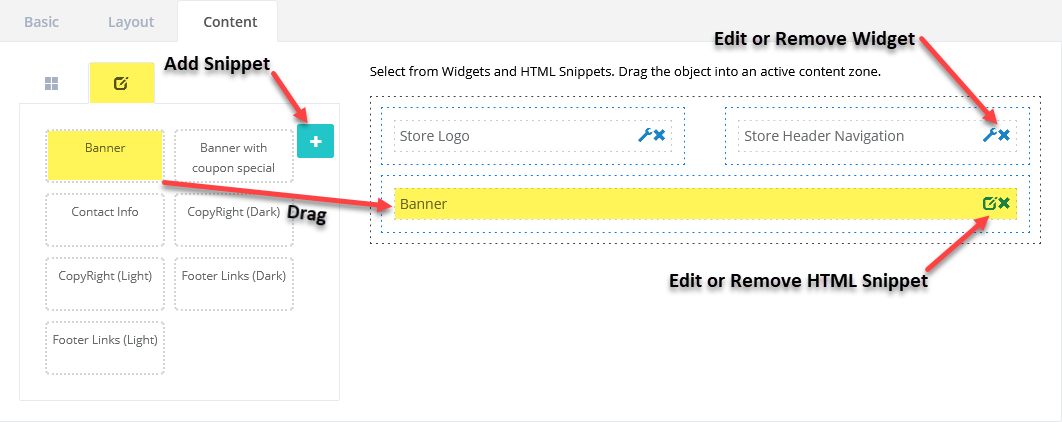
Now click the Snippet tab. Drag an HTML snippet into the bottom row. For this example, we already have an HTML snippet named "Banner".
To complete the widget board, make any changes to the widget
properties or to the HTML Snippet. Refer to the example below.
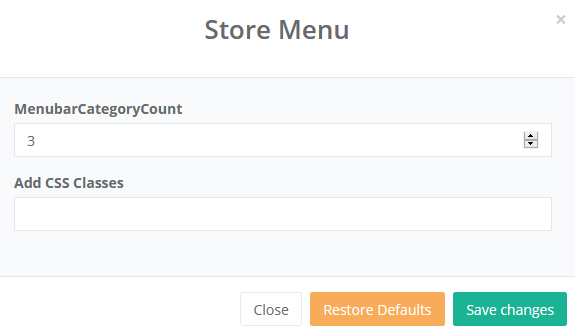
For many widgets, you can change the settings. The following
example shows a popup for the "Store Menu" widget. This
widget contains a setting to allow adjustment for the number of top-level
categories shown in the menu. Each widget will have its own unique
settings, but not all widgets will have settings.
You can also click the Edit icon for any HTML Snippet that has been inserted into the board. This will bring up the WYSIWYG editor where you can easily modify the HTML content.
When the Widget Board is completed, click the Save and Close button in the admin footer. This closes the design area.
Click the Cancel button to return to the Widget Board listing.
Now that you have a new Widget Board, it will be available to place within any template. The boards are versatile enough to be placed within the Page Template or an Inner Template, but you must keep your content in mind and consider the type of widget(s) that are being used within the board. For example, if you use a widget within your board that displays information for a product, then the widget board should only be used on a template that is compatible with product pages.
For HTML Snippets that are within a Widget Board, these can be used in any template for any page. Keep in mind that changes to HTML Snippets, whether they are part of a board or not, will be updated in all locations.
You can apply Widget Boards to a template for use on multiple pages, or apply a board directly to a single page in the retail storefront.
For additional information on templates, see:
- Website > Store Design > Page Templates
(how to create, design, and apply page templates)
- Website > Store Design > Inner Templates
(how to create, design, and apply inner templates)
Let's finish up the working example and apply the new Widget Board to a Category page.
If you want to edit a template that is used on several pages, then you should do that from the admin side. Refer to the section above which includes links to edit page templates and inner templates.
To make changes for an individual page in the catalog, make sure you are logged in as an admin user.
Go to the retail storefront and find a page using the template. If we want to continue using the documented example, go to a category page. (e.g. Dogs)
Turn ON design mode using the control found along the right margin.
Then slide open the design tab by clicking the > tab
found along the left margin..
This will display a panel showing the design elements.
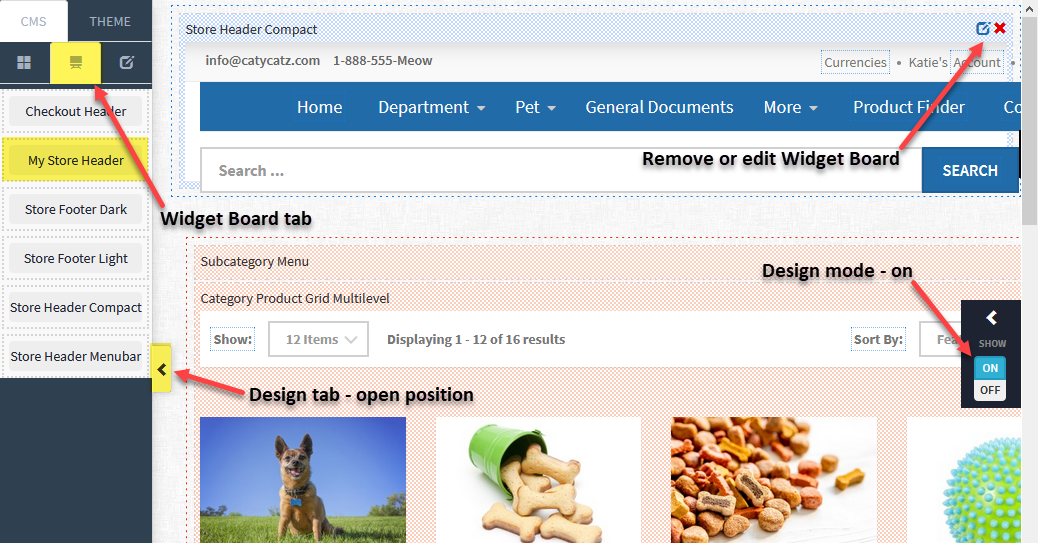
Click the middle tab to display available widget boards.
Before adding a new widget board in the top header zone, let's remove the existing one.
Click the red X in the upper-right corner of the existing widget board to remove it from the template.
A confirmation message will be displayed. Click Yes to continue.
You should be seeing an empty zone where the original widget
board was once shown.
Drag the new example widget named "My Store Header"
into the empty zone.
In the admin footer, click the SAVE button.
As shown in the diagram below, the retail side
page designer has additional features which allow you to displays
content from the CMS tab and design elements from the Theme tab.
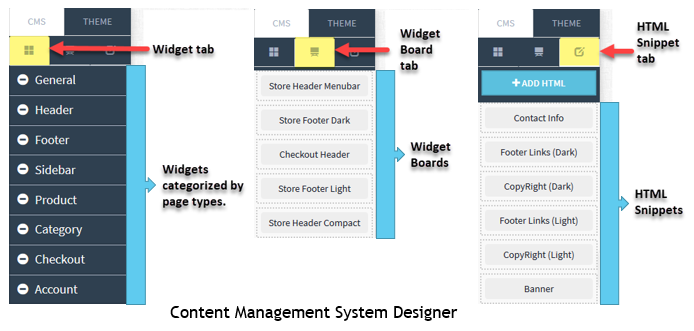
All content is found under the top CMS tab.
Widgets (pre-made design elements categorized by intended use)
Widget Boards (combines widgets and snippets in a custom layout)
HTML Snippets (custom HTML)
Be sure to click the SAVE
button in the footer.
Note:
If you accidentally insert a widget board where it isn't designed
to work, there is a chance it could break the page. If this should
happen, return to the Merchant Administration. Go to Website >
Customized Pages and select one of the page types (Content, Product,
or Category). Find the page you were editing; it should appear at
the top of the list if you check the Last Modified date and time.
From the Action column, click the Cancel
Last button to revert the last action. You can also click the
Reset All button to remove all changes that were made to the page
from the Retail side.
After a widget board is inserted into a page, you must be sure to click the SAVE button in the footer.
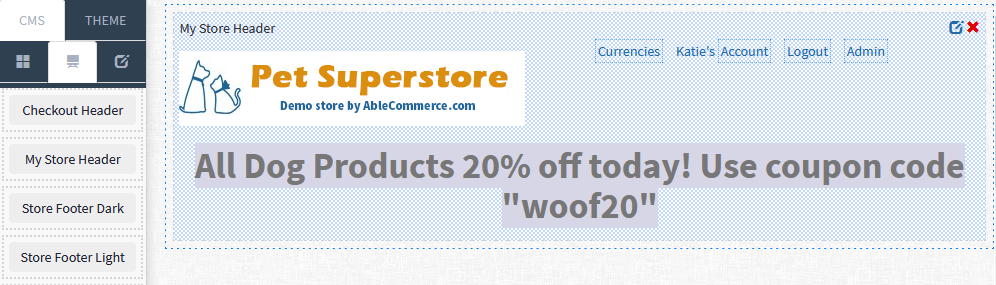
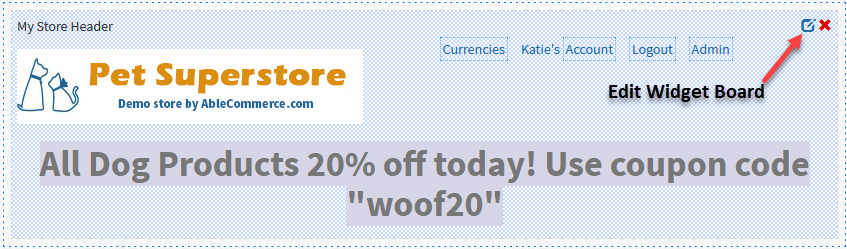
Continuing on with our sample widget board, My Store Header,
find and click the edit icon
in the upper-right corner as shown below.
After enabling edit mode for the Widget Board, the area will
be encompassed by a red-dashed border as shown below.

While in edit mode, you can edit any HTML snippets or widgets
that are part of the board.
Note:
Editing a Widget Board will update all locations that it is used.
For this example, let's change the banner text. Click the edit icon in the upper-right corner
of the HTML snippet named "Banner". This will expand the
inline HTML editor and allow you to make changes.
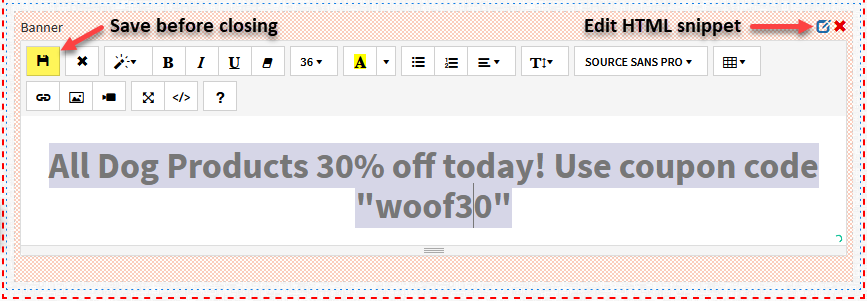
When finished with the HTML editing, click the Save button shown above.
Then be sure to click the Close and Save icon in the upper-right corner of the Widget Board.
To view the final result, turn OFF
design mode using the control found along the right
margin of any page.
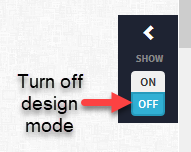
Note:
If you have made any other changes to the page, then a prompt will
ask you to save those changes before closing.
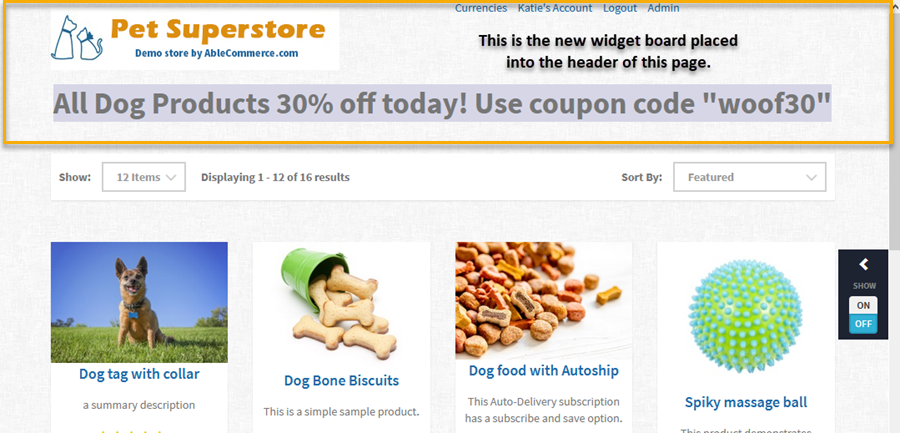
Take a look at the example category below using the store header
widget board:
There are two ways to remove customizations from a page. The first is through the retail side, and the second is through the admin side. Both methods are described below.
From the retail side, find the page you want to remove customizations for. Make sure you are logged in as a store administrator.
Turn ON design mode using the control found along the right margin of any page.
In the bottom footer, you will see a RESET button if the page
has any custom overrides.

Click RESET to confirm.
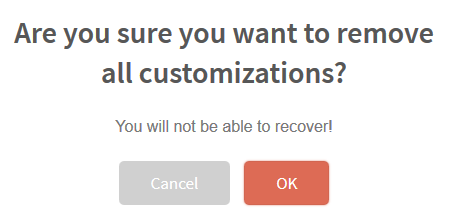
Click OK to continue.
You can perform the same process from the admin side.
Using the menu, go to Website
> Customized Pages > Category Pages listing.
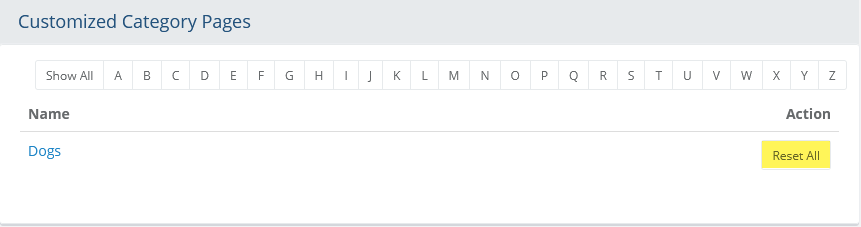
Our working example is uses a Widget Board assigned to a category, so that is why we need to look under the Category Pages listing. Otherwise, you may need to find a content page or product page.
You can check the Last Modified date to make sure that you are on the desired page.
From the Action column, click the Reset All button.
A confirmation screen will pop-up. Click OK
to confirm removal of all customizations. This action cannot be undone!
Note:
Removing customizations only applies to the overrides that have taken
place on the retail side. If you have modified a page template from
the admin side, then it cannot be reset back to the default values
because these ARE the default values for that page. Only changes taking
place on the retail side can be removed using this method.