Page Layouts
Table of Contents Show
Page Layouts
A Page Layout is used to control the overall design of your page and establish areas that will be used for content. Therefore, a page layout has strict requirements in order for the entire page to function as a whole. A page layout cannot stand on its own, but instead it will be used by the page template. The sole purpose of a page layout is to define the content zones.
A content zone is essentially a container for any type of content, such as HTML Snippets, Widgets, Widget Boards, and Content Pages. Additionally, and most importantly, the placement of the Inner Template is defined here. One thing to keep in mind is that the Inner Template will have its own layout.
If a layout is in use by a page template, it cannot be removed. Also, changing of a layout when it is already in use will reset any existing content zones.
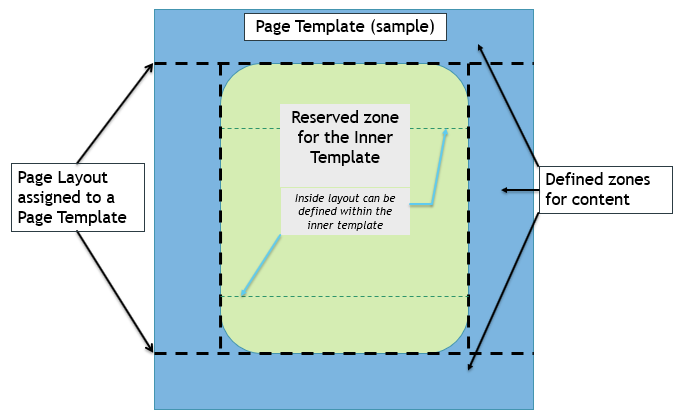
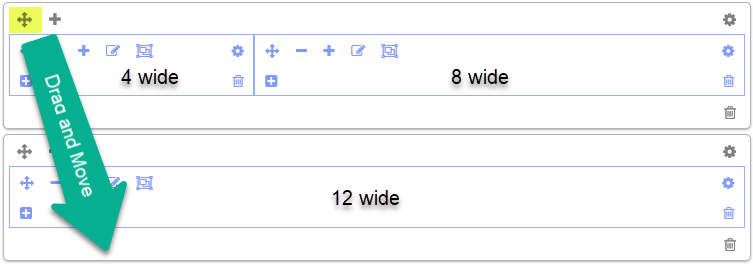
Refer to the diagram above.
Page Layouts are shared by one or more page templates. A Page Layout creates the outer content areas (shown in blue) with a responsive grid system using a maximum of 12 columns. The layout also defines which area on the page will be used to display the Inner Template.
Page Templates are assigned to products, categories, content, and application pages; the objects that make up the entirety of the storefront. A Page Template includes all the content outside of the Inner Template.
Zones are placed within the outer portions of the page layout to define its content containers. A content zone holds data for HTML Snippets, Widgets, and Widget Boards.
Inner Template - Every Page Layout must include a defined content area (shown in green) that will be used exclusively for the Inner Template. Like Page Templates, the Inner Template is assigned to products, categories, content pages, and application pages for the entire storefront.
Each page in the retail storefront is made of three elements: Page Template, Inner Template, and a Theme. You can set default values for each one to minimize making changes on a mass scale, or you can make each page as unique as you like!
Managing Page Layouts
From the menu, go to Website > Store Design > Page Layouts.
In a new installation, there will be five layouts defined. These are shown below with a short description.
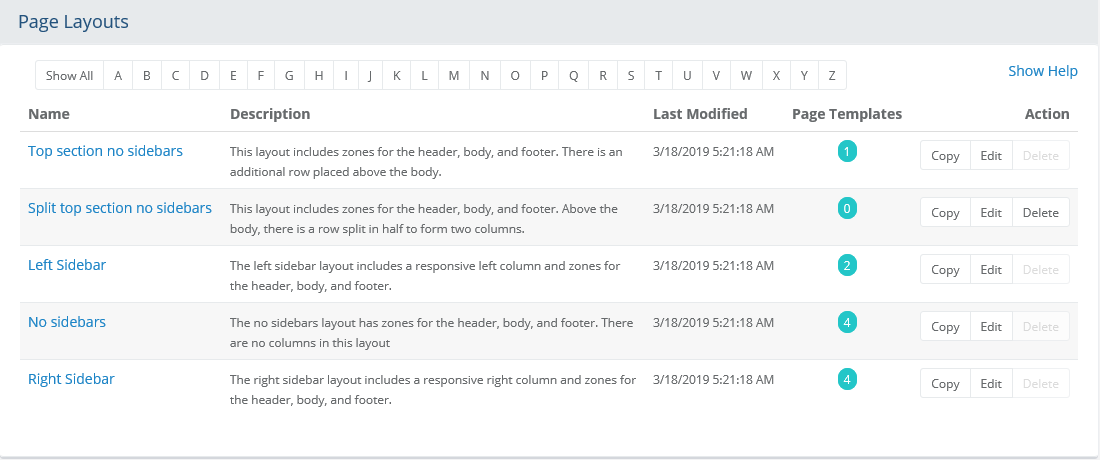
At the top of the Page Layouts listing is a Quick Search filter. You can use this tool to filter results by name.
The first column displays the Name of each layout. You can click the link to edit. Click the column heading to sort the list alphabetically.
A Description of each layout is provided. This explains the overall page divisions and the zones created for content.
The Last Modified date is shown in the third column. You can click the column heading to sort the list by date changed.
The Page Templates column displays a counter that indicates the total number of page templates that are using each layout. You can click any counter, with a number, to display the page templates that are in use by the layout.
Note: You will not be able to delete a page layout if it is in use. Page Layouts can only be used by Page Templates.In the last Action column, there are buttons to Copy, Edit, or Delete.
Add a Page Layout
Before adding a layout, keep in mind that this type of layout establishes the main content areas of a page, including placement of the inner body template. Creating a new page layout from scratch isn't typically necessary if you can use one of the existing layouts that have been created. If this is the case, then skip this step, and go to Page Templates instead.
Using the menu, go to Website > Store Design > Page Layouts. This will bring you to the Page Layouts listing.
Click the button in the upper-right corner to Add Page Layout. A page similar to the one below is displayed.
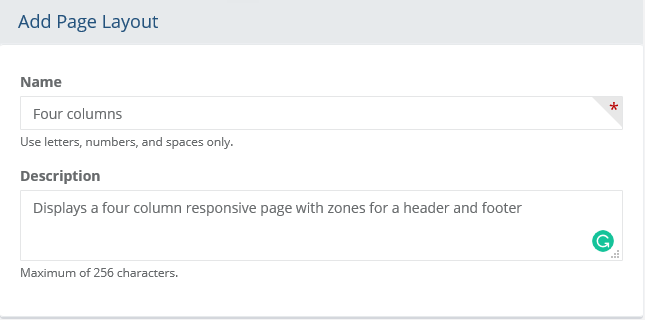
In the first field, enter a Name for your new Page Layout. The name must only include letters, numbers, or spaces.
Enter a description for the page layout. This is used for internal purposes only. A maximum of 256 characters is allowed.
Click the Save button in the admin footer.
The page will refresh with two tabs for Basic and Design. Reference the screenshot below.

The Basic tab contains the layout name and description.
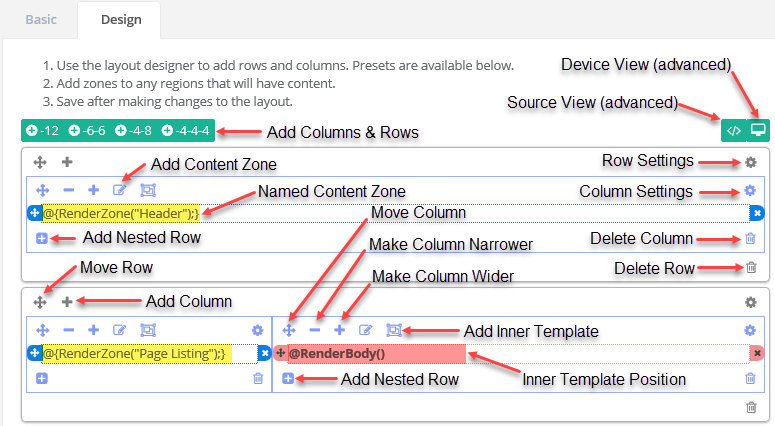
Click the Design tab to begin.
Use the green + icons to add row(s) using the preset column values.

For this new layout example, we will add three rows: click +12, then +4-4-4, then +12
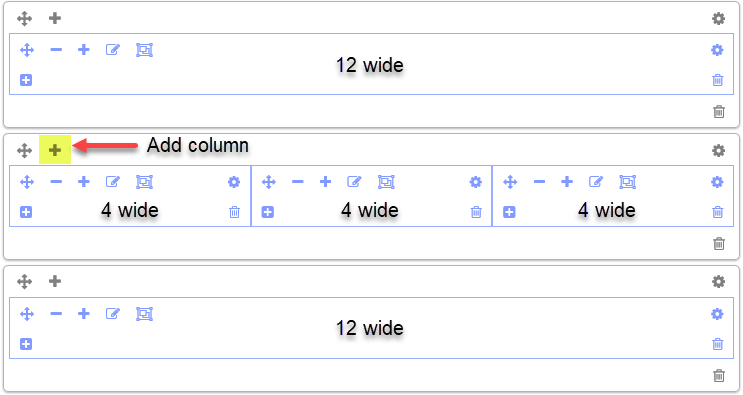
Before adding new columns, realize that 12 is the maximum number of columns that can be created in a responsive website.
Note: Each column will contract or expand to fit the screen width for any size device (phone, laptop, desktop computer, etc.) viewing the page.
Click the + icon to add a new column in the middle row. Reference the screenshot above.After adding a new column, the total number of columns will exceed 12. You must adjust the width of each column by decreasing the value of each by one, or in any configuration you like, but not to exceed 12 columns total.
To make a column narrower, click the - icon as shown in the following example. To make a column wider, click the + icon.

Adjust each as needed so all columns fit within the row. The 4 column layout should look similar to the screenshot above.
Click the Save button and continue to next section.
Define the Inner Template
Notice the Page Layout still has a warning message. Defining
the position of the Inner Template
is required.

To remove the Warning, let's add another row to our Four Column layout example.
Click the +4-8 green icon. A new 4-8 column row will be added to the top of the layout.
Click and hold the move icon as indicated in the example above. Drag the new row down so it is below the 12 column row.
Click the Save changes.
To reserve the section that will be used for the Inner Template, click the icon as shown in the following example.
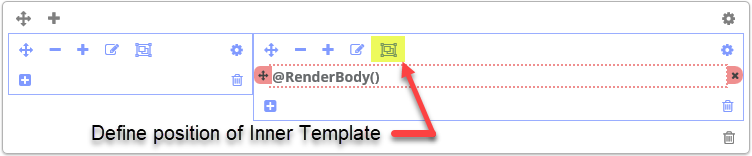
Placement text "RenderBody" is shown within a pink-dashed border. This is where the content generated by the Inner Template will be shown.
Note: A layout can only have one area reserved for the Inner Template. Once it has been added, a warning message will be displayed if additional are added. Although, you will still be able to delete it and add to a different location if needed.Click the Save button and continue to next section.
Add Content Zones
The final step to complete a working Page Template includes defining zones, or containers for your content.
For each section of the example Four Column layout, we will need to create a new zone, or add an existing zone.
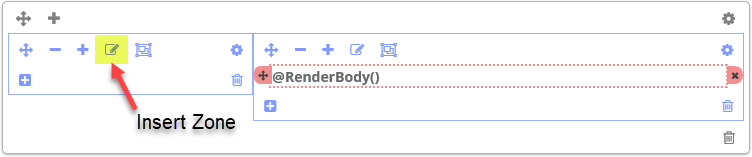
To add a new zone, click the edit icon as shown in the following example.
A pop-up will be displayed.
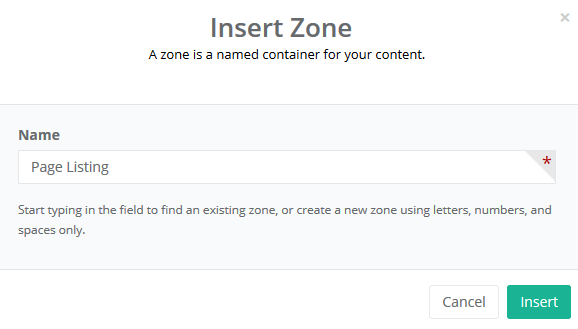
The form supports the addition of existing zones or you can create a new one. For this example, we are going to create a new zone named "Page Listing".
You can start typing characters into the form and it will display existing zones which can be used in the layout.
Note: Zones are effectively containers that are named. These containers hold data and can be used in multiple locations. If you ever need to reset a page layout, you can add the existing zones back to the page without loss of data.Click the Insert button to finish.
The new zone is added. The name of the zone is also shown.

Complete adding zones to each section of the layout. To add an existing zone, click the edit icon in the first row.
The Insert Zone pop-up will appear as before. Instead of creating a new zone, let's pick an existing zone "Header" by typing the name into the field provided.
Click the Insert button to finish.
Repeat by clicking the edit icon in the last row of the layout.
This time, type in the zone name "Footer" and insert as before.
Lastly, for this example layout, we are going to create four new zones for the row that has four columns.
The zone names are completely arbitrary, but should be short and named according to their proposed content.
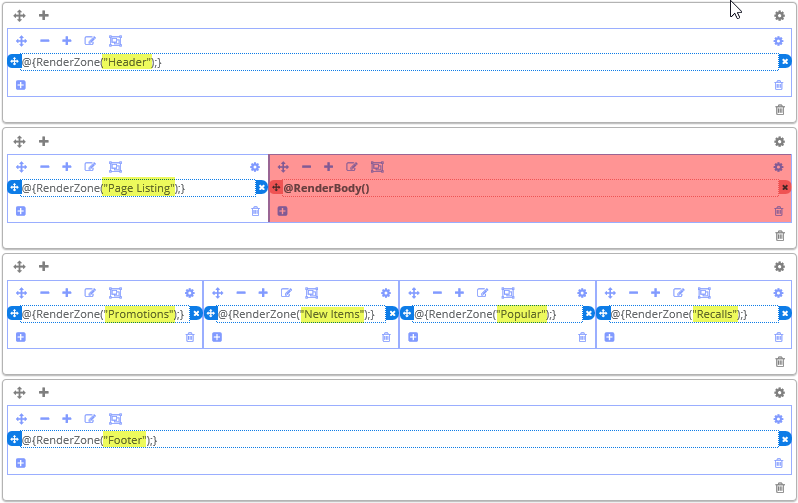
The example above shows a completed custom page layout design. The items highlighted in yellow are content zones, and the pink highlighted area is reserved for the Inner Template content.
As mentioned previously in this document, it is generally not necessary to create a new page layout since there are five common layouts provided with a new installation. However, you can create as many custom pages as needed with the Page Layout designer.When finished, click the Save and Close button to return to the Page Layout listing.
Now that you have a custom layout, continue to the next section, Page Templates to start adding new content.
Edit or Delete a Page Layout
Using the menu, go to Website > Store Design > Page Layouts. This will bring you to the Page Layouts listing.
Before editing a Page Layout, check to see if it has been assigned to a Page Template.

If the counter shows that it is used by one or more Page Templates, then the number of times uses will appear in the round-teal oval.
As long as the counter shows 0, then it is safe to edit or delete a page layout.
Click the Edit button to proceed to the Page Layout design area, or -
Click the Delete button to remove the layout. A confirmation message will appear.
Editing a Page Layout in use
Before editing a Page Layout that is in use by a Page Template, understand that you may need to re-add content through the Page Template if any of the content zones are removed from the layout. It is perfectly fine to move existing content zones, adjust column sizes, or add new content zones.
In the following example of a Page Layout, the editing actions are shown. In the section above, "Add a Page Layout", there are additional instructions for editing a layout.
If you have added any new content zones, continue to the next section, Page Templates to add the content.
Copy a Page Layout
Using the menu, go to Website > Store Design > Page Layouts. This will bring you to the Page Layouts listing.
Click the Copy button to create a copy of any page layout.
Enter a new Name for your new Page Layout. The name must only include letters, numbers, or spaces.
Enter a new description for the page layout. This is used for internal purposes only. A maximum of 256 characters is allowed.
Click the Save button.
Go to the Design tab and make any adjustments as needed. In the section above, "Add a Page Layout", there are detailed instructions to continue.