|
There are many ways to edit your pages within AbleCommerce, however, the recommended method is to use the built-in Editor Zone. From any page in your store, you can go to the Editor Zone and modify the theme, display page, layout, and any scriptlet.
To view the Editor Zone, you must be logged into the store. You must also belong to a User Group that has permission to modify the website. Your user account must be in one of the following groups in order to use the Editor Zone:
Before you begin making changes to your store, you may want to review some other pages in this chapter. They provide descriptions and samples for the page layouts, and various scriptlets that can be used.
Recommended Reading:
Enabling the Editor Zone
-
Make sure you are logged into the store and are browsing the retail storefront pages.
-
Find the page you wish to change and scroll down to the bottom. You will see the Editor Zone.

-
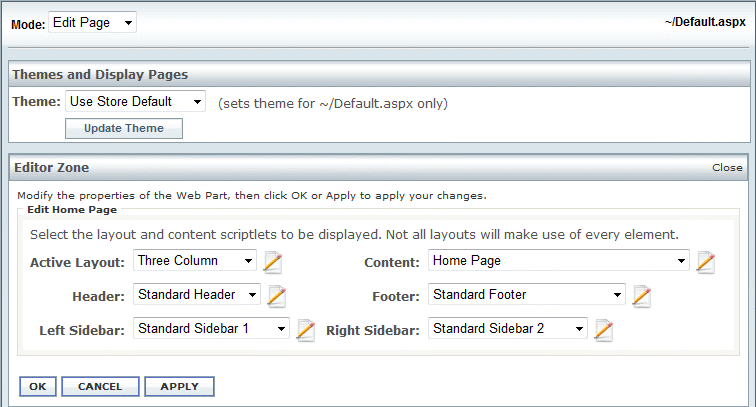
To switch to editing, change the Mode to 'Edit Page'. The Editor Zone will automatically update. Not all pages will be exactly the same but the general format will look very similar to the following example.

-
In the top row, you can switch back and forth between Edit mode and View mode.
-
To the right, the name of the page, or script that is used to display all the elements of this page is indicated. (e.g. default.aspx)
-
The next section allows you to change the theme and display page if more than one is available.
-
The last section is the Editor Zone which allows you to change the layout, content, header, footer, and sidebars.
Themes and Display Pages
-
Within the Editor Zone, you can select a new Theme and/or Display Page for the page you are editing.

-
Select the Theme you want to use for the page you are viewing. If you plan to use the same theme for your entire store, then you should set the 'Store Default' theme from the Website > Themes and Display Pages menu instead.
If you are editing any top-level page like the home page, shopping cart, my account, etc., you will have the option to choose the default store theme or select a different one. However, if you are editing a category or product page, you will notice the 'Inherit' setting. This setting is enabled by default and any category or product using it will inherit the theme from it's parent catalog object.
For example, if your store had categories for Apparel, Electronics, Toys, and Grocery, you could create a theme for each one. When you assigned the theme to the top-level category, any sub-categories and products could 'Inherit' that theme automatically. You can of course over-ride this setting and select a theme for any category, sub-category, or product individually.
-
Select the Display Page from the options available. If you plan to use the same display pages for your categories and products, then you should set the 'Default Display Pages' from the Website > Themes and Display Pages menu instead.
The Display Page setting is available for the categories, products, and webpages in your store. The other pages, like home, cart, my account, each have their own display page so it is not necessary for the option to appear.
A display page is a collection of settings determined by the scriptlets you select. AbleCommerce provides a variety of display pages for categories and products so that you have the option to choose from all the available content scriptlets.
-
Click the UPDATE THEME button after making your selection(s).
Choosing Scriptlets from the Editor Zone
Scriptlets are the web parts that make up the display page. If you change the scriptlet options, it will modify the display page accordingly. For each catalog object that uses the display page, it will also change.
-
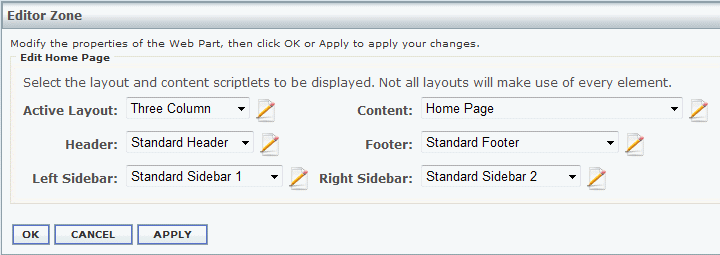
The Editor Zone section is where you can change the individual parts of the display page.

-
Select the Active Layout first and click the APPLY button.
-
Select the remaining scriptlets for Header, Footer, and Content. If the layout uses it, then select a Left Sidebar and/or Right Sidebar.
-
Click the APPLY button to view your changes.
Editing Scriptlets
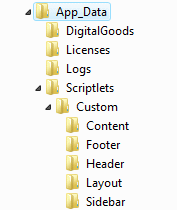
You can edit scriptlets from the store-side Editor Zone or from the Merchant Administration Website > Content and Layout page. Either way, when you use AbleCommerce to edit a scriptlet, it will be marked as Custom and a copy will be automatically placed in the \App_Data\Scriptlets\Custom\... folder.

If you would like to manually modify a scriptlet outside of AbleCommerce, then we recommend that you make a copy and place it in the applicable sub-folder. AbleCommerce will automatically recognize the new location and use your custom scriptlet.
Editing from Website > Content and Layout
-
Login to the Merchant Administration and go to the Website > Content and Layout menu.
-
You can sort the scriptlets page by clicking the Name, Type, Description, or Custom column headings.
-
Click the edit icon  next to the scriptlet you want to modify. next to the scriptlet you want to modify.
-
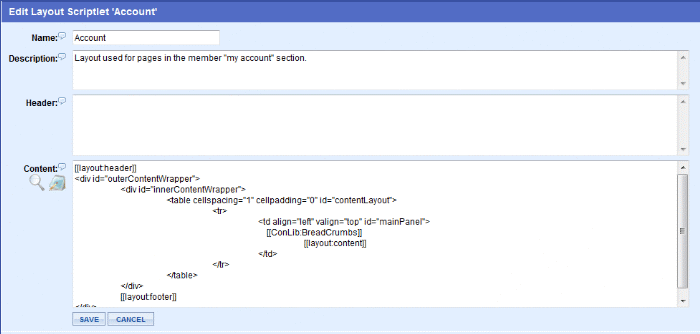
The Edit Scriptlet page will be shown.

-
You can modify the Name, Description, Header and Content:
-
Name - The name of the scriptlet. This must be unique among scriptlets of the same type.
-
Description - Optional description for the scriptlet. Will only be displayed to the merchant.
-
Header - Optional content to be placed into the <HEAD> Header goes here </HEAD> portion of the page.
-
Content - Specify the content that is associated with this scriptlet. You can use the enhanced NVelocity syntax.
-
Click the SAVE button when finished.
-
You will be returned to the Scriptlet list where you can now see that the scriptlet is marked as custom. Note the "X" shown in the Custom column.

-
After the scriptlet has been customized, you can click the delete icon  and AbleCommerce will automatically revert to the original file. and AbleCommerce will automatically revert to the original file.
-
Additionally, you can click the copy icon  and make a copy of any scriptlet. and make a copy of any scriptlet.
Editing from the Editor Zone
-
Make sure you are logged into the store and are browsing the retail storefront pages.
-
Find the page you wish to change and scroll down to the bottom. You will see the Editor Zone.
-
To switch to editing, change the Mode to 'Edit Page'. The Editor Zone will automatically update.
-
Scroll down and select the scriptlet you wish to edit.

-
Click the edit icon which will bring up a form field with the selected scriptlet code inserted.

-
You can edit the html code directly and click the SAVE button.
-
Or, you can click the HTML button to open a WYSIWYG text editor.
-
The ADVANCED button will open a new window showing the Edit Scriptlet page as if you were editing the scriptlet through the Merchant Administration. This option has some additional features not available from the basic editor available within the Editor Zone section.
Reset Page Option
After making changes to your display page, you can reset the original values if you are not happy with the change.
-
Make sure you are logged into the store and are browsing the retail storefront pages.
-
Find the page you wish to reset and scroll down to the bottom.
-
While the Mode is still set to 'View Page', you should see a RESET PAGE button.

-
Click the button and all the original settings for the display page will be used.
|


