Configure > Payments > Gateways
Authorize.Net CIM
The Authorize.Net Customer Information Manager (CIM) allows you to store customers' sensitive payment information on secure Authorize.net servers, simplifying your compliance with the Payment Card Industry Data Security Standard (PCI DSS) as well as the payments process for returning customers and recurring transactions. The Authorize.net CIM integration works with our new automatic Recurring Orders feature for subscriptions.
CIM supports customer profiles that include billing, payment and shipping information. Each profile is stored on Authorize.net servers and assigned an ID that is used in place of all customer information. Each customer profile can include up to 10 payment profiles and up to 100 shipping profiles. You can manage customer profiles and issue transactions manually from within the Merchant Interface, or use the integration provided with AbleCommerce.

AUTHORIZE.NET and the Authorize.Net logo are trademarks of CyberSource Corporation.
Authorize.Net CIM Processing Features
AbleCommerce supports all the standard features of the Authorize.net CIM payment gateway.
-
Authorize
-
Authorize Capture
-
Capture
-
Void
-
Refund
-
Partial Refund
-
Recurring Billing Profile Managed
At this time, multi-currency is not a supported feature of AbleCommerce's Authorize.Net CIM integration. All amounts will be in USD.
Post-order Processing
All AbleCommerce payment gateway integrations offer full support for post-order processing. This means that after an order is placed, you can authorize, capture, refund, and void transactions from the AbleCommerce order administration area.
Some post-order processing features, such as refunds, may require that you enable credit card storage from the Security > System Settings page.
For stored payment profiles, it is not necessary to enable credit card storage because the Authorize.net gateway is storing this information for you.
Enable Authorize.Net CIM Payment Gateway
Before you begin, make sure that you have your Authorize.Net API login and transaction key. If you are currently using Authorize.net and wish to enable the CIM payment gateway, you can add this option to your existing account. Authorize.net charges a small monthly fee to enable the CIM option. Once this is done, you can switch from the standard Authorize.net payment gateway and use the new Authorize.net CIM gateway.
If you do not have a transaction key, you can skip to the next section, "To Create an API Login or Transaction Key", for instructions on generating one from your Authorize.Net merchant account.
-
From the Payment Gateways page, click the ADD GATEWAY button.
-
From the Add Gateway page, click the AUTHORIZE.NET CIM button.
-
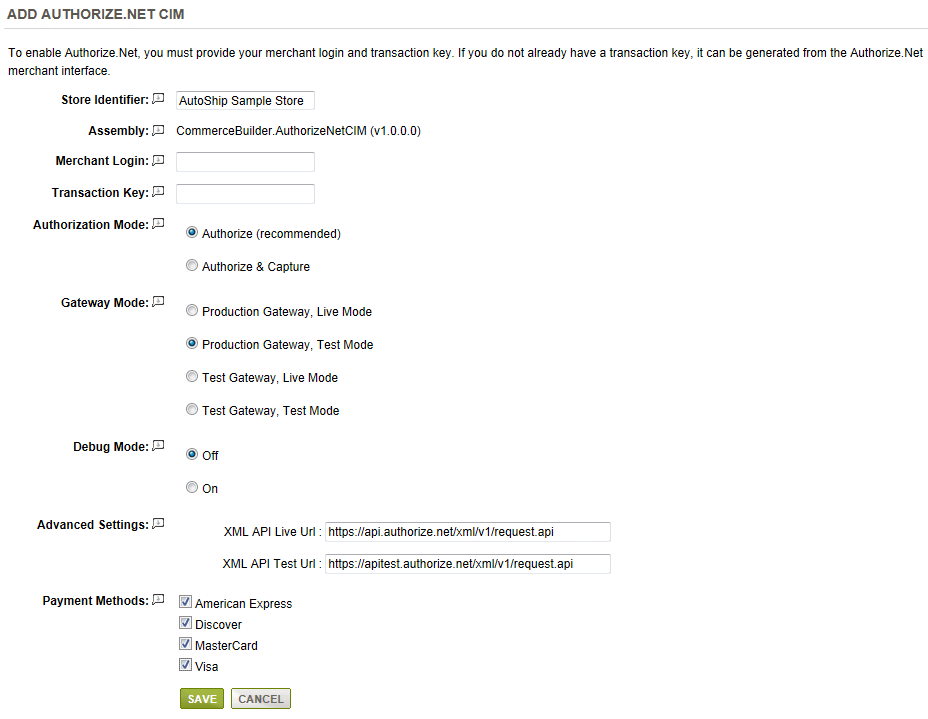
You will now be on the Add Gateway configuration page for Authorize.Net CIM.
-
In the field named Store Identifier, the name of your store will automatically populate. If you have multiple installations, you can track each one separately by using a unique store identifier.
-
In the field named Merchant Login, enter your Authorize.Net API Login ID.
This is NOT the same as your merchant account login used to access Authorize.Net's website. -
In the next field, enter your Transaction Key.
If you do not have a Transaction key, then you will need to create on from your Authorize.Net merchant account. -
Choose the type of Authorization Mode.
-
Authorize: to request authorization without capturing funds at the time of purchase. You can capture authorized transactions through the order admin interface.
-
Authorize & Capture: to capture funds immediately at the time of purchase. You should not use this feature unless you are able to ship goods the same day of the sale.
-
-
Choose the Gateway Mode.
-
Production Gateway, Live Mode - used for processing live transactions with a production merchant account.
-
Production Gateway, Test Mode - used for testing transactions with a production merchant account.
-
Test Gateway, Live Mode - used to test live transactions with a test merchant account.
-
Test Gateway, Test Mode - used for specific test results with a test merchant account.
-
-
Debug Mode is an optional feature and should only be enabled at the direction of AbleCommerce support.
-
In the Advanced Settings section, you will see two fields for XML API Live and Test URLs. Do not change this information unless directed by Authorize.net or AbleCommerce personnel. It is available in case Authorize.net provides a different API link in a future update.
-
Scroll down to the bottom of the page and find the section called Payment Methods.
-
Click the box next to all credit card payment methods that will use the Authorize.Net CIM gateway.
-
At the bottom of the page, click the SAVE button.
Create an API Login or Transaction Key
Your API Login ID and Transaction Key are unique pieces of information specifically associated with your payment gateway account. The API Login ID is different than your user login ID. Your user login ID allows you to log into your Merchant Interface user account. The API Login ID grants a merchant access to submit transactions to the payment gateway.
-
Go to Authorize.net's website and login to your merchant account.
-
From the top navigation bar, click on the Account link.
-
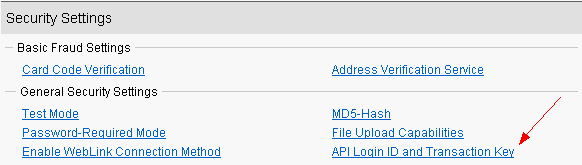
From the Settings page, find the section called Security Settings
-
Click on the "API Login ID and Transaction Key" link.
-
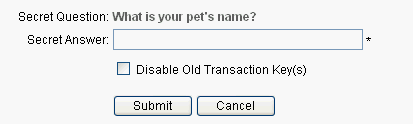
On the next page, type in your Secret Answer. You should have configured a Secret Question and Secret Answer during account activation.
-
Click Submit to continue. The API Login ID and Transaction Key generated for your payment gateway account appear.
-
Now, go back to the AbleCommerce Authorize.net configuration page and enter this information into the fields provided.
-
Click the SAVE button when finished.
Obtain a new Transaction Key
For additional security, you may obtain a new, unique Transaction Key as often as needed.
-
Go to Authorize.net's website and login to your merchant account.
-
From the top navigation bar, click on the Account link.
-
From the Settings page, find the section called Security Settings, and click on the "API Login ID and Transaction Key" link.
-
On the next page, type in your Secret Answer. You should have configured a Secret Question and Secret Answer during account activation.
-
To disable the old transaction key, click the check box labeled Disable Old Transaction Key.
-
Click Submit to continue or click Cancel to cancel the action. Your new transaction key is displayed.
-
Now, go back to the AbleCommerce Authorize.net configuration page and enter this information into the fields provided.
-
Click the SAVE button when finished.
Testing with Authorize.Net
Enabling test mode in the Authorize.Net merchant interface will override the live mode option set here.
-
Edit the Authorize.Net gateway configuration page in AbleCommerce.
-
Change the Gateway Mode to the applicable setting depending on the type of gateway your are using.
-
At the bottom of the page, click the SAVE button.
-
You can use a Visa card number of "4111111111111111" to run a test transaction.
-
Be sure to change the Gateway Mode to Live before processing real credit card transactions.
|
NOTE: |
There may be additional features within your Authorize.Net account that have not been tested with AbleCommerce. If you enable unsupported features, you are doing so at your own risk. |
Related Topics
Manage > Orders > Payments (Credit Card Transactions)
Manage > Orders > Payments (Offline Payments)