Catalog > AutoShip Subscription Plans
Automatic Recurring Orders
NOTE: As of the release of AbleCommerce Gold R7, a new subscription model is available. The new subscription feature will allow you to create products that can be shipped on a regular basis. The original gateway managed subscription plans will still work the same. We recommend that you do not use a combination of both subscription types (new and old), as this may cause confusion with your customers because of the different behaviors. Once the Automatic Recurring Orders feature is enabled, you will be using the new feature and any subscriptions created will need to be configured using the new gateway and payment method requirements.
Download Subscription.PDF to view the workflow and a comparison of our different subscription models available.
REQUIREMENTS and LIMITATIONS:
This is the first iteration of our Recurring Orders feature. It is a large and complicated addition to the software, so please understand that some areas may still be incomplete. We hope to get feedback and make further improvements as time goes on, so please be sure to click the green Feedback button from any area within the AbleCommerce merchant administration to report a bug or let us know how we can improve.
-
Authorize.net CIM is the only supported payment gateway at this time. It is required to securely store the customer's billing profile on the Authorize.net servers.
-
You must enable the "Accepts Subscription Payments" setting for the payment methods that are acceptable for recurring orders via the Authorize.net CIM gateway.
-
PayPal, Amazon, and Gift Certificate payment methods will not be available for recurring subscription purchases.
-
The store's checkout setting, that requires users who purchase a subscription to create an account on checkout, needs to be enabled. (On by default)
-
Mobile Store does not yet support customer management of Recurring Orders subscriptions.
-
Subscription delivery of digital goods is not supported, however, you can use the new Digital Good's group feature in conjunction with subscription groups to provide digital files to your customers.
This document describes the process of setting up automatically recurring orders with your subscription products.
If you have not configured subscription settings, please do so now before continuing.
Adding Subscription Plans to Products
-
From the Product Editing page, click on the Subscriptions tab.

-
Click the ADD SUBSCRIPTION PLAN button.
-
In the top section, there will be a Allow One Time Purchase option. When you check this box, additional options will appear. This feature is used to incent customers to purchase the subscription product instead of the regular product. It is optional, but recommended for the Recurring Orders subscription feature. If you use this feature, the regular price of the product will be used as the subscription base price.

-
In the Sales Pitch field, you can enter a short phrase that will appear to the customer when they are reviewing the product. This may help them decide whether to purchase the product for one time delivery or setup a subscription for automatic delivery.
-
You will need to enter a One Time Purchase Price. This can either override or modify the subscription base price. The value for a one-time delivery price would typically be higher than the price for a subscription, or automatic delivery. Note that the "Subscription Base Price" is determined from the value entered for the product price. If you see $0.00 in parenthesis, then click on the PRODUCT tab and enter the price in the PRICE field.
-
The Tax Code setting can be used to make the One-Time Purchase price taxable. Make sure to select a tax code here if the product is also taxable.
-
Let's take a look at a sample product using the One-Time Purchase option.
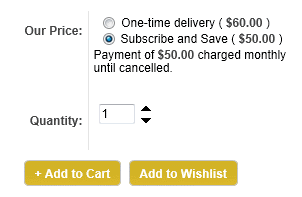
-
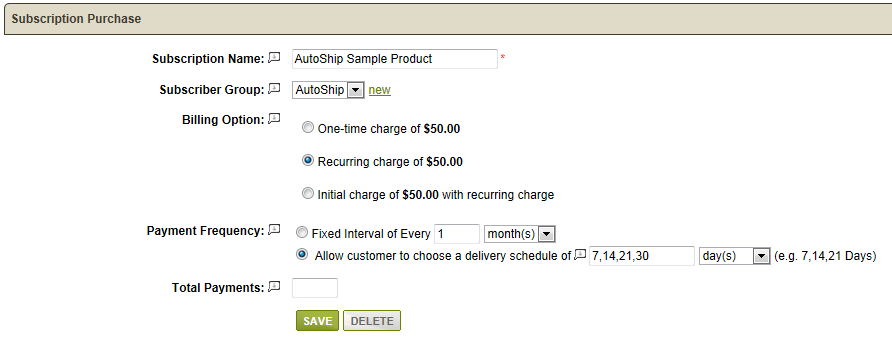
In the next section, you will be able to setup purchase options. Review the screen below -
-
The Subscription Name will be populated with the name of the product. You can change this if you want the subscription plan name to be different from the product.
-
If you want the user to be added to a group when the subscription is purchased, then select one from the list or click the link to add a new group. By adding users to a group, you can easily send email to all users at once, or deliver digital goods by way of the group setting added in AbleCommerce Gold R7.
The Subscriber Group feature will automatically maintain the member group subscription, and when the subscription expires, the member will be removed from the subscription's group. -
Select a Billing Option. Options will vary depending the billing option selected -
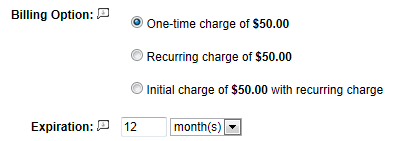
One-time Charge - This billing option will charge the customer just once, and it will create a subscription plan. The amount will be whatever price is set for the product. Enter the Expiration (in months or days) or leave blank to have no subscription end date.
Recurring Charge - This billing option will create a subscription plan, and charge the customer a recurring fee where the product price will be used for the first and all future payments. The Payment Frequency can either be a fixed interval determined by the merchant, or you can allow the customer to choose the frequency of subscription deliveries by entering a comma delimited list of values. The frequency can either be in months or days.
Enter a value for Total Payments if you would like to have the subscription terminate automatically. Otherwise, leave the total payments field blank so the subscription continues until cancelled by the customer or merchant.

Initial Charge with Recurring Charge - This billing option will create a subscription plan, and charge the customer an initial fee at time of sale, and then future recurring payments will have a different amount. For the Recurring Charge, enter a value in the field available and select the "override" or "modify" base price option. If the Recurring charge should be Taxed, then select a Tax Code from the list available.
The Payment Frequency can either be a fixed interval determined by the merchant, or you can allow the customer to choose the frequency of subscription deliveries by entering a comma delimited list of values. The frequency can either be in months or days.
Enter a value for Total Payments if you would like to have the subscription terminate automatically. Otherwise, leave the total payments field blank so the subscription continues until cancelled by the customer or merchant.

-
The Payment Frequency is an option for subscription plans that have recurring payments. Enter how often the payments will occur in months or days.
-
When finished, click the ADD button.
-
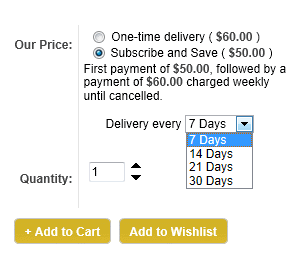
This completes the process. The product purchase form will provide information about the subscription plan.
Note, in the sample below, that the optional Payment Frequency setting is in use to allow the customer to choose a delivery schedule for the subscription.
-
To manage subscription orders, you can:
- Modify the subscription directly from the customer's order.
- Go to the Manage > Subscriptions page and use the search form.
- Or click the Manage Subscriptions button at the top of the product editing page. This will automatically filter the orders placed with the subscription. -
To remove a Subscription plan that is associated to a product, click the DELETE button.
After the order is placed, the customer can view the subscription plan purchased from their order as shown.
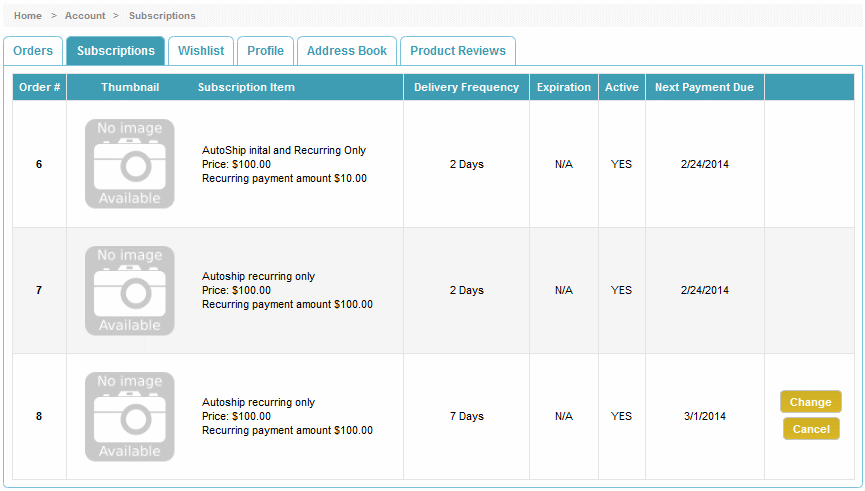
The Cancel and Change buttons are available to the customer when your Subscription Settings allow changes some number of days before the next order will be created. All of this can be configured by the merchant.
The Cancel action will prompt the user to confirm. When the subscription is cancelled, an email notification can be sent.
The Change button will expand the details of the subscription, and allow the customer to make changes to the billing, shipping, payment information, and frequency (if this is an option for the subscription).

The Edit button for Shipping Address and Billing Address will display a pop-up form where the customer can make any changes to the address, or add a new one. The information will be changed for the next order, as long as it has not been generated already, and all future orders.
The Add New button next to Payment Information will allow the customer to enter a different credit card. This will apply to the next order, as long as it has not been generated already, and all future orders. The credit card information will be stored securely with the payment gateway.
If multiple credit cards are stored, the customer will be able to select a different one and update or remove as needed.
Go to Site Map