Catalog > Add Product
In this Topic Show
Add Product
Create products and learn about several related features.
Adding a New Product
-
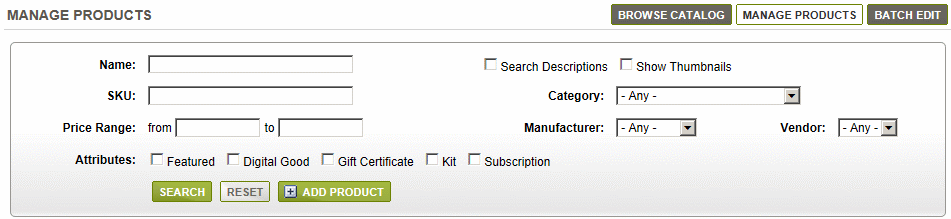
From the Manage Products page, or from the top-menu, go to Catalog > Products.
-
Click the Add Product button.
-
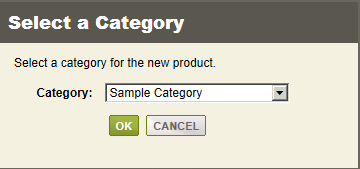
Select a Category from the drop-down list. All products must be assigned to at least one category. You can easily change the category assignment after creating a new product.
-
Click OK. This will bring you to the blank product form.
Adding a New Product from the Catalog
-
From the Browse Catalog page, or from the top-menu, go to Catalog > Categories.
-
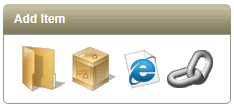
Find the Add Item section for the selected category. A product must belong to a category, so you will need to be viewing a category to see the selections below.
-
Click the Product icon to view the Add Product page. This page has a huge assortment of features available.
Each part of the main product editing page are covered in the sections below.
|
NOTE: |
After you save a new product, or a edit an existing product, there will be even more options available from the product editing page! |
Product Basic Information
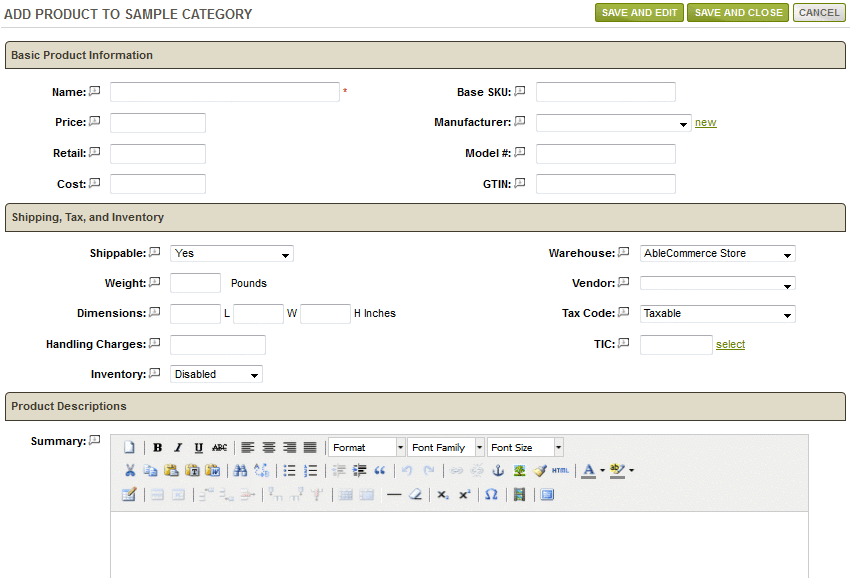
The example below shows the BASIC PRODUCT INFORMATION section of the Add Product page.

-
Name - This is the name of your product. It is the minimum required to create a new product. Maximum of 255 characters.
-
Price - The base price of the product, before any pricing adjustments are made.
-
Retail - The retail price of the product used for display purposes only, not available with options.
-
Cost - This is the cost of the base product before any options are included.
-
Base SKU - A product identification of your choosing. AbleCommerce does not enforce a unique SKU. Maximum of 12 characters.
-
Manufacturer - Select an existing Manufacturer, or create a new one. Assigning to products to their manufacturer creates additional search options for the customer.
-
Model # - For display purposes, a manufacturer reference number can be used as well as SKU.
-
GTIN - The UPC, ISBN, or GTIN of the product.
Product Shipping, Tax, and Inventory
The example below shows the SHIPPING, TAX, AND INVENTORY section of the Add Product page.
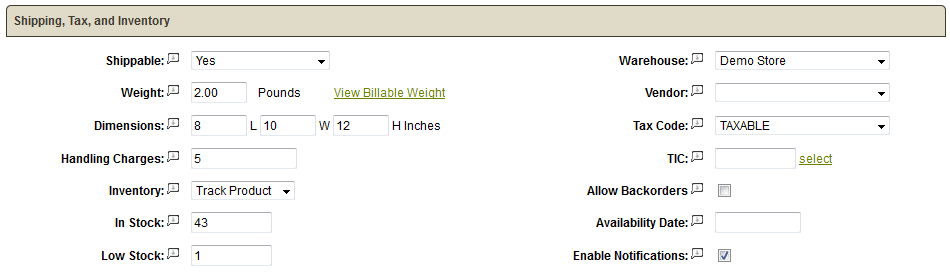
-
Shippable - This setting determines how shipping will be calculated for the product.
Yes - The product is shippable and can be shipped with other items.
No - The product is a digital good, or shipping calculations will not be applied at checkout.
Separately - The product cannot be shipped with other items, so shipping calculations are based on the weight of this item alone, and added to the final shipping calculation. -
Weight - Enter the base product weight if it is shippable. This is a requirement if you are using a shipping service like UPS or FedEx.
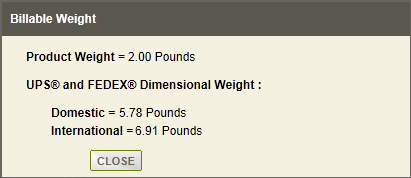
The "View Billable Weight" link is available to assist merchants in determining whether the product dimensions will result in a higher billable weight than the actual weight entered. It is a common calculation that is used by FedEx and UPS. Click the link to view the calculated billable weight. This information can only be calculated when dimensions are entered for the product.
To avoid lower than cost shipping rates, it may be desirable to enter the calculated billing weight into the product weight field, or use the shipping setting to 'Calculate Separately' so product dimensions will always be used to determine the weight for shipping. -
Dimensions - The length, width, and height may be entered for each product, but these values are only used when the product is set to ship 'Calculate Separately', or when the product is a single item in the order. When products weights are combined to calculate shipping, then dimensions on each product cannot be sent to the shipping gateway.
-
Inventory - To use inventory tracking, you must first enable this feature for the store. Then each product may use it's own inventory tracking setting.
Disabled - the product will not be using any inventory control method.
Track Product - the base product's inventory levels will be tracked with each purchase.
Track Variants - the product has a variety of options, and inventory will be tracked for each product option purchased. -
In Stock - After inventory control is turned on, you can enter the In Stock value for a product. This is the actual amount of inventory available.
-
Low Stock - After inventory control is turned on, you can enter values for Low Stock. This value sets the threshold for the amount of stock remaining when an email notification is sent and also when it will be shown on the Manage > Low Inventory page.
-
Allow Backorders - When checked, you are allowing customers to purchase inventory that is no longer available.
-
Availability Date - If used with inventory control, this date is only shown to the customer when the Allow Backorder feature is off and the In Stock level has been depleted to 0.
-
Enable Notifications - [New in R12] - Check this box to enable restock notifications. When inventory levels are depleted, you can use this feature to allow customers to sign-up for a notification when the product is back in stock.
-
Warehouse - The shipping origin for this product. This is the address used for customer invoices and shipping calculations.
-
Vendor - If you have created Vendors, then you may assign the product to one of them. When the product is sold, a Vendor email notification can be sent.
-
Tax Code - The tax code is used to determine how the product will be taxed. If the product is not taxable, then remove the selection.
-
TIC - This is a special tax identification code used exclusively for the TaxCloud tax service. It should only be used if you wish to over-ride the default tax code value.
-
Special Handling Charges [New in R7] - Enter an amount that will be added as a handling fee or shipping surcharge. You can control the display and taxation of this fee by setting options from the edit shipping method page. The amount will be taxable if the handling charge has a tax code assigned. The amount can either be shown separately on the order, or combined with the shipping charges.
Product Display Options and Advanced Settings
The example below shows the ADVANCED SETTINGS section of the Add Product page.
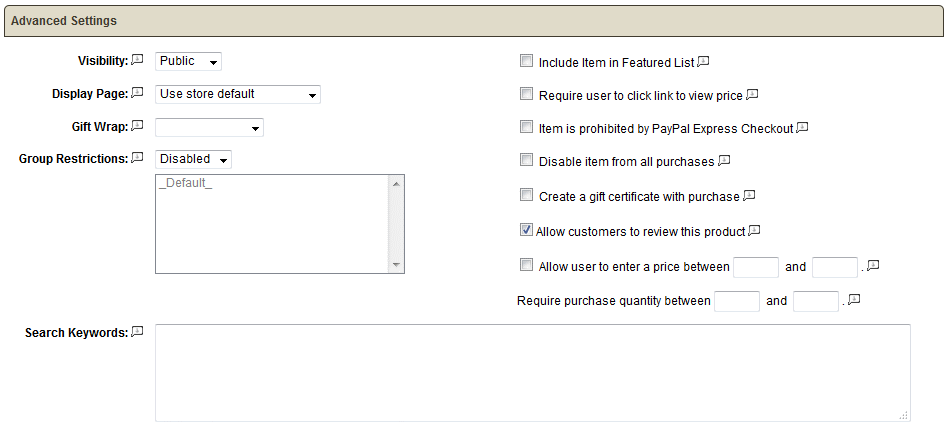
-
Visibility - A setting which determines whether the product will be shown to Public (all users), Hidden (available through direct link only), or Private (unable to view or purchase).
 Products that are Private will be removed from a user's shopping basket before checkout begins.
 -
Display page - Select from the list of product display pages available, or use the store's default display page.
-
Gift Wrap - You can assign a Wrap Group to each product. These can provide several Gift Wrapping choices for your customers when checking out.
-
Group Restrictions - You may create new groups and assign them to specific products. The default option is Disabled, which means the product can be viewed by any user. If you choose to enable a group restriction, then select one or more groups from the list provided. The product can only be viewed by users who belong to one of these groups. A new group can be created from the People > Groups page.
NOTE: If you are using membership only products as part of a non-member Kit, then the member product will still appear as part of the Kit. However, the user will not be able to directly view the member only product unless they have membership access. -
Variable Price - When checked, the customer can enter an amount between the minimum and maximum price accepted.
-
Featured - While checked, this product, and any other products, will be randomly displayed where the Featured Products control has been added.
-
Hide Price - If checked, the product price will not be immediately viewable within the store, unless the user clicks on a link to Show Price, or adds the item to their shopping cart.
-
Prohibited - If checked, this product (and any other items within the same order) will be unavailable to the Google Checkout payment feature. See Google for product restrictions.
-
Exclude From Feeds - If checked, the product data will not be included in any of the feeds available within AbleCommerce.
-
Disable Purchase - If checked, the product will still be displayed in your store, but there would be no ability to purchase the item.
-
Gift Certificate - When checked, the product turns into a gift certificate that, when purchased, will activate a system generated serial number for the amount of the product purchase. The gift certificate serial number can be used on any item within the store it was created from.
-
Allow Reviews - If checked, users can submit product reviews. Additional settings are available from configurations.
-
Min Quantity - The minimum quantity of this item that must be purchased before checkout can be completed.
-
Max Quantity - The maximum quantity of this item that can be added to the shopping cart.
Product Descriptions
The example below shows the DESCRIPTIONS section of the Add Product page. You can disable the WYSIWYG editor from the Configure > Store > General page.
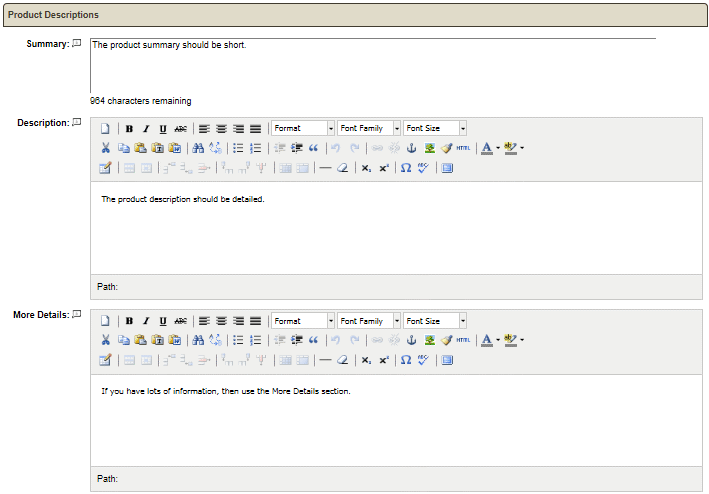
-
Summary - The summary description is shown when the products are displayed in a group listing, such as on the category pages. The maximum characters for this field is 1000.
-
Description - The standard description field has no limit, however, the data entered here is stored within your database. Use the built-in HTML editor to create your description content.
-
More Details - This extra description field toggles a link, from the product page, to a different, and usually more detailed description.
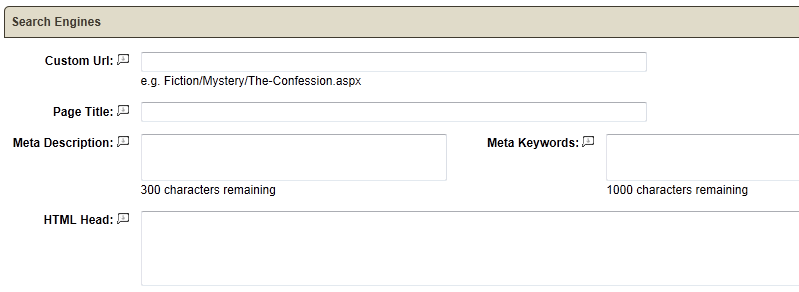
Search Engines
The example below shows the Search Engines section of the New Product page.
-
Custom URL - If desired, you can enter your own URL, or link to this product. These are relative URL's to the store installation path.
-
Page Title - Enter a custom page title if desired. If this value is left blank, then the product title will be used.
-
Meta Keywords - You can use this field to enter keywords for the product. You can also enter common misspellings. The search engine will automatically use this information to find the product within the retail pages.
-
Meta Description - Enter a summary description in text only. This is what search engines will use as a description for the page.
-
HTML Head - You may use this field to include custom scripts within the HTML head field.
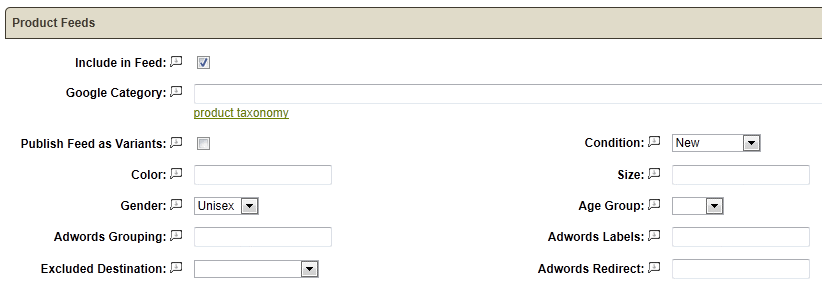
Product Feeds
The example below shows the Product Feeds section of the New Product page.
-
Include in Feed - If this option is checked, then the product will be included in any generated feeds.
-
Google Category - If using the Google feed, enter the category for the product. See Product Taxonomy for a list of valid categories.
-
Condition - Select the condition of the item for sale. Options are New, Used, and Refurbished.
-
Publish Feed as Variants - If checked, the product will be published to Google Feed using the variants defined by color, size, material, or pattern. In order to use this feature, you must be using the "Apparel & Accessories" Google category. See Options and Variants for detailed information.
-
Color - If you are listing an apparel item through Google Feed, it is required to enter the color.
-
Size - If you are listing clothing or shoes through Google Feed, it must enter the size.
-
Gender - Select the gender of the item if it is applicable. Options are Unisex, Male, or Female.
-
Age Group - If applicable, you can select a specific age group for Adults or Kids.
-
Adwords Grouping - If using Google Adwords, you can enter a name to group together products.
-
Adwords Labels - If using Google Adwords and CPC, you can enter one or more labels for the product.
-
Exclude Destination - Select to exclude the product from Google Shopping or Commerce Search.
-
Adwords Redirect - You can enter a different URL for advertising and tracking purposes.
See Feeds if you would like more information and requirements for submitting product feeds.
-
When finished, you will find SAVE buttons at the top and bottom of the page.
-
After saving, you will be able to access additional features from the tabs, as shown.

The features within this menu are covered in detail and can be accessed by returning to the main Products page. -
You can return to the product page, at any time, and make changes to the product. Any changes you make will be reflected in the store immediately.
![]()
Go to Site Map