Manage > Orders > View Order # > Payments
Credit Card Transactions
Process a credit card payment online, capture funds, or issue a refund. When you setup your payment gateway in AbleCommerce, you may have different features or options available depending on the gateway integration you've selected. When you add a payment gateway in AbleCommerce, it will list the primary features available for each merchant service.
Every merchant service provider has a setting to 'Authorize' or 'Capture' funds. The recommended practice for an online store is to first 'Authorize' funds during initial order placement, and then 'Capture' payment on shipment.
This document describes how to capture full and partial payments, issue a refund, add a credit card payment manually, or delete a transaction.
Payment Transaction History
All orders that use a payment gateway to process a credit card will have a log of events for the transactions. This is called the Transaction History. All credit card activity is recorded here. The example below shows an order with a Transaction History.
-
Amount - The total amount for this payment.
-
Date - The date and time of the transaction.
-
Status - This shows the current payment status for this transaction.
-
Status Note - An optional note that can be added by the merchant when the status is changed.
-
Account Details - You can view the details of the credit card payment. This feature is only available when SSL is enabled and when you have chosen the option to save credit card information. When any user views the credit card information, an entry is made in the Audit Log.
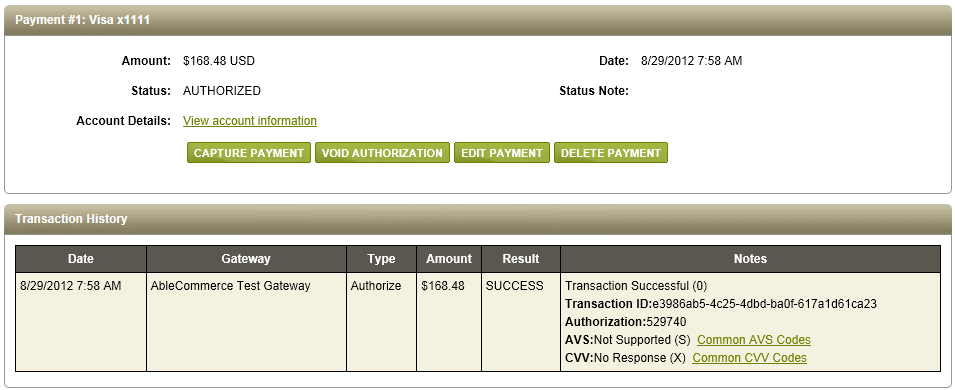
In this example, the payment gateway is setup to 'Authorize' funds. The payment status indicates the order is 'AUTHORIZED' so the next task is to capture the funds.
The transaction history section displays information about the credit card response. Looking left to right, the columns are described as follows:
-
Date - The date and time of the credit card transaction.
-
Gateway - The payment gateway. (Your merchant service provider)
-
Type - This designates if the payment is 'Authorized' or 'Captured'.
-
Amount - The amount of the transaction.
-
Notes - The notes contain transaction data such as transaction ID, Authorization number, AVS and CVV responses. Not all payment processors have the same features, so the information shown here can vary.
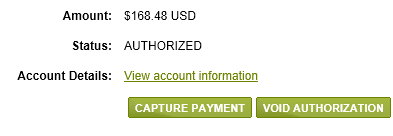
Capture a Payment
REQUIREMENTS: You will need to select an order that has a payment status of 'Authorized' to complete this section.
-
From the Payments page, click the CAPTURE PAYMENT button for the payment you want to capture.
-
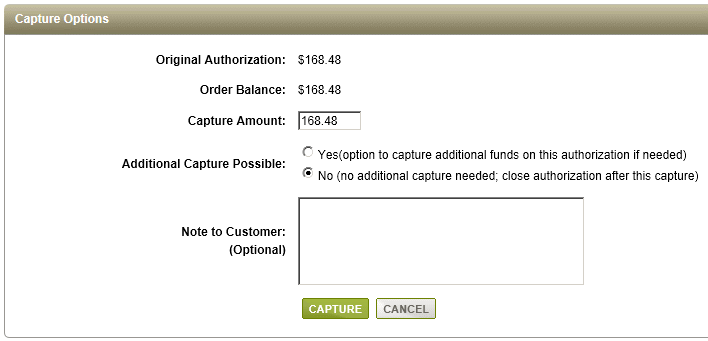
The next Capture Options page will allow you to modify the transaction if needed.
-
If you want to change the amount to capture, then enter a different Capture Amount.
-
If you want to add an order note for the customer to see, enter it in the field provided.
-
Some payment gateways support the Additional Capture feature. By selecting this option, you can capture a portion of the total authorized amount. This will keep the authorization open so further transactions can be placed.
-
When finished, click the CAPTURE button. After a moment, you will be returned to the Payments page.
-
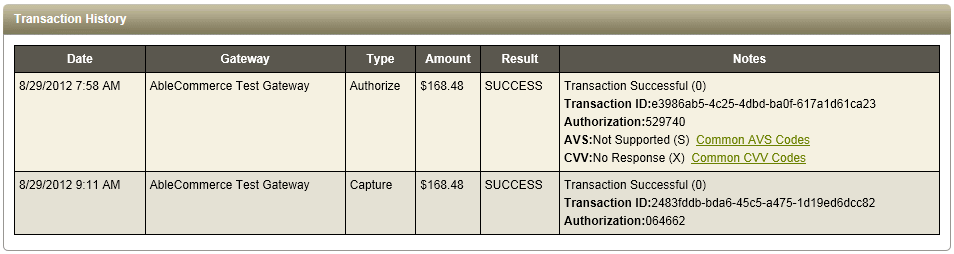
The transaction history has been updated to show the Captured payment.
NOTE: Although it might appear there are two transactions in the example above, it is important to understand that the first transaction was only an authorization of funds. The second transaction is the capture of the funds where money is actually moving from one account to another.
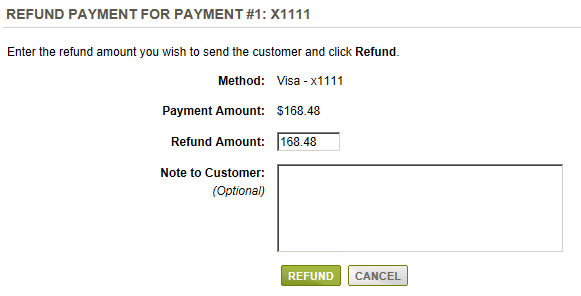
Refund a Payment
REQUIREMENTS:If you want to refund a payment by credit card, then you must select an order where the payment transaction has been completed.
-
From the Payments page, click the ISSUE REFUND button for the payment you want to return.
-
The next page will allow you to modify the transaction.
-
If you want to change the amount of the refund, then enter a different Refund Amount.
-
Depending on the payment gateway you are using, you may need to enter the full credit card number, the last 4 digits of the card, or the expiration date. (see Refund Notes in the next section)
-
If you want to add an order note for the customer to see, enter it in the field provided.
-
When finished, click the REFUND button. After a moment, you will be returned to the Payments page.
-
The transaction history will be updated to show the Refund payment.
Refund NotesThere are certain conditions that must be enforced to issue refunds. In some cases refunds cannot be tested. A refund is a feature that is only available through certain merchant service providers. |
|
|
MANUAL REFUND by CARD NUMBER When a payment is authorized and captured, the associated card data will be erased from the database. Then, when you go to a issue refund, you will be prompted to enter the card number. |
AUTOMATED REFUND When a payment is authorized and captured, the card data will remain in the database. Then, when you issue a refund, you should not be asked for the card number. The card information will be available for the number of days you are saving it. |
|
FAILED REFUND for UNSETTLED TRANSACTIONS |
FAILED REFUND in TEST MODE |
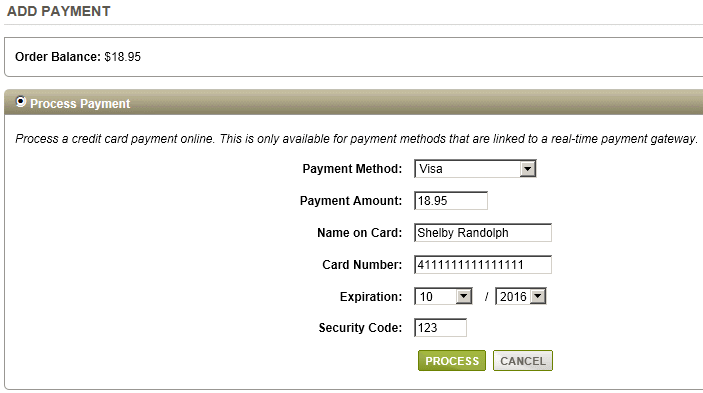
Add a Credit Card Payment
Collect payment on a changed order that has a balance due, or apply a credit card payment for any amount.
-
From the Payments page, click the ADD NEW PAYMENT button located at the top of the page.
-
Make sure the 'Process Payment' option is selected. (default setting)
-
Choose a credit card type from the "Payment Method" selections.
-
Edit the Payment Amount if needed. The amount due is automatically shown.
-
Enter the credit card account information, expiration date, and security code.
-
Click the PROCESS button to initiate the transaction. After a moment, you will be returned to the Payments page.
-
The transaction history will be updated. If necessary, make sure you capture the funds if transaction is an authorization.
NOTE: Any credit card used for an order will have it's own payment identification. The transaction history will be shown separately for each payment.
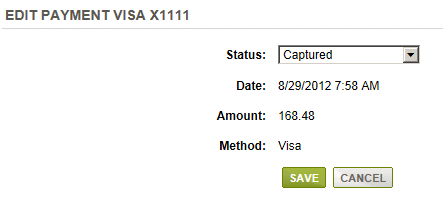
Change the Payment Status
REQUIREMENTS: This section applies to credit card payments recorded.
-
From the Payments page, click the EDIT PAYMENT button.
-
The next page will allow you change the payment status to one of the following:
-
Unprocessed, Authorization Pending, Authorized, Authorization Failed, Capture Pending, Refund Pending, Refunded, Void Pending, Void, Completed.
-
-
Select one of available credit card payment statuses, and click the SAVE button.
NOTE: Unless you have a specific reason to change the payment status, we recommend using the default settings.
Delete a Transaction
-
From the Payments page, click the Delete Payment button.
-
A browser warning prompt will appear for confirmation. If you want to delete the payment and all transaction information, then click OK.
Related Topics
Manage > Orders > Payments (Offline Payments)
Record other types payments
Configure > Payment Gateways
Setup credit card processing, PayPal, or Google Checkout.
2007-2008 © Able Solutions Corporation