USPS® Shipping with OAuth
Table of Contents Show
![]()
Migrating to USPS Shipping with OAuth
USPS has implemented an OAuth 2.0 security model for all its APIs to enhance the overall security of its customers, to reduce fraud and provide enhanced API capabilities. To enhance the commercial customer experience, the United States Postal Service® has deployed a new API Gateway and API Developer Portal to provide leading-edge, scalable API management. The AbleCommerce integration with USPS's version 3 API's replaces the legacy UPS OnLine® Tools at a future date.
If you are currently using the "USPS Web Tools " integration with AbleCommerce, then follow the migration steps below to use the new USPS Shipping integration which supports the OAuth 2.0 security model.
What is OAuth?
OAuth 2.0 is a protocol used for authentication and authorization
between two or more web applications. The OAuth 2.0 security model
involves the use of access tokens, which are issued to a client
application by an authorization server.
The access token is a string of characters that represents the
authorization granted to a client application by a resource owner
(typically, a user). This token is used to authenticate the client
application and authorize access to specific resources on behalf
of the resource owner and is passed in a secure API request.
Steps for Migration
The new USPS with OAuth is a built-in feature, available in AbleCommerce 9.0.11 and later. If you are using AbleCommerce 9.0.x, and are currently using USPS as your shipping carrier, then follow these instructions for a seamless transition.
Login to your AbleCommerce Merchant Admin.
Using the menu, go to the Plugins page.
Find and install the new AbleCommerce Plugin name "USPS® OAuth".
If needed, follow step-by-step instructions HERE. You will need your keys from Step 4. below to configure the plugin.Signup for a Business Customer Gateway account to login to the USPS Developer Portal and create an App.
If you need help, follow the instructions HERE. Complete steps 1 through 5 to obtain your keys for the plugin configuration.Use your new Consumer Key and Secret (OAuth security credentials) to configure the new plugin.
If you need help, follow the configuration steps HERE
Complete all steps above before continuing.
Copy Over Configuration Settings
While stilled logged into the admin, open the configuration pages for both U.S. Postal Service and USPS® OAuth with each in a separate browser window, side by side.
Match your configuration settings from U.S. Postal Service to the new USPS® OAuth.
Some configuration settings have changed with the upgrade to USPS v3 Shipping Rates API. These are noted below. Carefully check the configuration settings and update only the following to match U.S. Postal Service:Price Type (new setting; choose retail or commercial - replaces "Use Online Rates")
International Mail Class is no longer applicable. All international mail classes are available.
Enable Package Breakup
Maximum Weight (default 70)
Minimum Weight (default 0.10)
Enable Address Validation
DO NOT CHANGE: Live URL, Test Server URL, or Tracking URL fields as these are now different than the old integration.
When finished, Save the settings
for the new USPS OAuth configuration.
Assign Shipping Methods
In the new version, the shipping methods are different than USPS Online Tools. There are no longer 6 iterations of a single service name. Select the new shipping methods that you would like to provide to your customers. Please also review other changes USPS made in this new API.
Using the check boxes in the first column, select the shipping methods that you want to offer your customers. Use the Update > Add Selected Methods function, or use the Add button in the Action column to activate individual methods.
Now check (edit) each of these active shipping methods in use for the existing U.S. Postal Service integration and make sure the corresponding ones in the new USPS OAuth integration have the same configuration as the corresponding one in use.
If you don't have any custom shipping methods, or you have finished carrying over the changes for each, then you can test before deactivating the old existing U.S. Postal Service carrier.
To test, go to the storefront and add a shippable item to the cart.
Proceed through the checkout and stop on the Select Shipping Method page.
If you see two entries for each of USPS shipping methods, then it is working.
If you don't see two entries, then go back to the new USPS OAuth configuration page and re-check all the settings by comparing to the original U.S. Postal Service configurations. (Some names and services have changed with the upgrade to USPS v3 Shipping Rates API)After a successful test, use the Remove button from the configuration page for the old existing U.S. Postal Service integration being replaced and remove all the active shipping methods from the Configure > Shipping > Carriers page.
The migration is complete.
USPS® Features and Requirements
To enhance the commercial customer experience, the United States Postal Service® has deployed a new API Gateway and API Developer Portal to provide leading-edge, scalable API management. As announced by USPS, this will replace legacy Web Tools® eCommerce interfaces by January 2026.
The AbleCommerce integration with USPS® OAuth includes:
Domestic Prices 3.0
This API provides USPS product pricing based on the characteristics of what is being shipped for Priority Mail, Priority Mail Express, flat rate boxes, Ground Advantage, Library Mail, and Media Mail. AbleCommerce sends your product's weight and dimensions to USPS and they calculate the most accurate rates possible.
International Prices 3.0
This API provides International USPS product pricing based on the characteristics of what is being shipped for Priority Mail Express Mail International®, Priority Mail® International, and First-Class Mail® Package International. Any unique mailing restrictions or declaration forms are the responsibility of the merchant. Global Express Guaranteed® service is suspended as of September 29, 2024.
Addresses 3.0
Effective July 12th, 2026, using the Addresses API requires a license agreement and Enterprise Payment Account.
This API will validate and correct address information for the customer. The Address Standardization API validates and standardizes USPS® domestic addresses, city and state names, and ZIP Code™ in accordance with USPS® addressing standards. The USPS® address standard includes the ZIP + 4®, signifying a USPS® delivery point, given a street address, a city and a state.
Tracking for Shipments
Package tracking is included by entering the tracking number for the order. The tracking URL will be displayed to the customer on their invoice, as well as the shipment notification. Tracking details are provided on the USPS website.
IMPORTANT: Other Information to know about the changes that USPS made to their new API...
USPS expects all product measurements to be in pounds. This is a change from the previous version where pounds and ounces were both used.
Measurements are converted before being sent to USPS for the rate request. You may use Ounces in AbleCommerce and these will be converted to pounds before being sent to USPS.Shipping API will support shipping from U.S. states only.
Shipping to international destinations is supported through the Priority Mail International, Priority Mail Express International, and First-Class Package International.
First Class mail service for Letters, Postcards, and Envelopes uses a different API. If you plan to ship letters, flats, or cards, you will need to create a custom shipping method for these types of products. The prices for delivery are set by the USPS and do not change by destination or weight.
A few of the mailing services, such as USPS Ground Advantage, Media Mail, and Library Mail have different requirements from the old API. USPS now requires that dimensions are included for the shipments that use these specific services.
Ablecommerce will always send dimensions for products that have them, however, if there are multiple items in a single shipment, it is not possible to send dimensions for an entire box holding multiple items. The only way to work-around this new requirement is to include dimension (LxWxH) for every product that must be shipped using one of these services, and to use the AbleCommerce Special Condition setting "Calculate Costs Separately".
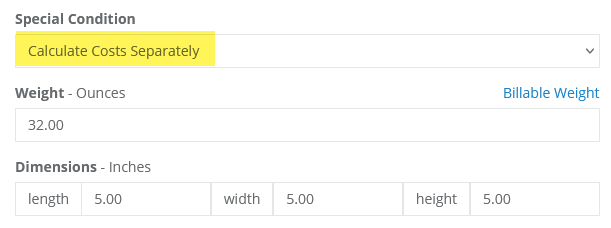
On the shipping calculation, AbleCommerce sends an itemization of each product with dimensions to obtain a rate from USPS, and then the total of all rates are summed to provide you customers a single shipping method and rate for that shipment.
Installing the USPS Plug-in for AbleCommerce
Login to your AbleCommerce installation.
Using the menu, go to the Plugins page.
Use the Filter Plugins option and select the type "Shipping".
Note: USPS OAuth plugin will be available in the list as shown in the screenshot below.
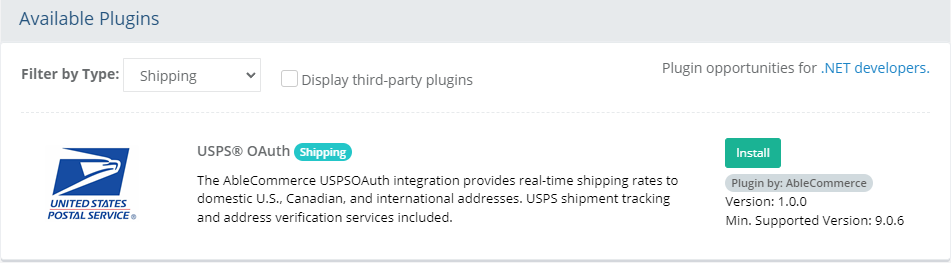
Click the green Install button in the far right column.
When the confirmation popup appears, click the green Yes, install it button.
Upon completion, click the orange Configure button.
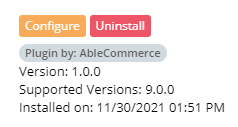
NOTE: Version shown may be different depending on the release of AbleCommerce you are using.
Follow these steps to use USPS APIs
You may also reference: https://developers.usps.com/getting-started
Step 1. You will need to use the USPS Customer Onboarding Portal (COP) and sign in with your existing USPS Business Account, or create a new USPS Business Account.
Login or signup here before continuing.
Step 2. Log in to the
USPS
Developer Portal using the account credentials from step 1.
Step 3. Create
an App in the USPS Developer Portal by clicking the Apps
link in the top Menu Bar.
Complete the following steps:
Click "Add app" button
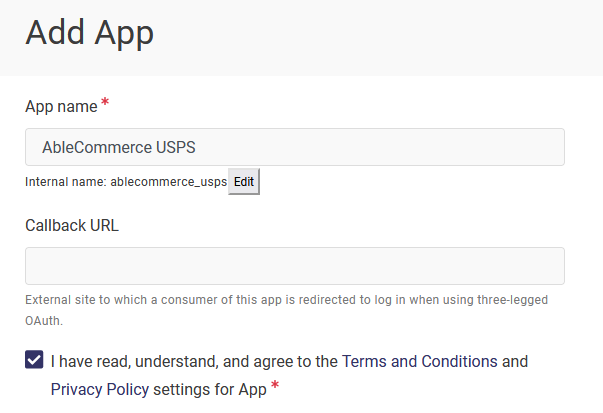
Enter any "App Name" for your application (e.g. AbleCommerce USPS)
Do not enter a "Callback URL"
Check the box to accept Terms and Conditions, and Privacy Policy
Enter "Description" if you want.
Select the Public Access I product.
Click the ADD APP button.
After adding, the new App appears on the Apps page. Click on it to view the Details page.
Step 4. Retrieve your Consumer Key and Secret
View or Edit the App and the first page shows a Details section and below that, the credentials section.
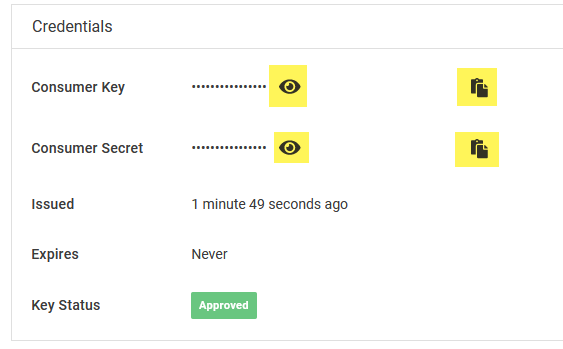
These credentials are required for generating the OAuth token. You can view the information using the eye icon, or copy the information using the copy icon. Both of these are highlighted in the above image.
Save this information. You will need them to complete the USPS registration page in AbleCommerce, and for the next step.
Step 5. Authorize Application to Access Protected Information Resources
Login to the USPS Customer Onboarding Portal
to authorize the client application you registered in step 3 above.
This is required to access all version 3 APIs.
Enter the Consumer Key from the previous step.
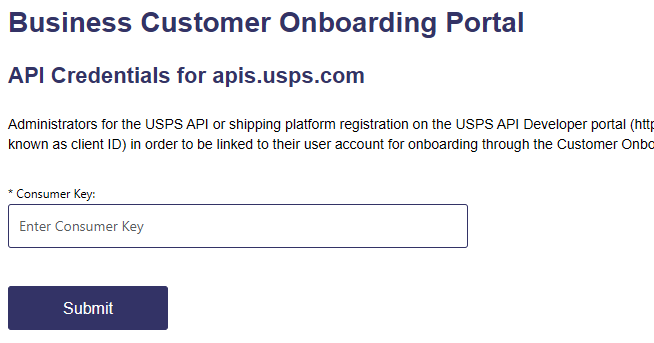
Click the Submit button. If successful, an on-screen message will appear "Consumer key is linked to CRID" and you will be redirected to back to the USPS Developer Portal.
Confirm you are still logged in to the USPS Developer Portal.
Click the "Apps" link in the header to view your Approved API application.
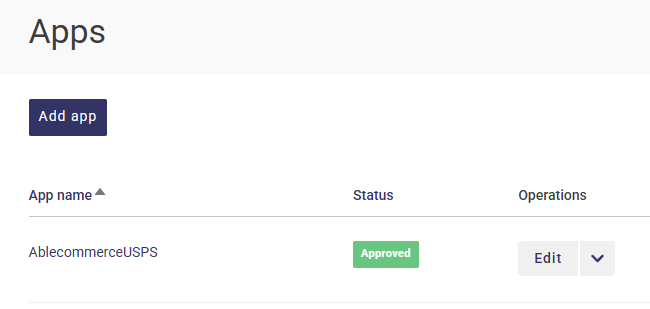
If you need to obtain your API connection credentials again, simply Edit the application and go to the View tab.
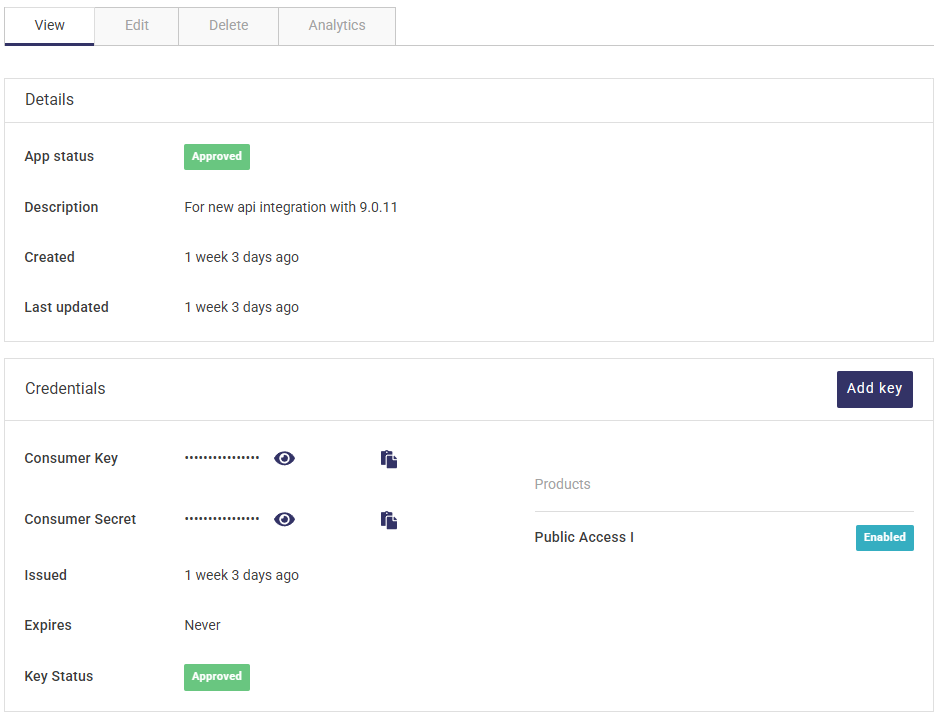
The Consumer Key and Consumer Secret are available from this page. These will be used to configure AbleCommerce USPS shipping in the next section.
Complete Installation of USPS® in AbleCommerce
In order to use USPS® API's, you must have an active business account with them and connect an app through the developer portal as described in the section above. You will need the Consumer Key and Consumer Secret to complete the installation of USPS in AbleCommerce.
After installing the plugin, go to the Configure > Shipping > Carriers page from the admin menu.
Any installed shipping carriers will be available from this page. Click the blue plus (+) button or linked name to continue to the registration page.

Carefully read the on-screen instructions before continuing.Enter the Consumer Key and Consumer Secret in the fields provided.
Click the Next button from the admin footer.
Configure USPS®
After registration, the next and last section is the USPS configuration page. You can get to this page directly by going to Configure > Shipping > Carriers page, and then editing the USPS OAuth shipping integration.
View the configuration page below:
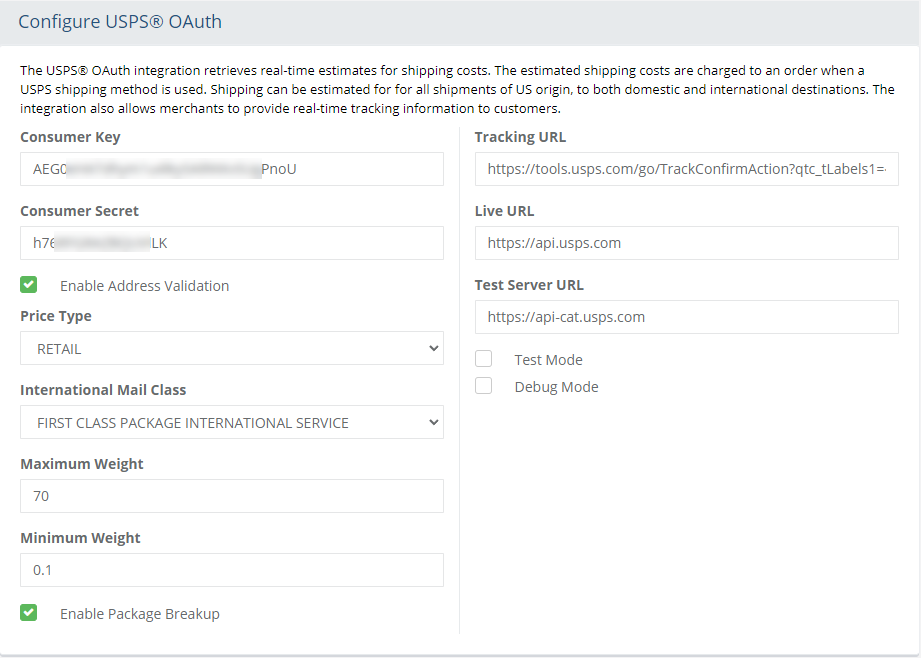
The USPS Consumer Key and Consumer Secret fields should already be populated after registration.
Enable Address Validation is an optional service that can be used when a customer enters an address during checkout. If a better address can be suggested to the customer, they will see an alternate address and be allowed to use the suggested one, or keep the address as entered. Check the box to enable this feature.
- You may not use USPS for Address Validation while using a different provider for shipping rates.
- You should not activate more than one Address Validation Service within AbleCommerce.The Price Type setting determines if the rate shown to the customers will be standard retail rates, or commercial discounted rates.
The Maximum Weight is this carriers limit for a package. The default value is 70 lbs.
The Minimum Weight is the amount used when the order weight does not meet the minimum.
The Enable Package Breakup option is checked by default. This allows a shipment to be split into multiple parts if the total order weight exceeds the maximum amount. This will not change the number of shipments in the order, only the calculation to determine the most accurate shipping costs.
The URL settings come pre-configured when you create the shipping account through AbleCommerce. These URL's can change so the fields are available for modification. It is not advisable to modify the URL's here unless specifically instructed to do so.
Live Server URL: The URL to which requests are posted in Live mode. https://apis.usps.com
Test Server URL: The URL to which requests are posted when Test mode is enabled. https://apis-tem.usps.com
Tracking URL: The URL to which requests are sent for package tracking. {0} is substituted with the tracking number at the time of request.
The Mode settings are used to enable/disable rates from the test server. Debugging can also be enabled which can help with any communication problems.
Test Mode: When Test Mode is enabled, rate requests are sent to test server using the Test Mode URL.
Debug Mode: When debug mode is enabled, all messages sent to and received from USPS are logged. This should only be enabled at the direction of qualified support personnel.
Default Log File Location: ..\App_Data\Logs\[gatewayname].logAfter making any changes, click the SAVE button. To complete the shipping carrier setup, see Adding or Removing Shipping Methods in the next section. Or, click the SAVE AND CLOSE button to return to the Shipping Carriers page.
Adding or Removing Shipping Methods
All GXG shipping methods were suspended on September 29, 2024 according to USPS.
The FIRST CLASS mail service for Letters, Postcards, and Envelopes use a different API, which requires sending a the processingCategory (Letters, Flats, or Cards) and the Thickness of the item which is NOT an available dimension in AbleCommerce. As a work-around, merchants can use First Class mail by updating the shipping price for each item to include the postage.

Configuring Shipping Services for USPS®
You must select the services you want to be available to your customers. Each service (shipping method) is configured separately once it's added.
NOTE: The USPS service names are stored in the \app_data\uspsOAmethods.csv file and can be changed any time the USPS updates their service names.
In the bottom section of the page, you will see the Shipping Method menu. This is a list of all services offered by the provider. You should review the entire list of shipping services offered and decide which ones you want to make available as shipping options in your store.
You can use the buttons from the Action column to individually Add or Edit the shipping method.
Check the box next to one or more shipping methods, or check the box at the top of the first column to quickly select all methods.
This will activate the Update button, which will drop-down to provide 2 options: either Add or Remove the selected methods.
The update will take place immediately after selection.
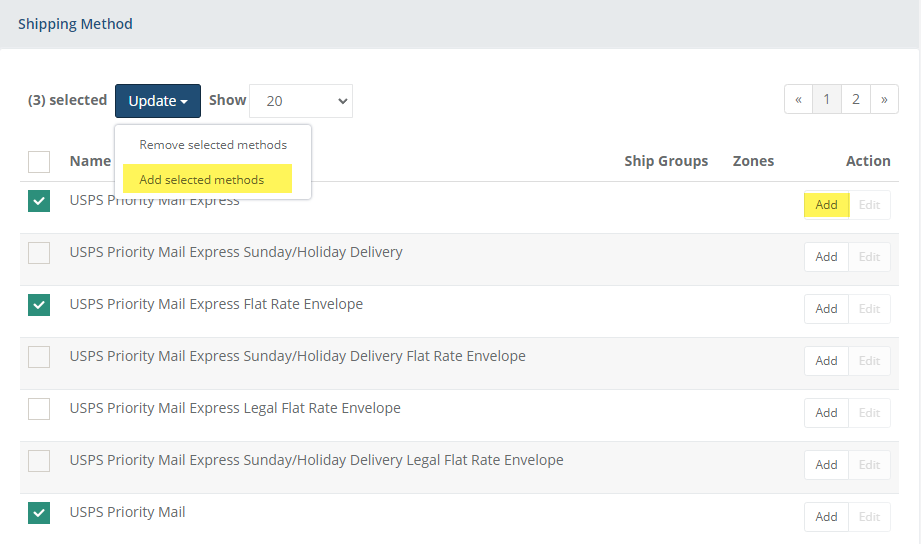
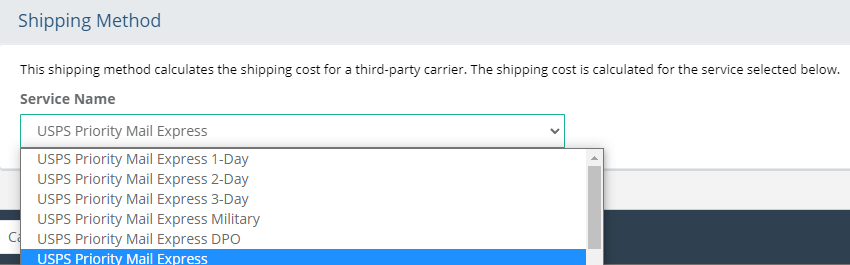
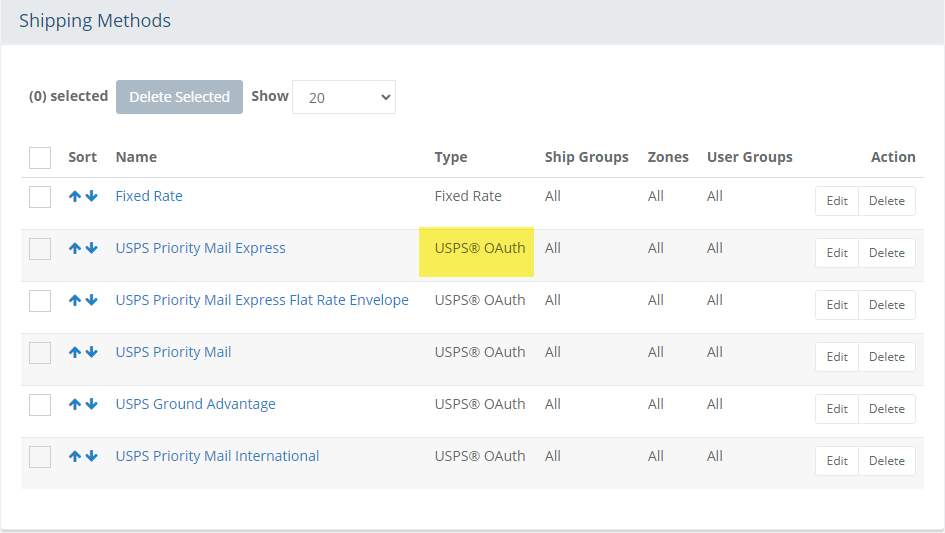
In this example, we will add and configure the "USPS Priority Mail Express" service, and a few others using the multi-add feature. Check the box next to all others you want to offer as a shipping service.
Using the Update button, select the option Add selected methods.
The selected shipping services now appear at the top of the list and each will be linked for configuration.

To remove an individual shipping method, use the Remove button in the Action column, or you can select multiple methods by checking the box in the first column and activating the Update button which will give you the option to select Remove selected methods. The update will take place immediately after selection.
Configure a Shipping Method
Each shipping method will use its own configuration settings. To configure a shipping service, click the EDIT button to view the Configure page.
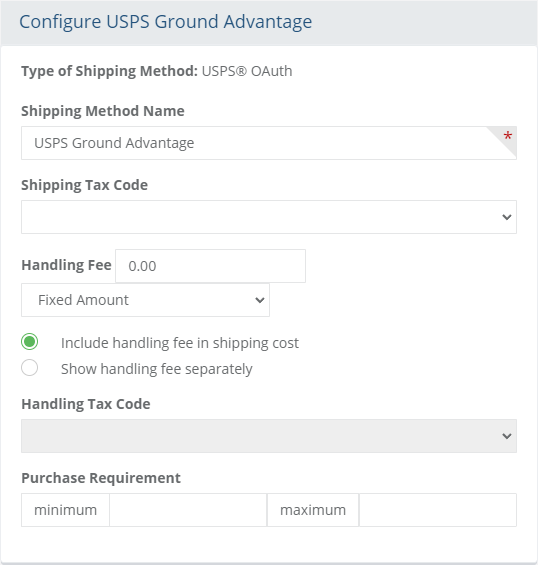
The above example shows the default configuration values for all shipping services that are added.
Change the Shipping Method Name if needed. This is the name that will be displayed to the customer and the merchant on all invoices and receipts.
Note: Most third-party carriers do not want the names of their shipping methods changed.If these shipping charges are taxable, then select a Shipping Tax Code. Make sure you understand the tax laws according to your local tax authority.
Taxes on shipping charges are combined with any other taxes calculated for the shipment.Use the Handling Fee field to include a charge for handling or processing. The handling fee can be a fixed amount, percent of the shipping charge, or a percentage of the shipment total. After entering the amount, select one of these three options available.
There is a display option to either show the Handing Fee included in the shipping cost, which will hide the amount in the shipping cost. Or to show the handling fee separately, where it will be displayed as a separate line item on the invoice. If you show the handling fee separately, you may then select a Handling Tax Code if you are required to collect tax on this type of charge.
The Minimum Purchase field is the designated minimum value of a shipment before this shipping method will be available. Until this limit is met, the shipping method will not display.
A minimum purchase value applies to the total of each shipment, not the total of the order.The Maximum Purchase field is the designated maximum value of a shipment before this shipping method will be available. If this limit is exceeded, the shipping method will not display.
A maximum purchase value applies to the total of each shipment, not the total of the order.When finished making changes, be sure to Save.
Additional Settings
There are three optional configurations which can be used to filter shipping methods that are shown to the customer.
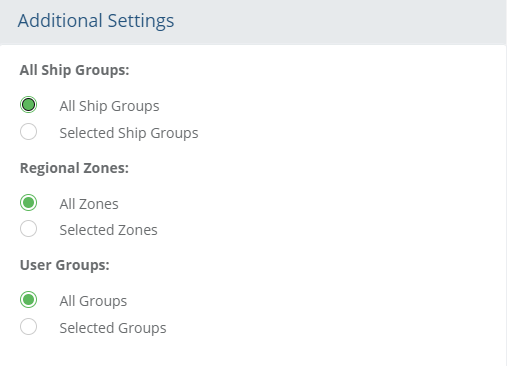
These additional settings allow you to display available shipping methods according to the shipping groups (used for custom shipping conditions and locations where products are shipped from), the zones (regions the products are shipped to), and/or any groups that a customer is assigned to. By default, every new method added will use all available destinations, special shipping conditions, and user groups. To make shipping methods explicit to any of these criteria, follow the steps given below.
Shipping with Ship Groups
Ship Groups are typically used for products that have special shipping requirements, such as perishables, oversized, or overweight. You can also define the shipping origin.
To setup Ship Groups, go to Configure > Shipping > Ship Groups using the menu.
If this shipping service needs to be applied to a specific warehouse(s), then you will need to setup Ship Groups first. The warehouse determines the origin of shipping, and ship groups allows you to choose specific warehouses and define which shipping methods and products will be available to them.
A warehouse determines the shipping origin. All USPS services must use a warehouse with an address in the United States.
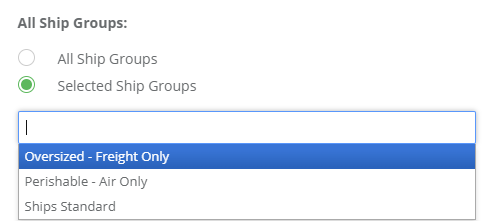
If this shipping method will be allowed from all locations and types, then keep the default All Ship Groups option selected.
Shipping with Zones
Zones allow you to configure specific places for use with many features, including shipping methods.
To setup Zones, go to Configure > Regions > Zones using the menu.
If the shipping service applies to a specific Zone(s), select it from the Selected Zones list.
A zone determines the shipping destination.
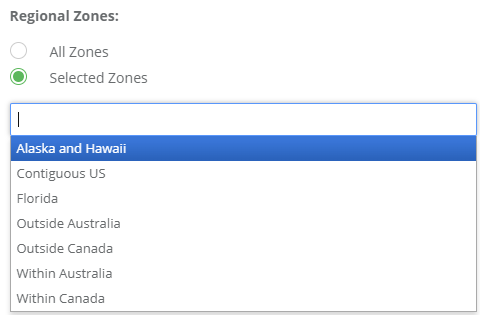
If the shipping service applies to all ship to locations, then keep the default All Zones option selected.
Shipping with User Groups
When you apply a shipping service to a user group, then it will only appear for the users who are logged in as members of that group.
To setup User Groups, go to People > Users > User Groups for regular customers. To setup User Groups for administrators only, go to People > Admins > Admin Groups.
If the shipping service applies to a specific User Group or Admin Group, select it from the Selected Groups list.
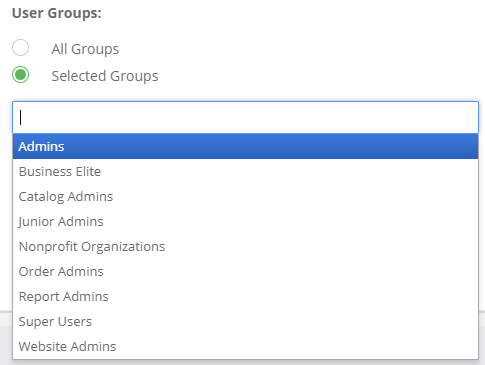
If the shipping service applies to everyone, admin and customers alike, then keep the default All Groups option selected.
When finished configuring this shipping method, press the Save button to continue.
Configuring Additional Services for the USPS
At the bottom of the Configure Shipping Carrier page, there will be a list of service names for the selected carrier.
When finished configuring a shipping method service, you may want to Save and then select another service type to configure.
After you have completed all configurations, press the Save and Close button to return to the list of all methods. This will include all shipping methods for all carriers any custom methods you have created.
This will bring you back to the Shipping Methods page which displays all configured shipping service types available for the store.
The Type column displays the shipping service and any custom methods in place.
Additional columns are shown for Ship Groups, Zones, and User Groups. Each of these features are documented separately.
From this page, you can add, sort, remove and configure all shipping methods.
To add a new shipping carrier, go to the Plugins page using the menu. You may have as many services and combinations of shipping carriers as needed.
Troubleshooting Techniques
Use this quick guide if the shipping methods are not appearing during the checkout process.
Confirm your product(s) are shippable and have a weight. Some carriers require dimensions as well. This information is found within the Shipping and Tax section of the Edit Product page.
Confirm you warehouse (the shipping origin) has a valid address for the carrier. Go to Configure > Shipping > Warehouses to check address information. On the same page, you will be able to find all the products assigned to this warehouse.
Confirm you are shipping to a valid address for the method. For example, some shipping methods will only appear if they are within a particular country or state. Another example, ground transportation is not available to Hawaii from the mainland United States.
If the carrier requires an account number or key, confirm the information is correct from the applicable service carrier's configuration page. This information is found under the Configure > Shipping > Carriers page.
Check the available shipping services you have configured and make certain they have the correct ship groups or zones defined for the package and address delivery. This step applies if you have configured special shipping situations using Ship Groups and/or Zones.
From the configuration page of the carrier, there is a checkbox to enable Debug Mode. Only use this feature if all steps above have been confirmed. Once debug is enabled, test a shipment calculation through the checkout process. This will log an entry.
Then you will need to access the debug log file which is located on the server in the following location ...\website\App_Data\logs\*carrier name*.log
Open the file and carefully review the data that was SENT and RECEIVED. In the received response, there should be a message or error indicating the reason the shipping method did not calculate on the shipment received. If needed, provide this information to technical support.
When finished troubleshooting, make sure to turn OFF debug mode.
Successful Shipping Rates
When the shipping carrier is setup correctly, the user should see the selected shipping methods and rates on the /Checkout/ShipMethod page:
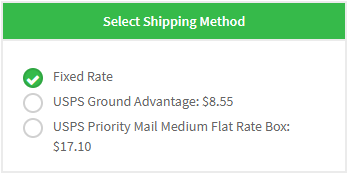
NOTE: The USPS methods are automatically filtered to show only the available service(s) to any given address.
USPS is a registered trademark of the United States Postal Service. All Rights Reserved.