Configure > Taxes
Tax Settings
The tax settings page is where you will enable the ability to calculate taxes for the store. This page gives you some display options to select from and allows you to control how taxes are presented to your customer. For merchants with a VAT requirement, such as United Kingdom, you can display prices with tax included and show the rate of taxation in a separate column. For merchant who have multiple levels of tax, such as Canada, you can show those separately on the invoice.
The changes you make here will take effect immediately and be shown throughout the store's administration pages and also the retail store pages.
Enable or Disable Taxes
A new installation of AbleCommerce will have taxes disabled by default.
-
From the Configure Taxes page, click the brown Tax Settings button, or go to Configure > Taxes > Settings using the top menu.
-
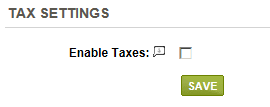
By default, taxes will be disabled as indicated in the example below.
-
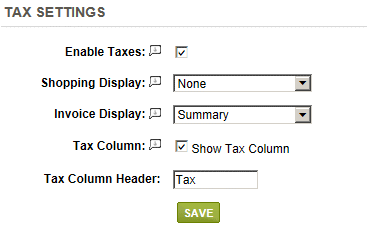
To enable taxes, select 'Yes' for the Taxes Enabled option. The page will refresh as shown below.
-
To disable taxes, select 'No' for the Taxes Enabled option.
Tax Display Settings
These are display settings only. For actual tax calculation, you must create tax rules and assign tax codes to your products.
-
On the Tax Settings page, make sure that taxes are enabled.
-
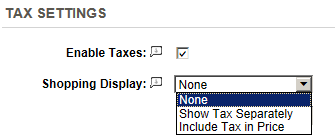
The Shopping Display options determine how taxes are shown when customers are shopping at your store. This includes any store page that displays a price. The shopping basket can display taxes separately or included in the price.
-
None - this is the default option. Tax is not shown while the customer is shopping.
-
Show Tax Separately - this option displays the tax in the shopping cart or mini-basket as a separate line item. Prices and their taxable amount are shown while customer is shopping.
-
Include Tax in Price - this will display a taxable product with tax included in the price. This is a VAT requirement. An option to include a Tax Column is shown in the example below.

-
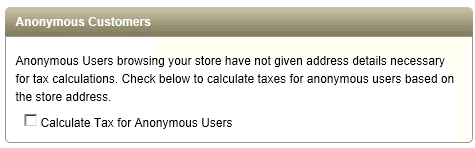
Anonymous Customers are the unknown users browsing your store. If you need to display taxes where the user's address is not yet known, then you will need to check this option. By doing so, the tax for an unknown user will be calculated based on the default store warehouse. After the user's address is known, a re-calculation of taxes will occur during checkout.
-
-
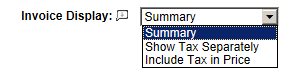
The Invoice Display options determine how taxes are shown when the customer has entered the checkout stage and on the final invoice.
-
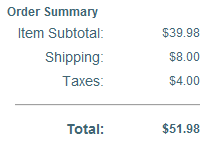
Summary - this is the default option. If taxes are applicable to the order, they will be shown in the summary part of the invoice. If more than one tax is applicable, they will be combined into one total amount. There is no detailed information shown regarding the tax name. It simply shows the total tax calculated for the order. The example below shows tax on the final invoice page.
-
Include Tax in Price - this will display a taxable product with tax included in the price. This is a VAT requirement. This option is generally used with the Tax Column feature so that the tax percentage is also indicated. The example below shows a portion of the final invoice page. Note the VAT tax column shows the tax percentage being applied and the price includes the tax.

-
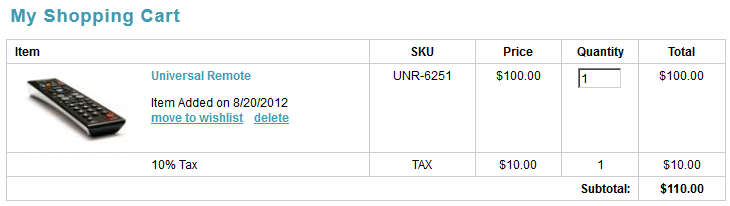
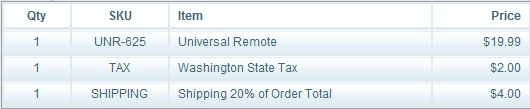
Show Tax Separately - this option will display a separate line item for the tax. The taxes can appear in the shopping cart, checkout page, and also on the final invoice. The display of taxes before checkout is based on the default warehouse address. If you have setup taxes for a region and your default warehouse address is within that zone, taxes can be displayed while the user is shopping. In the example below, the tax is a line item on the final invoice page. If there are multiple taxes being applied, they will each be shown on their own line.
-
-
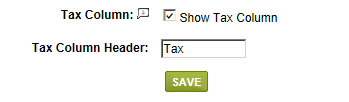
The Tax Column option can be enabled by checking the box. This is a VAT requirement.
-
This will refresh the page showing the Tax Column Header.
-
Enter the tax heading as you would like it to display on the invoices. The default value is "VAT" but you can modify this as needed. This option is typically used with the Invoice Display option "Show prices with tax included".
-
When finished with your tax settings, click the SAVE button. The changes you make here will be reflected immediately and throughout the store.
Related Topics
Configure > Taxes > Tax Rules
Create one or many tax rates for the specified geographic locations.
Configure > Regions > Zones
Use zones to offer shipping services and tax based on destinations.
Catalog > Category > Product (Taxes and Shipping)
Setup product for shipping, taxes, gift wrap, COGS, and Vendor.
Catalog > Gift Wrap
Create different gift wrap groups and wrapping styles.
Configure > Shipping > Custom Shipping Methods
Create your own shipping rules with the rates you define.