Configure > Payments > Gateways
SagePay
The SagePay payment gateway is one of the largest payment processors in the United Kingdom. SagePay is very simple and straight-forward to setup. To enable the gateway within Ablecommerce, you must provide your SagePay VSP Direct Vendor Name. There are no additional software requirements besides having AbleCommerce installed.
SagePay Processing Features
AbleCommerce supports all the standard features of the payment gateway. For more information on the services and features available, visit www.SagePay.com ![]()
-
Authorize - where the cardholder's funds are verified as available and set aside for the pending transaction.
-
Authorize Capture - where the cardholder's funds are verified and immediately transferred to the merchant.
-
Capture - a full or partial transfer of funds from the cardholder's pending authorization to the merchant.
-
Void Authorization - when the pending authorization of funds is canceled. This does not refund a payment.
-
Refund - when funds have been transferred to the merchant, and a full or partial refund is returned to the cardholder.
-
Partial Refund - where multiple refunds to the customer are possible.
The SagePay gateway supports multi-currency.
Post-order Processing
All AbleCommerce payment gateway integrations offer full support for post-order processing. This means that after an order is placed, you can authorize, capture, refund, and void transactions from the AbleCommerce order administration area.
Some post-order processing features, such as refunds, may require that you enable credit card storage from the Security > System Settings page.
Enable SagePay Payment Gateway
Before you begin, make sure that you have your SagePay VSP Direct Vendor Name.
-
From the Payment Gateways page, click the ADD GATEWAY button.
-
From the Add Gateway page, click the SagePay button.
-
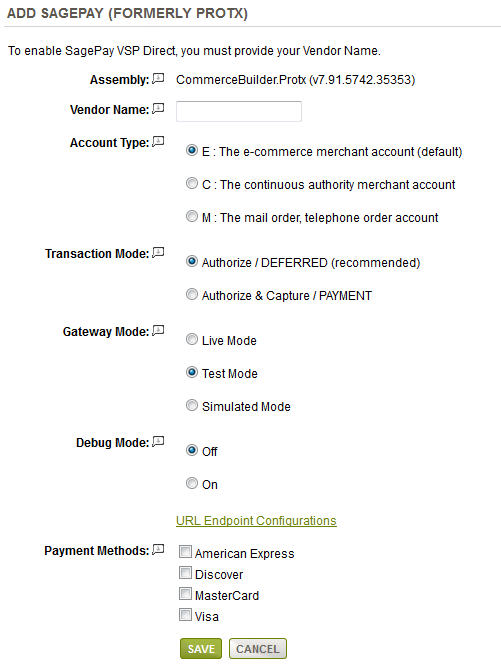
You will now be on the Add Gateway configuration page for SagePay.

-
In the field named Vendor Name, enter your vendor name provided to you by SagePay.
-
Select the Account Type in use. SagePay should provide you the account type.
-
E : The e-commerce merchant account (default)
-
C : The continuous authority merchant account
-
M : The mail order, telephone order account
-
-
Choose the type of Transaction Mode.
-
Authorize / DEFERRED: To reserve the funds without actually capturing them at the time of purchase. You can capture authorized transactions through the order admin interface later.
-
Authorize & Capture / PAYMENT: Use "Authorize & Capture (PAYMENT)" to capture funds immediately at the time of purchase.
-
-
Choose the Gateway Mode. SagePay should provide you this information when you setup your account.
-
Live Mode - used for processing live transactions with a production merchant account.
-
Test Mode - used for testing transactions with a production merchant account.
-
Simulated Mode - used to test transactions with a test merchant account.
-
-
Debug Mode is an optional feature and should only be enabled at the direction of AbleCommerce support.
-
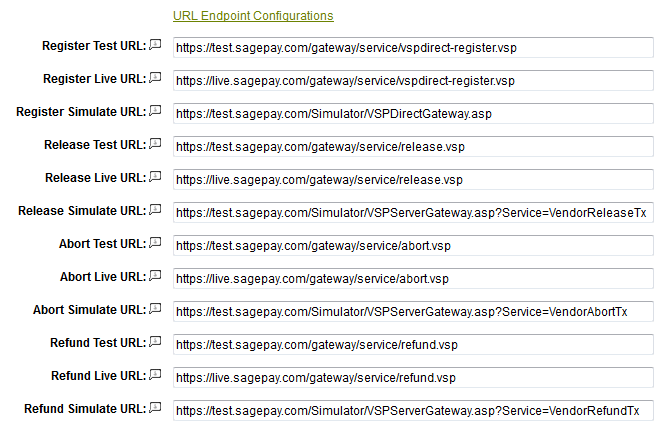
A URL Endpoint Configuration link is available. To view all possible endpoints, click the link. This URLs given are for test, live or simulation environments. These should not be changed unless directed by SagePay or AbleCommerce support personnel.

-
Scroll down to the bottom of the page and find the section called Payment Methods.
-
Click the box next to all credit card payment methods that will use the SagePay gateway.
-
At the bottom of the page, click the SAVE button.
Setting up your SagePay Account
-
Login to your Account control panel : https://ukvpstest.SagePay.com/VSPSimulator/

-
Click on the ACCOUNT button.
-
In the "Valid Currencies for this Account" section, you need to make sure the currency listed here is the same as your default currency for the store.
-
In the "Valid IP Addresses for this Account" section, you need to add the IP of your website. If you are not sure what this is, you can run a test transaction and the information will be displayed on the Payment page for the order.
Debugging Errors
The Currency you have supplied (UK) is not accepted by your VSP Simulator account. You can add this currency in the Account page. (INVALID).
See step 3. above. You need to make sure the currency set for your SagePay account is the same as the default currency for your store.
By default most carts will be set to GBP - this can be changed accordingly but only if the currency is set up on your SagePay account. We will only set up a currency on a SagePay account if your merchant number is capable of transactions in that currency, so always check with your acquiring bank.
The IP address of the server sending the transaction does not match the valid IP address ranges listed in the VSP Simulator. The IP address VSP Simulator sees for your server is 211.123.123.123. You can add this IP in the Accounts section of VSP Simulat (INVALID)
See step 4. above. You need to add the IP shown in your error message to the SagePay console.
Testing with SagePay
It is important that your cart is set to either Test or Live mode. When you first get notification of your SagePay test account being ready, you need to ensure that the cart is set to Test mode. Once Live, all that needs to be done is to set the cart to Live mode also.
-
Edit the SagePay gateway configuration page in AbleCommerce.
-
Change the Gateway Mode to the applicable setting depending on the type of gateway your are using.
-
At the bottom of the page, click the SAVE button.
-
You can use a Visa card number of "4111111111111111" to run a test transaction.
-
Be sure to change the Gateway Mode to Live before processing real credit card transactions.
|
NOTE: |
There may be additional features within your SagePay account that have not been tested with AbleCommerce. If you enable unsupported features, you are doing so at your own risk. |
Related Topics
Manage > Orders > Payments (Credit Card Transactions)
Manage > Orders > Payments (Offline Payments)