Configure > Payments > Gateways
In this Topic Show
PayPal™
There are three different integrations of PayPal™ available in AbleCommerce. You may implement any of these solutions at the same time. AbleCommerce provides a single configuration page where you can easily enter the information provided by PayPal and begin processing transactions from your store.
The AbleCommerce payment gateway integration with PayPal offers full support for bidirectional post-order processing. This means that after an order is placed, you can authorize, capture, refund, and void transactions from either the AbleCommerce order administration area, or your merchant account. All transaction activity is recorded in both places.
|
NOTICE: |
PayPal acquired Verisign Payflow Pro payment gateway which is documented separately. |
PayPal Overview
The integrations available are described as follows:
Encrypted Website Payments: Encrypted Website Payments relies on standard public key encryption for protection. Using Encrypted Website Payments helps secure payment buttons. Encrypted Website Payments protects the HTML button code that contains pricing information by encrypting it. HTML button code that you protect by using Encrypted Website Payments cannot be altered by malicious third parties to create fraudulent payments. [New in Gold R11]
PayPal Credit (Bill Me Later): A simple and new financing option that is proven to boost your sales. The PayPal Advertising Program offers free banner ads that promote PayPal Credit financing as a PayPal payment option. A recent study has shown that implementing these banner ads can drive an 18% increase in online sales. [New in Gold R9]

To advertise PayPal financing, please see section below on PayPal Banner Ads.
Website Payments Standard: Customers shop in your AbleCommerce store and go through the checkout process where they can select PayPal as the payment method. Once the customer completes the order, there will be a large PayPal button for them to click.

The customer will need to click this button to be redirected to PayPal's website, where they can pay for the order and return to your store when finished.
Express Checkout - Customers shop in your AbleCommerce store. When they are ready to checkout, there will be a PayPal Express button that will redirect the customer to PayPal's website.
![]()
The customer will login to their own PayPal account, return to your store to select a shipping method, and then go back to PayPal's site to make a payment.
Website Payment Pro - This is a full payment gateway for credit card transactions. Your customers will shop and pay in the AbleCommerce store. On the checkout page, they can select the type of credit card they wish to pay with and never leave your site.
|
|
|
|
|
PayPal Processing Features
The following actions are available through AbleCommere or PayPal's merchant interfaces. The post order processing is bidirectional so you can initiate transactions from AbleCommerce or from your PayPal merchant account as long as you have implemented the full PayPal integration.
-
Authorize - where the cardholder's funds are verified as available and set aside for the pending transaction.
-
Authorize Capture - where the cardholder's funds are verified and immediately transferred to the merchant.
-
Capture - a full or partial transfer of funds from the cardholder's pending authorization to the merchant.
-
Partial Capture - where you can capture additional funds on what remains of the pending authorization.
-
Void Authorization - when the pending authorization of funds is canceled. This does not refund a payment.
-
Refund - when funds have been transferred to the merchant, and a full or partial refund is returned to the cardholder.
-
Partial Refund - where multiple refunds to the customer are possible. A refund cannot exceed the last transaction amount or be greater than the remaining amount captured.
-
E-check - accept and process electronic check payments from consumer and corporate bank accounts.
|
NOTE: |
There may be additional features within your PayPal account that have not been tested with AbleCommerce. If you enable unsupported features, you are doing so at your own risk. |
PayPal Comparison
The following table represents a comparison of the PayPal payment services available within AbleCommerce. For a full feature comparison and pricing, please visit PayPal ![]()
Recurring Billing is not supported at this time.
|
Frequently Asked Questions |
Website Payments Standard |
Website Payments Pro |
PayPal Express Checkout |
|
Where do my customers shop? |
In your store |
In your store |
In your store |
|
Where do my customers checkout? |
PayPal's website |
In your store |
PayPal's website |
|
Do my customers need a PayPal account? |
No |
No |
Yes |
|
Do I need a merchant account? |
No |
Included |
Required |
|
Can I accept electronic checks? |
Yes |
No |
Yes |
|
Is capable of bidirectional payment processing? |
Yes*** |
Yes |
Yes |
|
Are there additional software requirements? |
Yes |
Yes |
Yes |
|
* Are PayPal accounts based in the U.K. supported? |
Yes |
No* |
Yes |
|
Can I accept payments from countries using a foreign currency? |
Yes |
Yes |
Yes |
|
** Does the server require full trust? |
No |
Yes |
Yes |
* To use Website Payments Pro U.K. (Payflow Edition), you must configure the PayFlow Pro service.
** A website can have different types of security environments called medium or full trust. Read the next section for more information.
*** Bi-directional payment processing is the ability to process transactions from PayPal or AbleCommerce. This feature is not available if you are only using standard instant payment notification (IPN). Merchants will need to process transactions from the PayPal merchant account when using Website Payments Standard alone.
PayPal Requirements
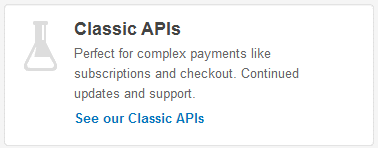
Getting started with PayPal requires that you first register for a merchant account. To do that, go to PayPal.com and click on the Signup link to get started. Your PayPal merchant account and AbleCommerce integration will use the Classic API option.
-
FULL TRUST: In order to use all versions of PayPal, you must configure your Asp.Net applications to run in full trust with WebPermission enabled.
-
MEDIUM TRUST: For strict shared hosting environments that run in medium trust, you will be limited to the Website Payments Standard version of PayPal.
Running PayPal in Medium Trust
These are the limitations and requirements with the PayPal integration running in medium trust environments.
-
You will only be able to use PayPal Payments Standard. Paypal Express Checkout and Website Payments Pro will not work in medium trust.
-
You will not be able to use the post-order processing features within AbleCommerce (Capture/Refund). So, you will need to have the funds captured immediately without a prior authorization. This means changing the Authorization Mode setting to Authorize & Capture.
-
You will need to have WebPermission enabled. Here is a test that you can perform to see if WebPermission is enabled:
You can find out if WebPermission is NOT on by trying a PayPal payment. Go all the way through and order and pay with PayPal. Click Paynow to go to PayPal's website. On the last PayPal screen, after payment is complete (the receipt page) it will have a button to ”return to the store”. Clicking this button is a manual trigger of the IPN code, and this will throw an error if WebPermission is unavailable because it cannot call out to PayPal to verify the origin of the IPN.
Enable Instant Payment Notification (IPN) and Website Payments Std
This step is required for all versions of PayPal.
Before you begin, make sure that you have the login information to your PayPal business account.
-
From the Payment Gateways page, click the ADD GATEWAY button.
-
From the Add Gateway page, click the PAYPAL button.
-
You will now be on the Add Gateway configuration page for PayPal.

-
In the field named PayPal Account, enter your PayPal (business) email address. This needs to match the same email that you have setup as your Primary email address within Paypal.
-
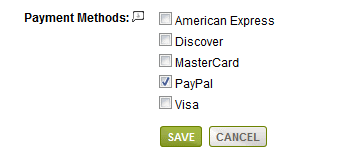
Scroll down to the bottom of the page and find the section called Payment Methods.
-
Check the box next to the PayPal payment method.
-
At the bottom of the page, click the SAVE button.
-
Keep the AbleCommerce PayPal configuration page up so you can copy the URL for the next step.
Enable IPN within your PayPal account
This step is required for all versions of PayPal.
-
Go to PayPal's website and login to your PayPal business account.
-
After logging in, you should be on the My Account page.
-
From the top navigation bar, click on the Profile link.
-
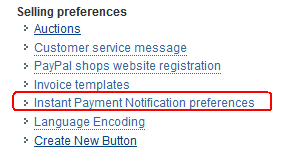
From the Profile page, find the section called Selling Preferences, and click on the "Instant Payment Notification Preferences" link.
-
On the next page, check the box to activate Instant Payment Notification.
-
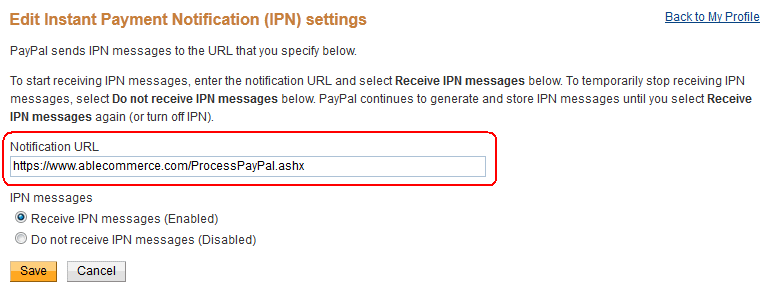
Now, go back to the AbleCommerce PayPal configuration page and copy the URL displayed below Instant Payment Notification (IPN).

e.g. https://www.mystore.com/ProcessPayPal.ashx (for live transactions the URL must be in SSL form) -
Return to the PayPal IPN page and paste this URL into the field provided for Notification URL.
-
Click the SAVE button when finished.
-
From the profile tab, under the Selling Preferences column, choose Language Encoding.
-
From the Language Encoding page, click the More Options button.

-
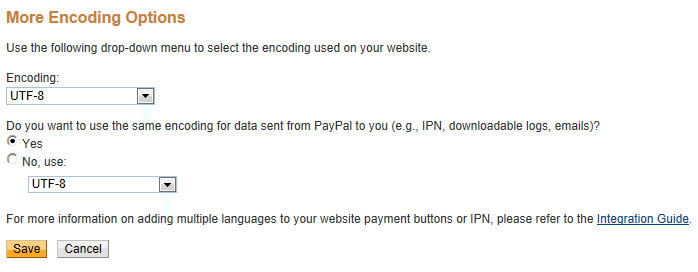
From the More Encoding Options page, select "UTF-8". The second option should indicate "Yes" to use the same encoding selected above.
-
Save your changes.
|
NOTE: |
This completes the configuration for PayPal's Website Payments Standard version. |
Enable PayPal Express Checkout or Website Payment Pro
Before you begin, make sure you have an API username, password, and signature issued by PayPal.
If you do not have this, please follow the steps in the next section "Obtain your API Credentials"
-
Return to the PayPal gateway configuration page in AbleCommerce.
-
In the section called "Express Checkout and Direct Payment", you will need to enter 3 pieces of API data. This is not the same information used for your PayPal business account.

-
Enter your API Username into the field provided. This information is provided by PayPal.
-
Enter your API Password into the field provided. This information is provided by PayPal.
-
Enter your API Signature into the field provided. This information is provided by PayPal.
-
If you are going to "Enable Encrypted Website Payments Using Public Key Encryption", please reference this page for additional setup instructions.
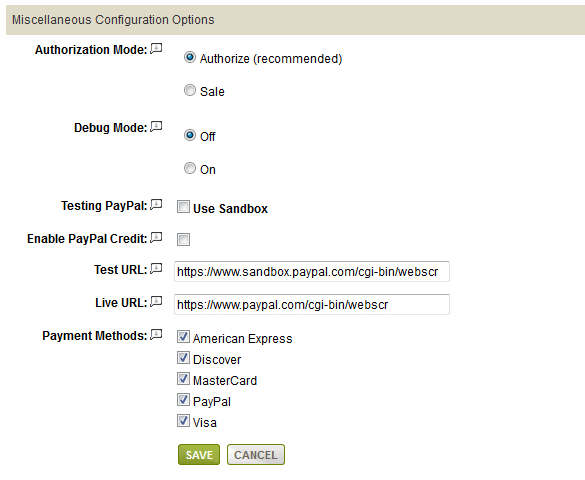
Otherwise, find the "Miscellaneous Configuration Options" section at the bottom of the page.
-
Choose the type of Authorization Mode.
-
Authorize: to request authorization without capturing funds at the time of purchase. You can capture authorized transactions through the order admin interface.
-
Sale: to capture funds immediately at the time of purchase. You should not use this feature unless you are able to ship goods the same day of the sale.
-
-
Debug Mode is an optional feature and should only be enabled at the direction of AbleCommerce support.
-
For development and testing use, you can check the Use Sandbox option. See the last section below for information on testing in Sandbox mode.
-
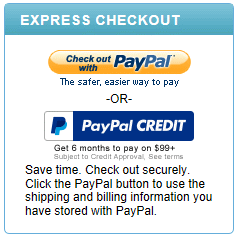
If you would like PayPal to offer your customers credit terms for purchases over $99, then check the box to Enable PayPal Credit at checkout.
-
The Test URL is used to communicate with PayPal gateway. This is the sandbox or testing environment. It should not be changed unless directed by PayPal or AbleCommerce support personnel.
-
The Live URL is used to communicate with the PayPal gateway. This is the live or production environment. It should not be changed unless directed by PayPal or AbleCommerce support personnel.
-
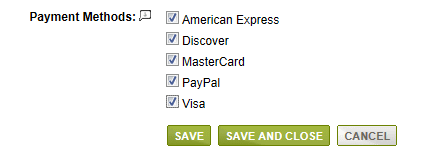
Scroll down to the bottom of the page and find the section called Payment Methods.
-
If you are going to use Paypal's Website Payment Pro, then you will need to associate payment methods to the gateway by checking the box next to all credit card payment methods that will use this PayPal gateway integration.
If you will be using Website Payments Standard, then make sure you have PayPal as a selected payment method.
-
Click the SAVE button when finished.
Obtain your API Credentials
If your PayPal account does not have API credentials setup, you will need to complete the steps below.
These steps are intended to help you request API credentials using the business account interface. PayPal requires that you complete an API approval process prior to obtaining your credentials.
-
Go to PayPal's website and login to your PayPal business account.
-
After logging in, you should be on the My Account page.
-
From the top navigation bar, click on Profile link.
-
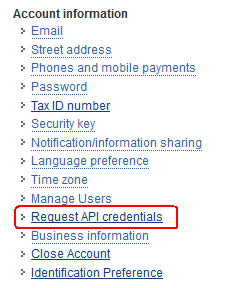
From the Profile page, find the section called Account Information, and click on the "Request API credentials" link.
-
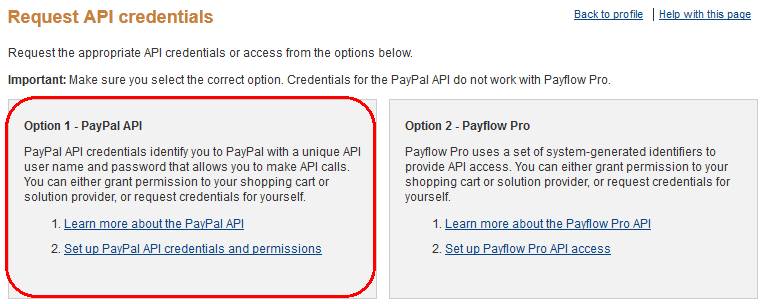
From the Request API Credentials page, click the link "Set up PayPal API credentials and permissions" from the Option 1 - PayPal API box.
-
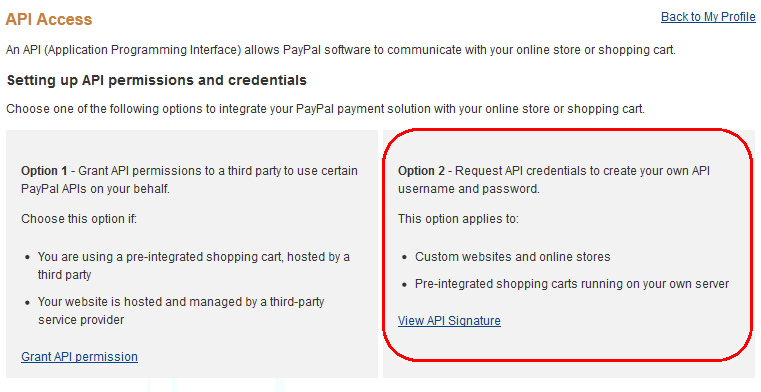
From the next page, select Request (or View) API signature from the Option 2 box as shown below.
-
The next page will display your API Signature credentials, which include API username, password, and signature. SAVE THIS FOR FUTURE REFERENCE.
-
When finished, click the Done button. You will need to enter this information into the PayPal configuration page in AbleCommerce.
Testing PayPal in Sandbox mode
Paypal provides a developer "sandbox" where you can test your site with PayPal. To use the sandbox you must have created a developer account and used that account in the configuration of the gateway.
-
Edit the PayPal gateway configuration page in AbleCommerce.
-
In the section called Testing PayPal, check the box next to Use Sandbox.
-
At the bottom of the page, click the SAVE button.
-
Make sure your PayPal developer account is enabled for testing.
Additional PayPal Info
When using PayPal in sandbox mode, keep in mind there are some potential issues:
-
You need to be logged into your PayPal developer sandbox and customer test account before going through the checkout process.
-
Using a test Visa credit card number of "4111111111111111" will usually result in a failed Authorization. Try using "4111111111111129" instead.
-
The developer sandbox servers are very slow! You may get unexpected errors, if this happens, be patient and try again.
PayPal Banner Ads
Display PayPal credit banner ads anywhere in your store using the new PayPal Banner Ad control available in AbleCommerce Gold R9. Access the control and add to any layout by going to the Website > Layouts page. Then edit the Layout and use the ADD CONTROLS button.
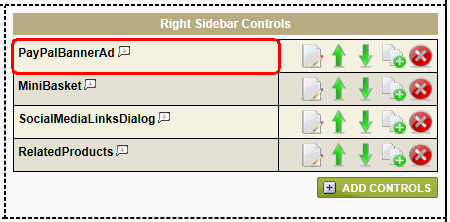
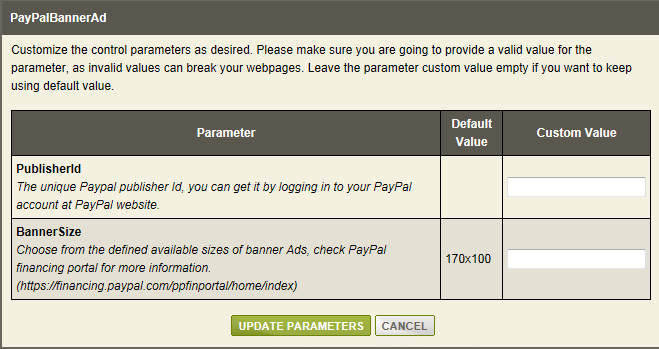
You can additionally use the control in any webpage, header, or footer by manually adding the following code: [[ConLib:PayPalBannerAd PublisherId="" BannerSize="170x100"]] with your Publisher ID and preferred banner size.
-
To create a banner advertisement for PayPal financing, you will need to first login to your PayPal merchant account and find the financing website located at https://financing.paypal.com
-
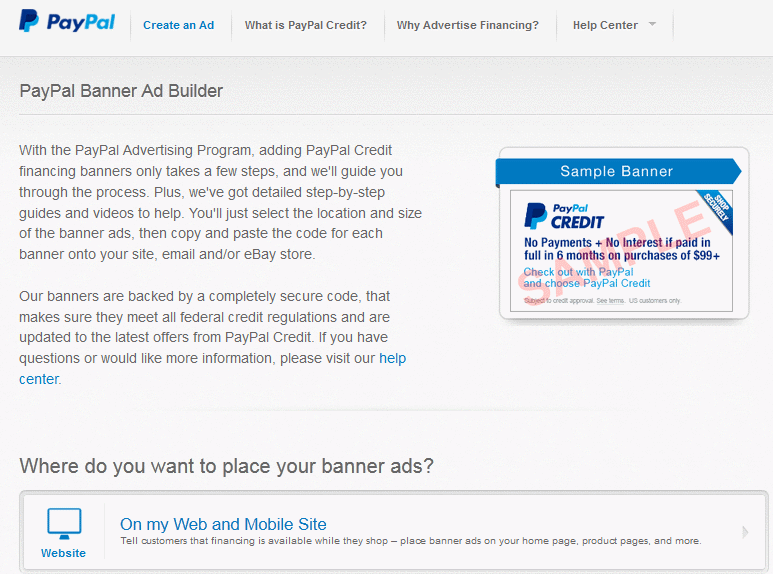
As shown in the example below, PayPal will ask where you want to place your banner ads. Select the "On my Web and Mobile Site" option.
-
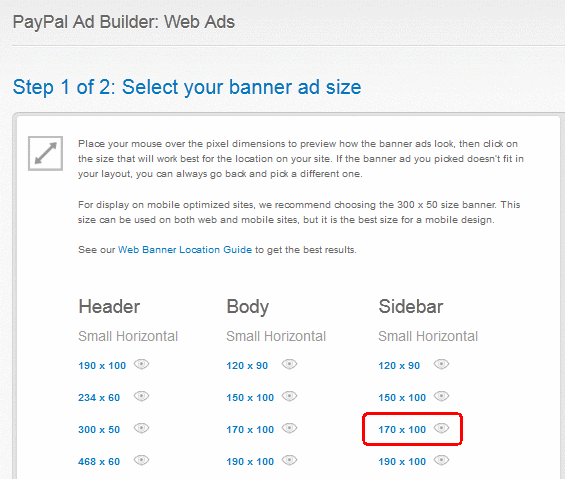
On the next page, you can choose the size of your banner. By default, AbleCommerce uses a banner ad size of 170 x 100
-
If you wish to use a different banner, then simply edit the control and enter the new size into the field provided.
-
The last step requires that you enter your unique PayPal publisher ID into the PublisherID field available in the control.
-
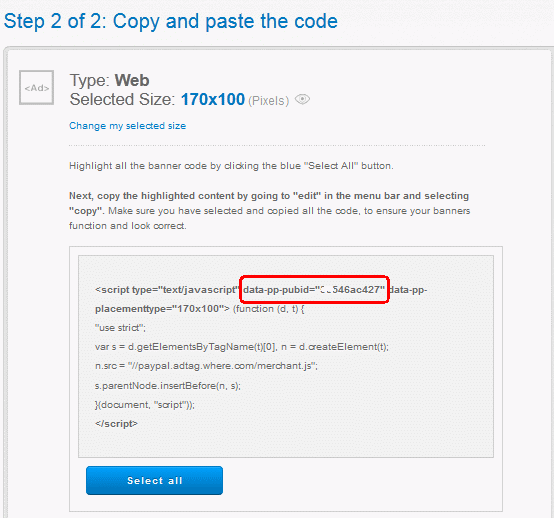
To find the Publisher ID, go to Step 2 of 2 in PayPal and use the screenshot example below. The code is between the quotes in the first line of javascript.
Example: data-pp-pubid="12345ab678" and it is circled in red below for reference.
-
Enter the code in your AbleCommerce control and click the UPDATE PARAMETERS button to save.
-
SAVE and CLOSE the layout editor page.
-
Now you can view your PayPal banner advertisement. Here is an example -

Related Topics
Manage > Orders > Payments (Credit Card Transactions)
Manage > Orders > Payments (Offline Payments)