Configure > Payments > Gateways
Amazon Payments
IMPORTANT NOTICE: Effective July 1, 2015, Checkout by Amazon is closed to new registrations. If you have registered before this date, then you are still eligible to use this payment gateway.
The Amazon payment gateway gives your customers the option to use their existing Amazon account to place an order in your store. The AbleCommerce integration offers both Checkout with Amazon and a Simple Payment option using Amazon Payments. [NEW in R3]
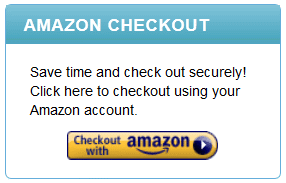
Checkout with Amazon
The Checkout with Amazon option is when the customer perceives that they are using Amazon's own checkout system, but all the while they remain in your store to complete the order. From the shopping cart, your customers can login to their Amazon account and be presented with the same billing information and address book that is already stored securely with Amazon.
This is an example of the Checkout with Amazon experience within AbleCommerce -
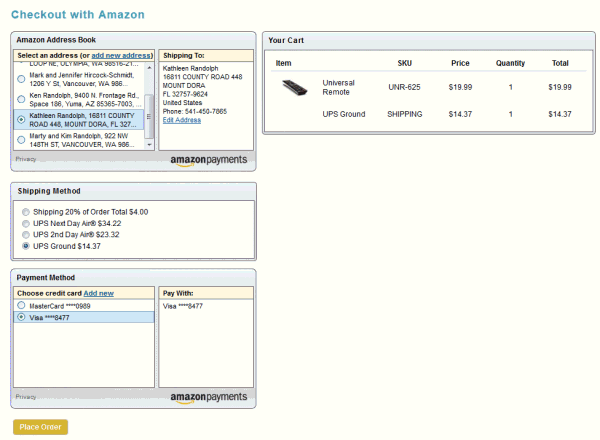
The billing address, shipping address and payment methods are retrieved from Amazon, while the Shipping Methods and any taxes will be calculated using your AbleCommerce settings. The customer has a single page to complete the checkout process by Amazon.
Amazon Simple Pay
Additionally, you can offer a simple payment option, which requires some additional configuration during setup (see below).
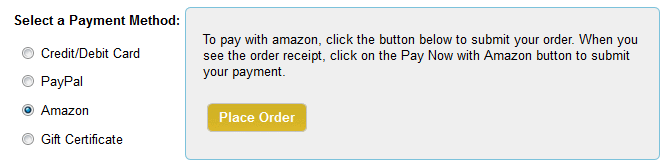
The customer will be able to select Amazon from the final payment page. When this payment method is selected, they will be given instructions on how to use the Pay Now button from the next page.
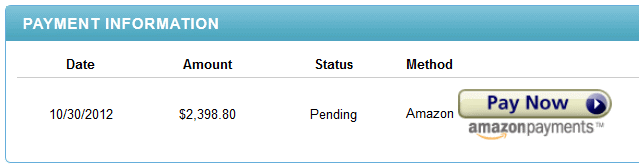
After clicking the Place Order button, the customer will need to complete the transaction and click the Pay Now button as previously instructed. When this happens, the user is redirected to Amazon's website, where they will need to login. Then, the user will be able to select from available payment methods and confirm to begin processing. This takes a few seconds to complete, and then the user can be returned to the store's order receipt page if desired. (This option is not available with Guest Checkout)
NOTE: The Amazon API does not support AbleCommerce's post-order processing features. This means that after an order is placed, you will need to manually process the payment from Amazon, as the software will not be aware of any transactions that are being performed within the AbleCommerce order system, and likewise, your merchant account will not be able to reflect changes made to an order that is already placed.
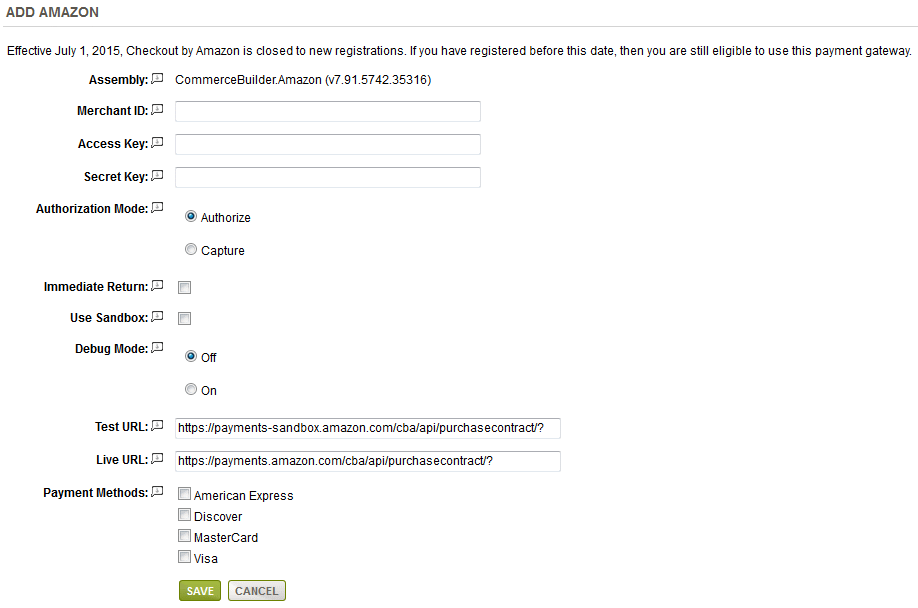
Enable the Amazon Payment Gateway
Before you begin, make sure that you have your Amazon Merchant ID, Access Key, and Secret Key, all of which are provided with your Amazon Seller account.
-
From the Payment Gateways page, click the ADD GATEWAY button.
-
From the Add Gateway page, click the AMAZON button.
-
You will now be on the Add Gateway configuration page for Amazon.
-
In the field named Merchant ID, enter your Amazon Merchant ID.
To locate the Merchant ID, go to the settings tab, then choose Checkout Pipeline Settings. The Merchant Id is printed in the second group of settings. -
In the next field, enter your Amazon Web Services Access Key.
To find your Access Key and Secret Key, go to the Integration tab, then select the Access Key item. This page will let you view both the keys needed for this step and the next. -
Enter your Secret Key in the next field.
-
Choose the type of Authorization Mode.
-
Authorize: to request authorization without capturing funds at the time of purchase.
-
Capture: to capture funds immediately at the time of purchase.
-
-
The Immediate Return option is available if you are using the Simple Payment option (see section below)
-
If testing, you can enable the Use Sandbox option. Many features are disabled in the Sandbox version.
-
Debug Mode is an optional feature and should only be enabled at the direction of AbleCommerce support.
-
The Test URL is used to communicate with Amazon's checkout service. This is the sandbox or testing environment. It should not be changed unless directed by Amazon or AbleCommerce support personnel.
-
The Live URL is used to communicate with Amazon's checkout service. This is the live or production environment. It should not be changed unless directed by Amazon or AbleCommerce support personnel.
-
Scroll down to the bottom of the page and find the section called Payment Methods.
-
Click the box next to all credit card payment methods that will use the Amazon gateway.
-
At the bottom of the page, click the SAVE button.
To Enable Amazon Simple Pay
If you would like to additionally offer the Pay Now with Amazon payments option, then all you need to do is create a new Payment Method for Amazon.
From the Payment Methods page, find the Add Payment Method section in the right side of the page.
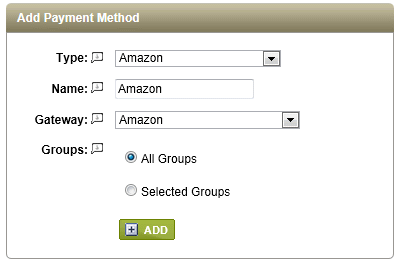
Select Amazon for the Type, Name, and Gateway. Click the ADD button to complete setup.
Now, the Amazon payment option will on the last page of checkout with any other payment methods you have available.
Getting started through Amazon Seller Central
IMPORTANT NOTICE: Effective July 1, 2015, Checkout by Amazon is closed to new registrations. If you have registered before this date, then you are still eligible to use this payment gateway.
You will first need to access your account through Amazon Seller Central. The steps below describe the minimum information needed to activate your account for use by AbleCommerce.
Login to https://sellercentral.amazon.com
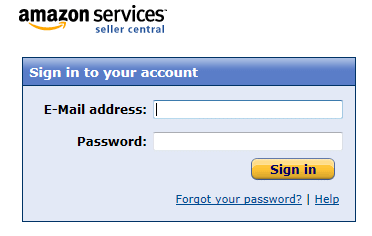
If you already have an account, then login with your merchant email address and password. Otherwise, you can contact Amazon to create a new account.
After logging in, you should see the Step 1 - Configure your Account Settings section.
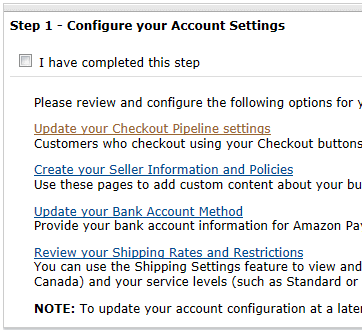
Click on the first link to "Update your Checkout Pipeline settings". On the next page, click EDIT to enter your Merchant URL
You need to point to the AmazonIPN.aspx page. For example, enter: http://www.my-store.com/AmazonIPN.ashx
Click UPDATE when finished.
Next, you should "Update your Bank Account" method. The sections to create seller information and policies or shipping rates and restrictions are not supported through the AbleCommerce/Amazon checkout experience.
When completed, check the box labeled "I have completed this step"
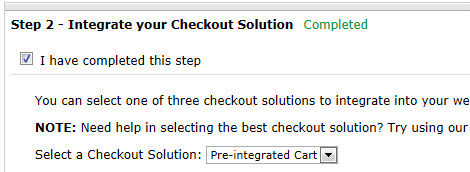
For the next section, Step 2 - Integrate your Checkout Solution, you can select the option "Pre-integrated Cart", and then check the box to show you have completed this step.
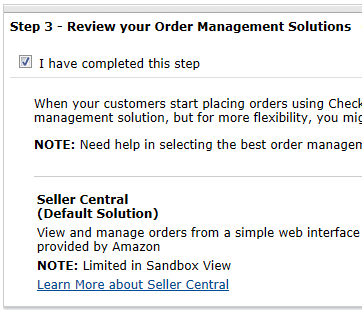
In the next section, Step 3 - Review your Order Management Solutions, use the default solution (Seller Central), and then check the box to show you have completed this step.
For the next section, Step 4 - Test your Checkout Solution, you will need to create a buyer account if you do not already have one. For testing purposes, you should be using a different browser than the one used for logging into the Seller Central account. This is to avoid login conflicts if the information is stored in your browser's cookies. Also, make sure that you do not use the same email address for your buyer account that you are using for your seller or merchant account.
Login to your AbleCommerce Administration, and from the Amazon configuration page, make sure the Use Sandbox option box is checked.
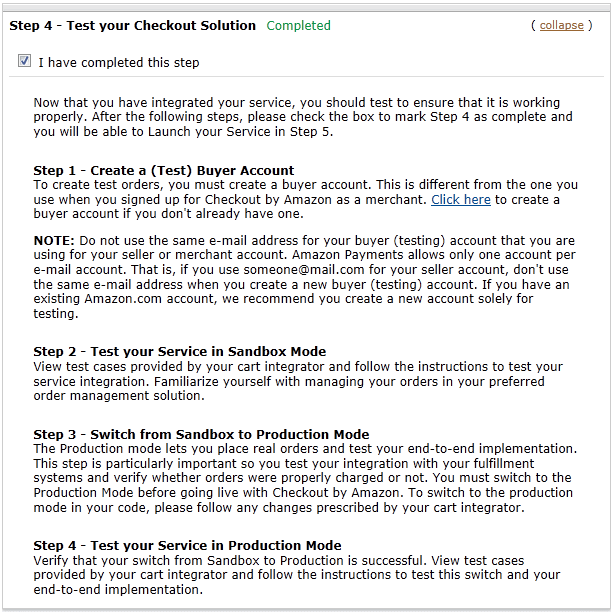
Next, place a test order through your AbleCommerce store. Make sure the product has valid shipping options. Once the order is completed, make sure that it appears within the Amazon Seller Central - Manage Orders section. Keep in mind that when testing in Sandbox mode, the orders within AbleCommerce will not process and the payment status will remain as "Waiting for IPN".
When you are ready to switch from Sandbox to Production mode, return to the Amazon configuration page within AbleCommerce, and un-check the box to disable Sandbox. From the Amazon configuration screen, check the box to indicate you have completed Step 4.
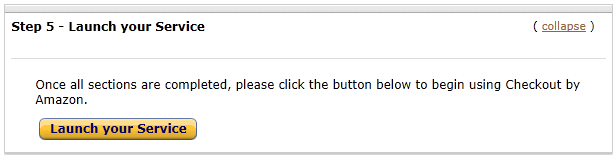
In the last section, Step 5 - Launch your Service, click the button "Launch your Service". Congratulations! You are now ready to receive live orders.
After a new order is received, simply process the payment through Amazon Seller Central - Manage Orders, and a notification will be set to AbleCommerce updating the payment status to PAID and the order will be ready to ship. If an order is canceled, then AbleCommerce will receive an updated status.
Related Topics
Manage > Orders > Payments (Credit Card Transactions)
Manage > Orders > Payments (Offline Payments)