Data Exchange > Import > Product Options
Import Product Options
You can import or update product options using a CSV formatted data file. [New in R12 SR1]
Product Options and Product Variants are different features. The data import feature supports both. If you are using product variants instead of options, then please go here instead.
Example Variant: Large Red shirt, where the product has options for size and color. The variants are the total number of possible combinations of the option choices.
Example Option: Large shirt, where the product has an option choices for size. Though you can still use multiple options, the variants of these options have their own unique data.
If you would like to read more about Variants and Options, please go here.
Select from the import options below.
Importing Tips and Information:
-
BACKUP YOUR DATABASE BEFORE ATTEMPTING AN IMPORT.
-
After importing new or modified data, while using the Lucene search provider, make sure to Reindex the database so your changes will appear.
-
Technical issues resulting from product imports fall under paid priority support only, due to the complexity of such issues.
-
Importing large sets of data may require that you upload the file directly to the AbleCommerce server, and use the "Select from Server" option in Step 5 below.
-
None of Data Update features can remove existing records.
Importing New Options
-
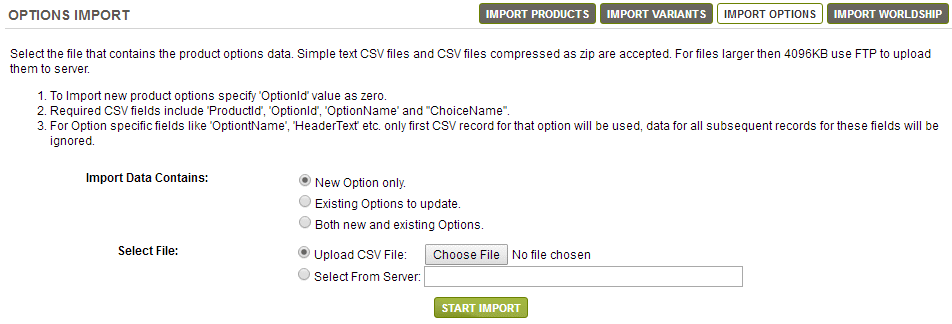
From the Data Exchange page, or from the top-menu, go to Data > Import > Options.
-
Import Data Contains: If you are only importing new options, then select "New Option only". For a new option import, you will need to specify the 'OptionId' value as zero (0) in your CSV import file.
Minimum Required fields: ProductId | OptionId | OptionName | and ChoiceName -
Select File: Select the product option data file from the server directly, or upload a new one if the size is less than 4096 KB. The data file must be formatted for CSV.
- Use the "Upload CSV File" option if your file is on the same computer you are using, and you wish to upload the file to the server.
- Use the "Select From Server" option if your file is already located in the folder where AbleCommerce is looking for data to upload. This location is \App_Data\DataExchange\Upload\. You must use this option if your product data file is larger than 4096 KB.
A CSV file is a commonly used term for a form of a file in which the names of the variables appear on the first line, and then below are all the cases (i.e. records), with each case on a single line and having a value for each of the variables, and with all the values and variables in text form and separated by commas (i.e. "Comma Separated Values"). Applications, such as Microsoft Excel, can be used to create a CSV file.
TIP: If you are unsure of the formatting, then use the "Export Products" feature to create a sample.

Sample CSV product options import file. -
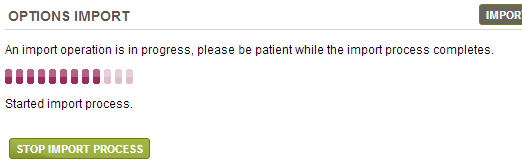
Click the START IMPORT button and wait for the process to complete. If necessary, you can click the STOP IMPORT PROCESS button.
-
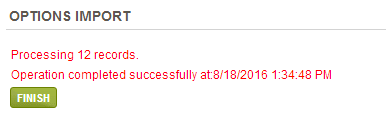
When finished, you will get a confirmation screen similar to the following. If there was a problem with the formatting of the data selected for import, then the error message(s) will be displayed here instead.
-
Click the FINISH button.
Import Existing Options
The Data Import feature will also allow you to import and update existing options. If you are updating existing options, then it is important that you first generate an export file to work with. This will contain the correct OptionId value in your CSV file.
To generate a valid CSV file, use the "Export Products" feature first. All existing options and choices can be exported into a single file. Then you can add new options or update the existing ones.
-
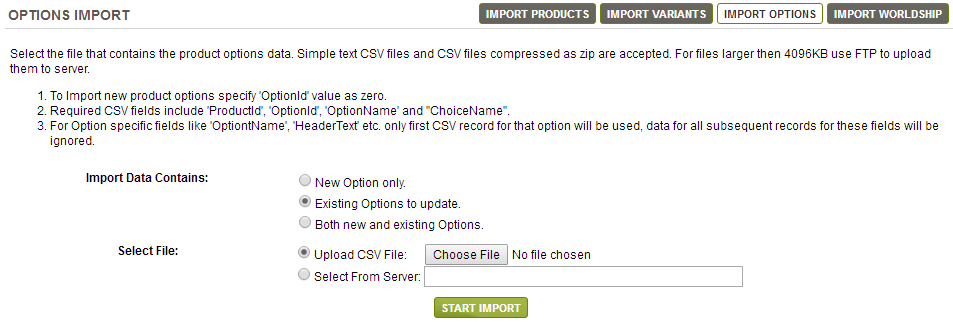
From the Data Exchange page, or from the top-menu, go to Data > Import > Options.
-
Import Data Contains: If you are only going to update existing options, then select "Existing Options to update". For a new option and existing option import, select "Both new and existing Options".
- For any new options, you will need to specify the 'OptionId' value as zero (0) in your CSV import file.
- If you are adding new choices for existing options, then you will need to specify the 'ChoiceId' value as zero (0) in your CSV import file.
Minimum required fields for new options: ProductId | OptionId | OptionName | and ChoiceName
Minimum required fields for existing options: ProductId | OptionId | ChoiceId -
Click the START IMPORT button and wait for the process to complete. If necessary, you can click the STOP IMPORT PROCESS button.
-
When finished, you will get a confirmation screen similar to the following. If there was a problem with the formatting of the data selected for import, then the error message(s) will be displayed here instead.
-
Click the FINISH button.
Go to Site Map