Data Exchange > Import > Product Variants
Import Product Variants
You can import or update products using a CSV formatted data file. Select from the import options below.
Importing Tips and Information:
-
BACKUP YOUR DATABASE BEFORE ATTEMPTING AN IMPORT.
-
After importing new or modified data, while using the Lucene search provider, make sure to Reindex the database so your changes will appear.
-
Technical issues resulting from product imports fall under paid priority support only, due to the complexity of such issues.
-
Importing large sets of data may require that you upload the file directly to the AbleCommerce server, and use the "Select from Server" option in Step 5 below.
-
None of Data Update features can remove existing records.
Importing New Product Variants
-
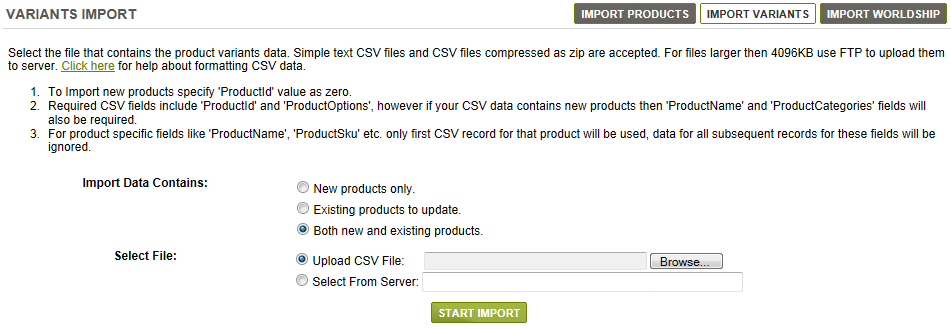
From the Data Exchange page, or from the top-menu, go to Data > Import > Variants.
-
Select the "New products only" option and click the NEXT>> button to begin.
-
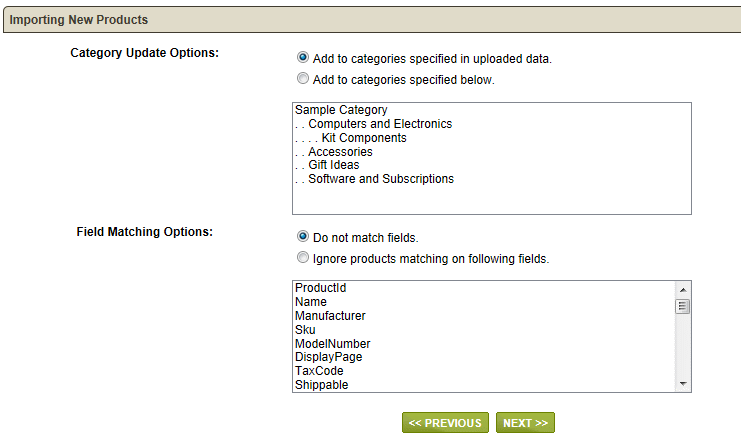
Category Update Options: All new products must be assigned to at least one category.
- Use the "Add to categories specified in uploaded data" selection if you are including new or existing categories with your product data.
- Use the "Add to categories specified below" option if you are going to select an existing category within the store. You must select at least one category from the list. -
Field Matching Options: This option will prevent duplicate products from being imported.
- Use the "Do not match fields" option if you are sure that your product data does not already exist in the store.
- Use the "Ignore products matching on following fields" option if you want to skip the import of products that may already exist in the store. You must select at least one match field from the list. When this option is used, each product imported will be checked to ensure that a duplicate does not already exist. -
Click the NEXT>> button to continue.

-
DataFile: Select the product data file from the server directly, or upload a new one if the size is less than 4096 KB. The data file must be formatted for CSV. You may compress the .csv file into a .zip file to reduce the size.
- Use the "Upload CSV File" option if your file is on the same computer you are using, and you wish to upload the file to the server.
- Use the "Select From Server" option if your file is already located in the folder where AbleCommerce is looking for data to upload. This location is \App_Data\DataExchange\Upload\. You must use this option if your product data file is larger than 4096 KB.
A CSV file is a commonly used term for a form of a file in which the names of the variables appear on the first line, and then below are all the cases (i.e. records), with each case on a single line and having a value for each of the variables, and with all the values and variables in text form and separated by commas (i.e. "Comma Separated Values"). Applications, such as Microsoft Excel, can be used to create a CSV file. If you are unsure of the formatting, then use the Export Products feature to create a sample.

Sample CSV product export and/or import file. -
Data Format: Select the text delimiter and text qualifier that matches your product data file.
- Text Delimiter options are comma ( , ) semicolon ( ; ), tab, or pipe ( | ).
A text delimiter defines the end of data part. (e.g. Name, 5.00, 6.00) where the comma is a separator for the product import fields.
- Text Qualifier options are quote ( " ) and apostrophe ( ' )
A text qualifier defines a value if you have a 2 words that are in the same cell. e.g. "import this description as one"
REQUIRED FIELDS: Required CSV fields include 'ProductId' and 'ProductOptions'.
If your CSV data contains new products then 'ProductName' and 'ProductCategories' fields will also be required.
To Import new products specify 'ProductId' value as zero.
For product specific fields like 'ProductName', 'ProductSku' etc. only first CSV record for that product will be used, data for all subsequent records for these fields will be ignored.
For a current list of all available product variant fields, you can create a sample product using all available variant fields, then export this product by going to Data > Export > Products/Variants page. Filter products, select the sample product, and then make sure to select the option "PRODUCT VARIANTS EXPORT". This will generate a CSV file with all available variant fields. -
Click the START IMPORT button and wait for the process to complete. If necessary, you can click the STOP IMPORT PROCESS button.

-
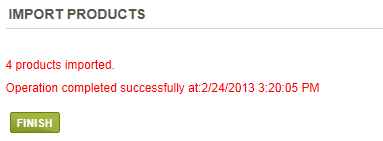
When finished, you will get a confirmation screen similar to the following. If there was a problem with the formatting of the data selected for import, then the error message(s) will be displayed here instead.
-
Click the FINISH button.
Import Existing Products
-
From the Data Exchange page, or from the top-menu, go to Catalog > Data Exchange > Import Products.

-
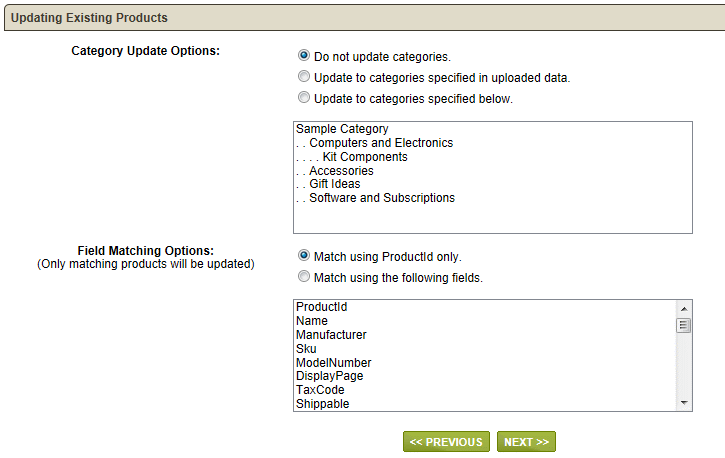
Select the "Existing products to update" option and click the NEXT>> button to begin.
-
Category Update Options: Existing products can be updated to use the same or different categories.
- Use the "Do not update categories" option if you will be matching the product data and do not wish to change the existing category assignment.
- Use the "Update to categories specified in uploaded data" selection if you are including new or existing categories with your product data.
- Use the "Update to categories specified below" option if you are going to select an existing category within the store. You must select at least one category from the list. -
Field Matching Options: This option will update your existing products by using the field(s) selected.
- Use the "Match using ProductID only" option if you are including the ProductID in your data import. This field will be used to determine which products are updated.
- Use the "Match using the following fields" option if you want to update products using one or more different match fields. You must select at least one match field from the list. When this option is used, only the matching products will be updated. -
Click the NEXT>> button to continue. From the next screen, you'll be able to select or upload your product data file to be used for the update. To avoid repetitive instructions, please follow Steps 5 through 10 in the section above named "Importing New Products".
Import New and Existing Products
-
From the Data Exchange page, or from the top-menu, go to Catalog > Data Exchange > Import Products.

-
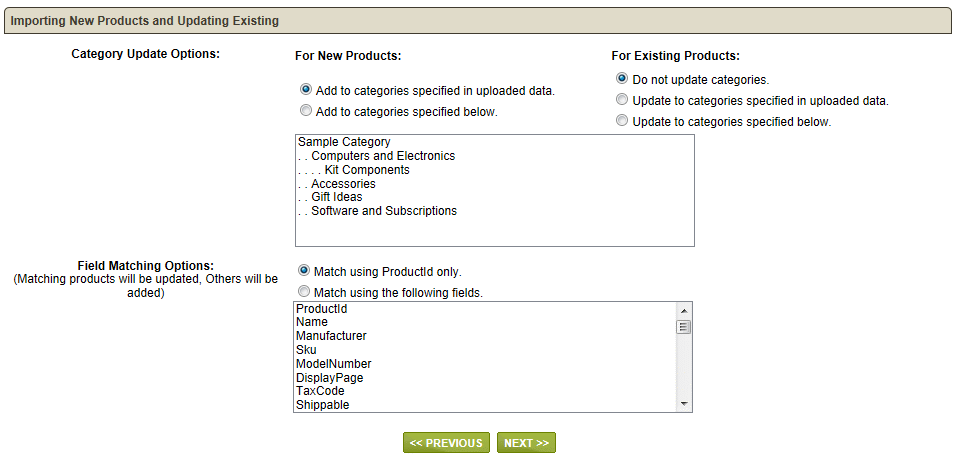
Select the "Both new and existing products" option and click the NEXT>> button to begin.
-
Category Update Options: New and Existing products can be updated to use the same or different categories.
For New Products:
- Use the "Add to categories specified in uploaded data" selection if you are including new or existing categories with your product data.
- Use the "Add to categories specified below" option if you are going to select an existing category within the store. You must select at least one category from the list.
For Existing Products:
- Use the "Do not update categories" option if you will be matching the product data and do not wish to change the existing category assignment.
- Use the "Update to categories specified in uploaded data" selection if you are including new or existing categories with your product data.
- Use the "Update to categories specified below" option if you are going to select an existing category within the store. You must select at least one category from the list. -
Field Matching Options: This option will update your existing products by using the field(s) selected. New products will be added.
- Use the "Match using ProductID only" option if you are including the ProductID in your data import. This field will be used to determine which products are updated.
- Use the "Match using the following fields" option if you want to update products using one or more different match fields. You must select at least one match field from the list. When this option is used, only the matching products will be updated. -
Click the NEXT>> button to continue. From the next screen, you'll be able to select or upload your product data file to be used for the update. To avoid repetitive instructions, please follow Steps 5 through 10 in the first section above named "Importing New Products".
Go to Site Map