|
The page allows you to add your store logo, set default sizes for your images uploads, and enable the product image lookup by SKU feature. AbleCommerce includes an automatic image resizer. This means you can simply upload a single, high-quality image, and AbleCommerce will automatically resize it to the three basic image sizes that are used in your store. This page allows you to specify the default sizes used when you upload an image for resizing.
The image lookup by SKU feature allows you to shorten the development cycle for your catalog by entering SKU's for each of your products. With this feature enabled, you can upload your images directly to the AbleCommerce server making sure to use the naming conventions specified below. AbleCommerce will automatically match the product to it's icon, thumbnail, and standard image. This eliminates the need to individually assign images to each of your products.
Upload your Store Logo
One of the first things you can do to personalize your store is to upload your own logo.
-
From the Logo and Images page, or from the top-menu, go to Website > Logo and Images.
-
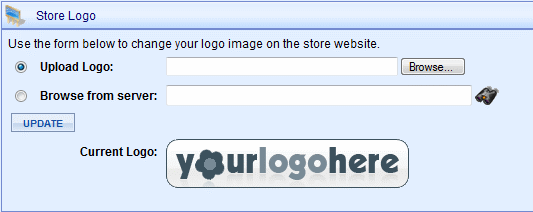
Find the Store Logo section as shown below.
-
The Current Logo will be displayed.
-
If you want to upload a new logo from your local PC, then select the Upload Logo option.
-
Click the Browse... button. A standard Windows explorer will appear where you will locate your logo file and select it.
-
The path to your local image will be displayed in the field.
-
If you want to select a logo that already exists on the AbleCommerce server, select the Browse from server option.
-
Click the search icon  to bring up the AbleCommerce Asset Manager. to bring up the AbleCommerce Asset Manager.
-
Find the image you want to use for your logo, click on the linked image name to view it, then click the PICK IMAGE button.
-
The path to the image on the server will be displayed.
-
Click UPDATE when finished. The Current Logo will change to your selection. You can now view the logo from your store's home page.
Default Image Sizes
When you upload an image, you have the option to automatically generate the icon, thumbnail, and standard image sizes. You can upload an image through the Asset Manager or from the product editing page.
|
TIP:
|
Image sizes are specified in number of pixels. To avoid distortion, you should use the same size for width and height.
|
-
From the Logo and Images page, or from the top-menu, go to Website > Logo and Images.
-
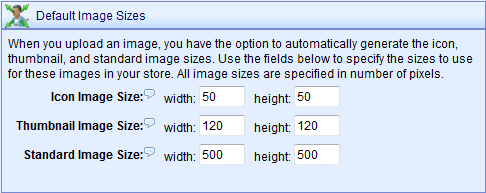
Find the Default Image Sizes section as shown below.
-
The Icon image is displayed in the mini-basket. If desired, enter a new width and height for the Icon Image Size.
-
The Thumbnail image is displayed on the category pages. If desired, enter a new width and height for Thumbnail Image Size.
-
The Standard image is displayed on the product detail page. If desired, enter a new width and height for the Standard Image Size.
-
Click the SAVE CHANGES button when finished.
Product Image Lookup by SKU
This is a powerful, but often overlooked, feature within AbleCommerce. When you activate this feature, you no longer need to assign images to your products. That is, of course, if you follow the naming conventions described below.
The expected format is:
|
TIP:
|
There are many graphics programs that can automatically re-size your images in bulk. Try to Google "image resizer" or use a professional program like Adobe's PhotoShop.
|
-
From the Logo and Images page, or from the top-menu, go to Website > Logo and Images.
-
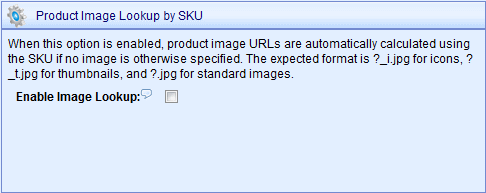
Find the Product Image Lookup by SKU section as shown below.
-
Check the box to Enable Image Lookup. This will not affect any products that already have image associations.
-
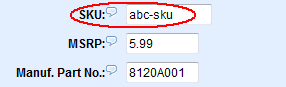
Make sure your product SKU's are entered and match the image name.
-
Using the above screenshot as an example, you should have 3 images named as follows:
-
abc-sku_i.jpg
-
abc-sku_t.jpg
-
abc-sku.jpg
-
Upload your images to the \Assets\ProductImages\ folder using an FTP program, or direct transfer from another computer.
-
Click the SAVE CHANGES button when finished.
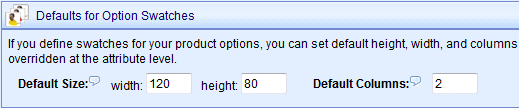
Defaults for Option Swatches
When you create products, you can also define options for those products. Additionally, each option can have it's own image. For example, you might have 9 different colors available for the same shirt. Instead of having to create 9 different products, you can create 1 product with 9 different options and each one having it's own small and large image. When a customer clicks on the smaller "swatch" image option, it will automatically display the large image for the option.
If you define swatches for your product options, you can set default height, width, and columns that will be used when displaying the images. The default values can be overridden at the attribute level.
-
From the Logo and Images page, or from the top-menu, go to Website > Logo and Images.
-
Find the Defaults for Option Swatches section as shown below.
-
The Default Size is 120 x 80. If desired, enter a new width and height for your product option swatches.
This value can be overwritten on a per-option basis from the product's options page.
-
You can specify the number of Default Columns that will be generated on the product display page.
For smaller images, you can set a higher value. For larger images, you should set a lower value.
-
Click the SAVE CHANGES button when finished.
|