Catalog > Product Options and Variants
Product Options and Variants
Add product options, or use variants for inventory control. Options and Variants are different in AbleCommerce depending on how you wish to use them.
What are the differences between options and variants?
OPTIONS - An option is a set of choices for the customer to select from. It may be something like Small, Medium, or Large. Options are the most simplistic variables of a product and do not have special inventory control or shipping requirements. An option may have it's own price, weight, or SKU. An option may also have it's own thumbnail and/or regular image to demonstrate different product styles or types to the customer.
VARIANTS - A variant is usually used when the product has more than one set of options. For example, the product may have sizes Small, Medium, and Large, and be available in colors Red, Blue, and Green. This example has '2 sets' of options with '3 choices' each, which in turn has created 9 different variations of the product. It is important to define all of your options and choices for a product before changing the variants.
Variants can be used by the merchant to establish the price and availability of a particular variant of the product. For example, let's say you are selling shoes. You have all variations of the shoe available except size 9 in the color white. You can uncheck the availability box for this particular variant, and it will no longer be available for purchase. The same thing applies for inventory. If a particular variant is out of stock, and you do not allow back-orders, then it cannot be sold to the customer. Variants also have support for model #, GTIN/UPC, dimensions, special handling charges, and inventory control where options do not.
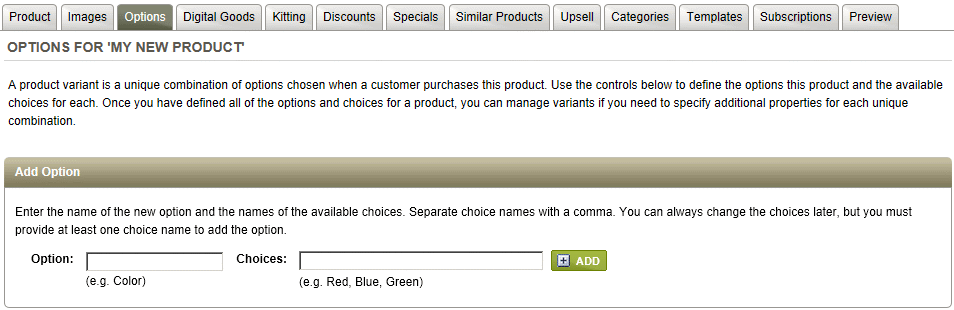
Adding new Product Options
-
From the Product Editing page, look in the left-column, and click on the Options tab.
-
The Manage Options page is a starting point for entering new options and selections for each. These are the Option Choices.
-
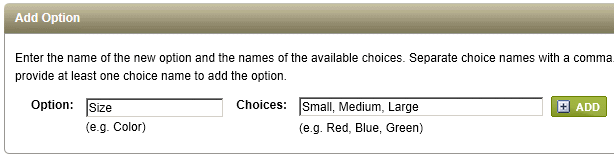
Enter an Option name and a list of choices for the option, separated by comma. You can add more option choices later.
-
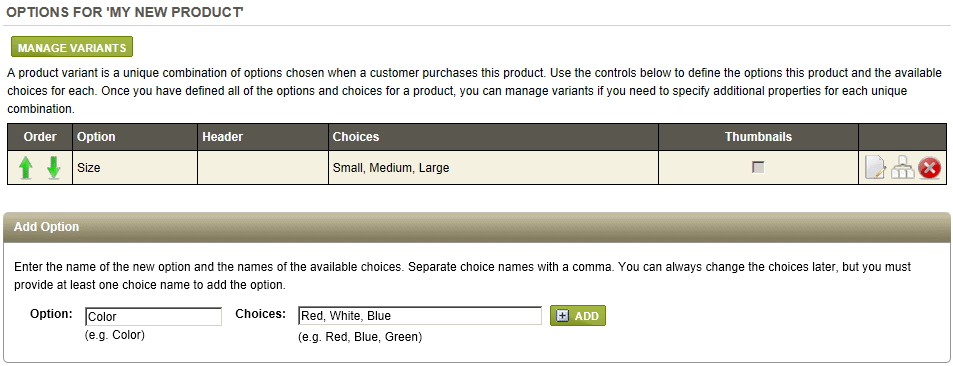
Click the ADD button to view the Manage Options page with your new Option shown with a list of Option Choices, as well as functions to edit and delete.
-
In the bottom section of the page, you can enter more options and choices in the fields provided.
Click the ADD button to create another option with choices.

-
In the first column, you can now sort each Option list by clicking the green up or down arrows.
-
Use the EDIT icon to view more option features available.
-
To remove an option and all of it's choices, click the DELETE icon.
Editing Product Options
-
From the Product Editing page, find the Options tab.
This is a continuation of the prior section, so the example below includes two options that have already been created.
-
Click the EDIT icon for any option. For this example, we'll edit the option name 'Size'.

-
In the first row, you'll see your Option Name in a field, so it can be changed if needed. This is a required field.
-
The Header Text is optional. This can be some text to prompt the user to make an option selection.
-
If you are using images for your option choices, then you can activate the feature by clicking Show Thumbnails. More information about using image swatches for your product options can be found in the Product Images topic.
-
When finished, click the SAVE AND CLOSE button.
-
Next, click the EDIT CHOICES icon for any option.
-
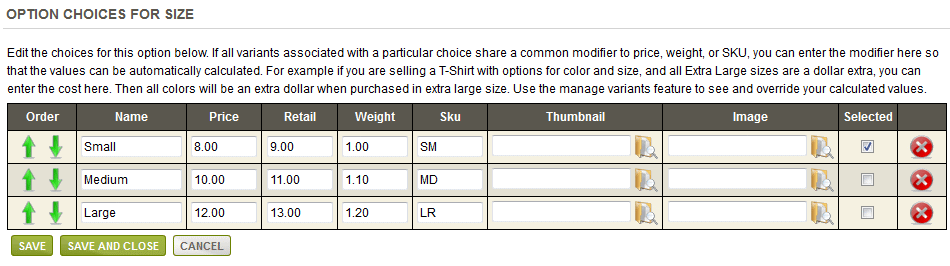
In the Choices section, each option Name will be shown in a sortable list. A name is the only required field for an option choice.
-
Click the green up or down arrows to sort your option choices.
-
A Price for each option choice can be entered in the fields provided. The option price you enter will modify the base product price of the product, if it is used.
-
The Retail price field is for display purposes only. If used, the retail price will be shown depending on the option selected.
-
The Weight of an option choice will alter the base product weight.
-
The SKU of an option can either stand on its own, or it will be appended to the base product SKU.
-
If you have the Show Thumbnails feature active, then you will need to use Image selector icon to select a Thumbnail and full size Image for each option choice.
-
The Selected checkbox can be used to designate which will be the default option choice shown to the customer. If none are selected, then the customer will be required to choose an option before purchasing the product. Only one option choice can be selected as the default value.
-
You can remove a single option choice by clicking the red DELETE icon.
-
Click the SAVE button after making any changes.
-
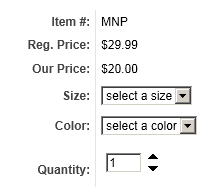
PREVIEW the product to see something similar to the following:
-
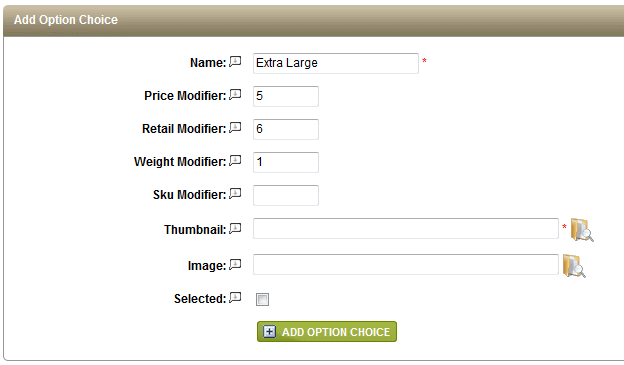
In the last section of the page, you can use the ADD CHOICE form to add more selections for this option.
-
The same option choice fields are available in this form. You can either enter the values now or enter them later after the new option is added.
-
Click the ADD CHOICE button when finished.
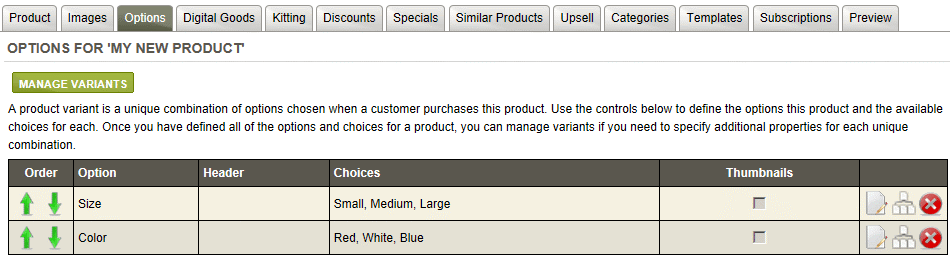
Manage Variants
-
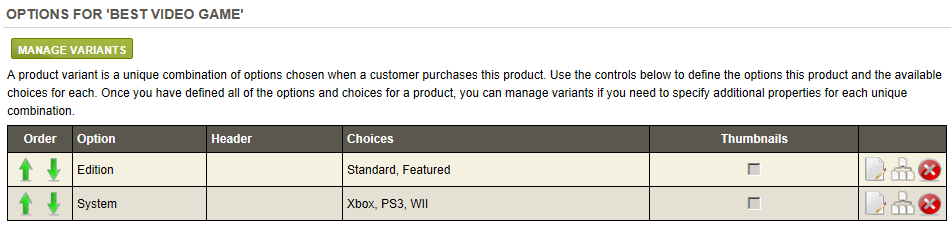
From the Product Editing page, find the Options tab.
The example below includes two options that have already been created.
-
Click the MANAGE VARIANTS button. This will bring you to page where you can manage the individual options created by combining all possible choices.
-
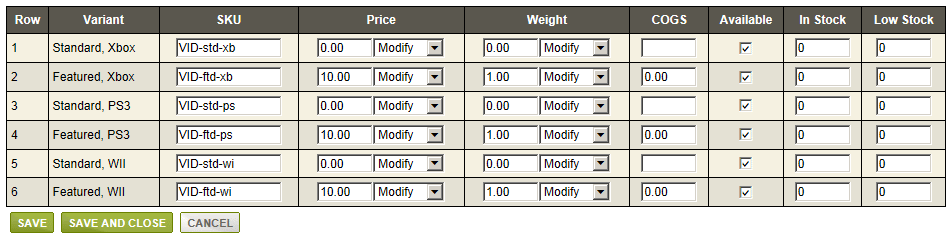
In the top section of the page, you can choose which variant parameters you wish to edit. This allows you to edit only the fields necessary and will maximize the amount of space you can use to enter information. Select the fields you want to edit and click the UPDATE COLUMNS button.
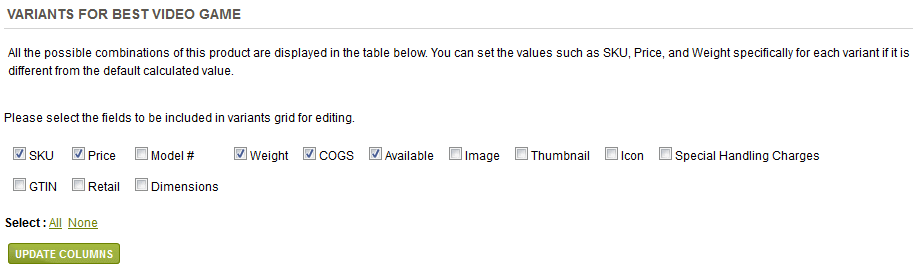
Your settings will be remembered and can be changed at any time. After updating, you will see only the fields selected above.
-
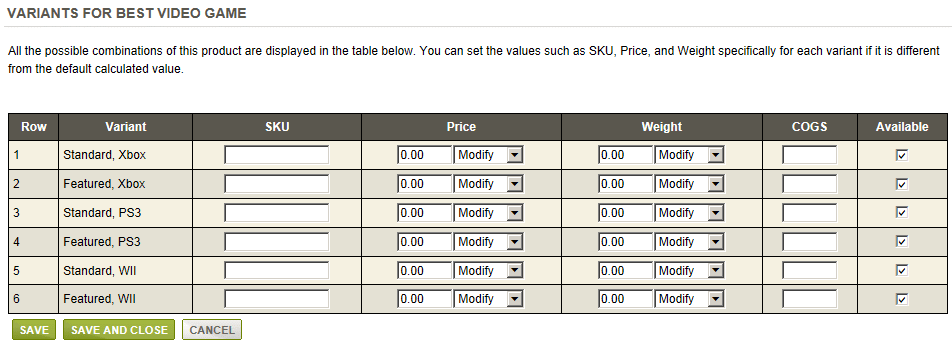
Notice in the example above, that all the fields have default values, or no value at all.
AbleCommerce has the ability to automatically create a combined SKU, and make price and weight adjustments. -
In the next example, we'll show you a more common, and automated approach to managing variants.
-
The total number of possible option choice variations are shown. If you have several variants, then you may see more than one page with navigation provided.
-
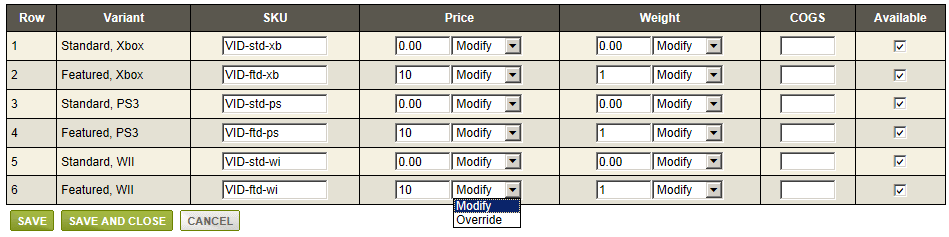
The SKU can be automatically generated, or you can enter a different SKU to override the calculated value.
-
If you enter a Price, then the selection to Modify or Override will be used.
Modify - the amount entered will be added to the base price of the product. e.g. Product Price + Option Price
Override - the amount here will be set as the price of the product. Any price entered for the product will be ignored. -
Similar to price, the Weight can be used to Modify or Override the base product values. Any 0 values will be ignored during calculation.
-
For report purposes only, you may enter a COGS (Cost of Goods Sold) for the variant.
-
The Available checkbox is active by default. If you uncheck any variant(s), they will not be available for purchase, so the option selections will not be displayed in the storefront.
-
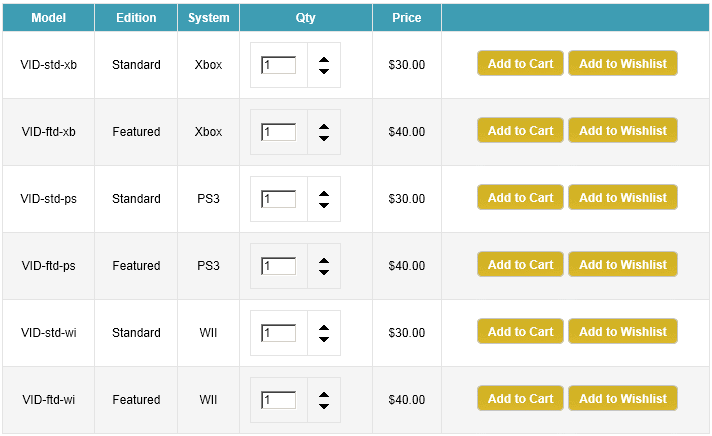
Click the SAVE button after making any updates. One example of a product page is shown below.
-
The Variants shown in this example were generated by using the base product and the option choices. Click the MANAGE OPTIONS button to return to the main options page. The screenshots that follow show the parts that were used to generate variant values automatically.
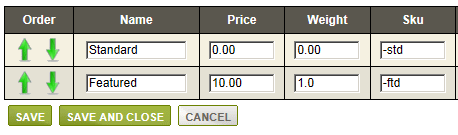
Two choices for the option named 'Edition'. The Std. version equals the base price of the product. The Featured version is $10 more than the base price of the product. The Featured version is also heavier than the base product weight.
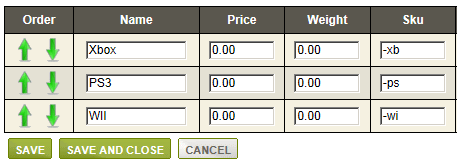
Three choices for the option named 'System'. The SKU's are incomplete, or partial because the product's base SKU will be used as well.
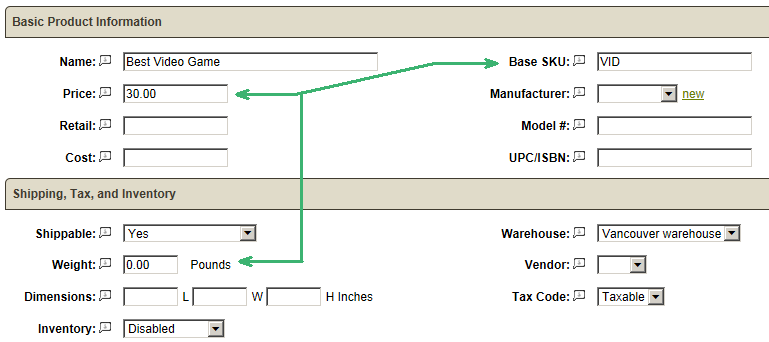
- The base product SKU is used to generate the complete variant SKU.
- The base product weight can be used with, or without, the option weights.
- The base product price can be used in combination with the option prices, or the option price can override this value.
If there is no price set for the product, then option pricing will be used alone.
Manage Inventory with Variants
-
From Product Editing page, find the section for Inventory Control.
-
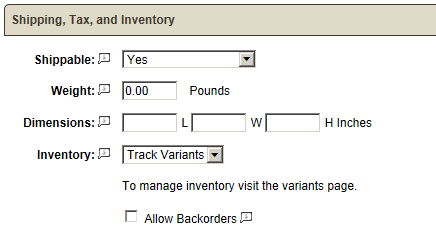
If the product has variants created, then the Inventory Tracking option to "Track Variants" will be available.
-
Select this option, and notice that an Allow Backorder option appears. If you check this box, then inventory levels will not be enforced, and customers can purchase more than the amount available.
-
Click on the Options tab.
-
Click on the MANAGE VARIANTS button to view the unique variants for the same example we've been using.
-
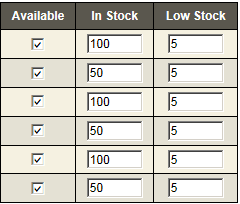
In the far right columns, you'll see two new fields for inventory use.
In Stock - this is the actual number of the item that is available to sell and ship immediately.
Low Stock - this number indicates when a low stock threshold has been reached. The Low Inventory email notification is triggered by this event. -
After activating the Inventory Control feature, you must add stock or the items will be unavailable for purchase.
-
Click the SAVE button after making your stock updates.
-
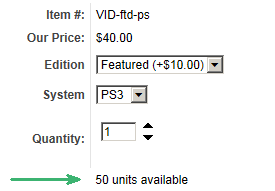
In this example, the number of units available is shown, but only after the user has made his/her selection.
-
Remember, the Available setting can also be used to make an out of stock item unavailable for viewing.
Any option item that is not available for purchase, either by the setting or because it has no inventory, will be automatically removed as a choice from the product listing page. Likewise, if the option item became unavailable while it was in a user's shopping cart, then the item will be removed as long as the user had not already arrived on the final checkout page.
|
TIP: |
Low inventory levels can be replenished through the Manage > Inventory Levels page, from the main menu. Email notification of low inventory is automated. |
Google Feed Options
As per Google Feed Specifications, variants are a group of identical products that only differ by the options ‘color’, ‘material’, ‘pattern’, or ‘size’. Variant-level information is required only for products in the "Apparel & Accessories" category, and all related subcategories. By submitting variant products, you will help shoppers find what they are looking for more easily by either enabling them to navigate between the different product variations on a details page or helping them discover additional colors, sizes, patterns etc. for a given product.
To submit variants for your "Apparel & Accessories" products in Google feed:
-
Set the product's Google category to "Apparel & Accessories" or a subcateogry.
-
Mark the product to publish it as variants by checking the checkbox "Publish Feed as Variants" at product edit page.
-
Create options with names "Color", "Size", "Material" or "Pattern" to match the respective Google attributes as required.
-
Google feed requires you to submit specific images corresponding to each of variant that differ in ‘color’, ‘pattern’, or ‘material’. You can specify image url's from manage variants page.
-
You can also specify other details like availability, price, weight, inventory details and GTIN for each variant from the manage variants page.
Please check the Google Feed Specifications for more details.
![]()
Go to Site Map