Product Templates
Table of Contents Show
Managing Product Templates
Product templates can be used to collect custom information from the customer for a product or service. They can also be used to display common attributes that make it easier for the merchant to provide information about a product or service. There are two types of product templates, merchant fields and customer fields. A product template can use any combination of merchant or customer fields.
The merchant can use a product template to create a faceted search page where your customers can filter and shop by many different aspects that are defined for the product. For example, you can setup shop by fields for gender, price range, age, color, style, condition, or anything unique about the product that will make it easier for your customer to find exactly what they are looking for.
Using the menu, go to Catalog > Product Templates to view a page similar to the one shown below.
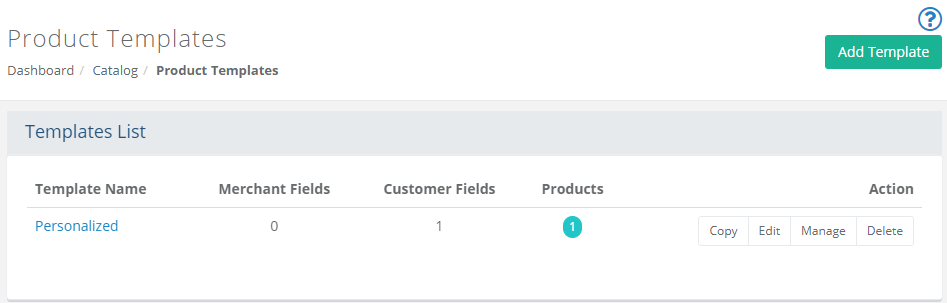
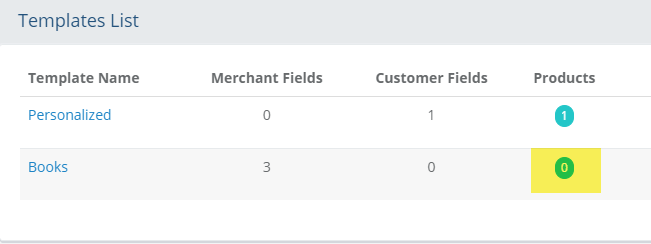
The Product Template management page displays the name of each Template Name, the number of Merchant Fields and Customer Fields for each one.
- In the Products column, a counter indicates the number of products that are associated to the Template. For products assigned to Templates that are using Merchant fields, this information is displayed within the Product Editing pages. For products assigned with a Template that is using Customer fields, the information is displayed within the product pages of the retail store.
- The Copy button creates a duplicate set of the selected Template and all of its input fields.
- To change the name of a Template, or if you want to edit/add Merchant and Customer Fields, click on the Edit button.
- Use the Manage button to create, edit, or remove the input fields that make up the product template.
- Click the Delete button icon to delete a Template, its input fields, and any product associations.
Add Product Templates
From the menu, go to Catalog > Product Templates.
Click the Add Template button from the upper-right corner of the page to view a pop-up, similar to the image below.
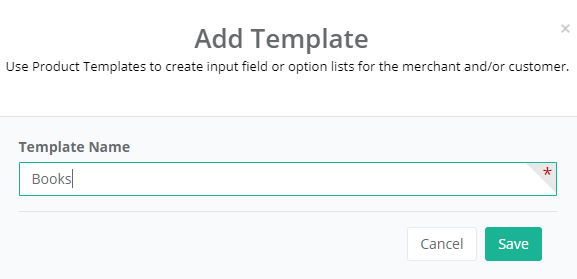
Enter a Name for your template in the field provided. This is for admin purposes only.
Click the Save button to create a new Template.
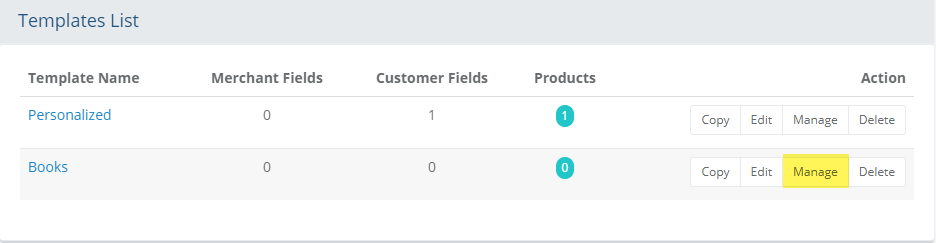
Your new template will shown on the Templates List page, as shown in the example below.
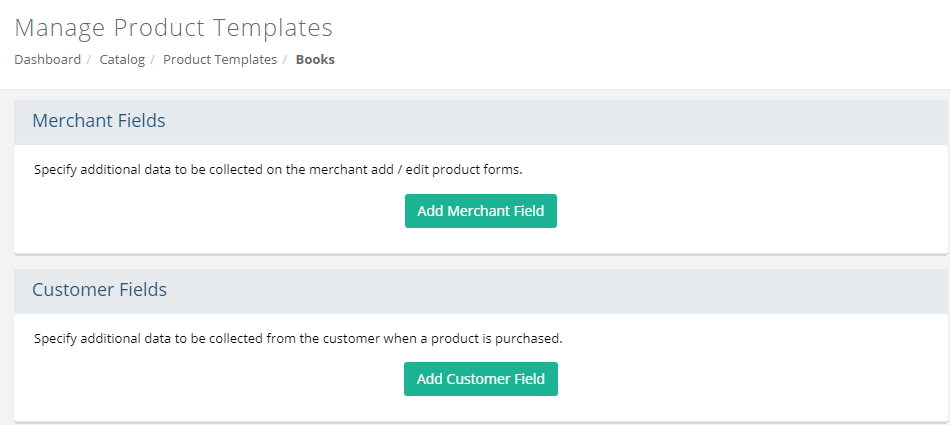
Click the Manage button to edit the template and add new input fields. The Manage Product Templates page for Merchant and Customer fields is shown below.
Product Template Merchant and Customer Fields
For each template, you can add Merchant and/or Customer fields to collect or display additional information about the product it is assigned to. Both merchant and customer templates have distinct and different purposes but are nearly the same when setting up.
See Add Merchant Fields and Add Merchant Fields using the Shop By Feature
See Add Customer Fields and Collecting Information with Products
Merchant fields collect information which can be used for two purposes:
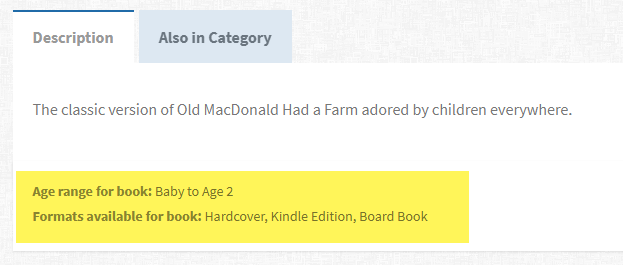
When a merchant field is assigned to the product, then additional information is shown and selected on the product editing page. This makes it easier for the admin to create custom fields and present data on the product page like in the example below.
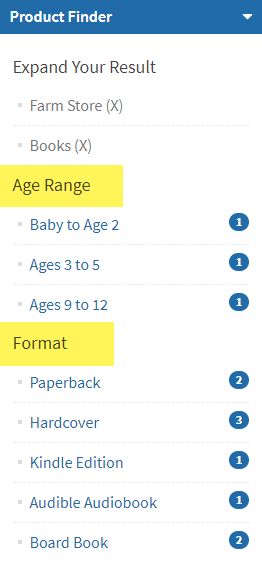
Additionally, the merchant can create product templates, using Shop By fields, that are used for the Product Finder search page or the Category Search Sidebar widget.
The Shop By feature is documented in the next two sections below.
Add Merchant Fields
A product template can include both merchant and customer fields for input by the admin or customer respectively. The merchant fields are used specifically to display information about the product.
After clicking on the Manage button for the Product Template you want to add merchant fields to.
Find the "Merchant Fields" section of the Product Template page, and click the Add Merchant Field button.

Take notice of the Input Type options. The different types are shown in the example below.
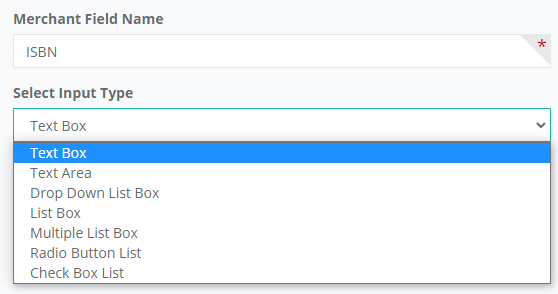
Each type of input selection will change the edit form accordingly. An example of each input type are shown in the sections below. For this example, we will use a text box input type.
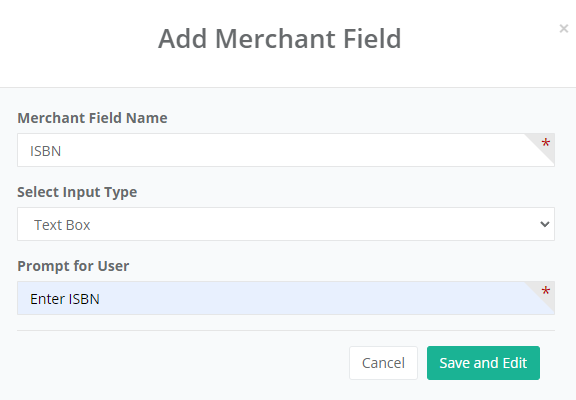
Enter the Merchant Field Name. This will be shown to customers and admins alike and should describe what data will be shown or entered.
From the list provided, Select Input Type to determine how data will be need to be entered and how it will be shown.
Enter a Prompt for User then click the Save and Edit button to view a page similar to the one shown below.
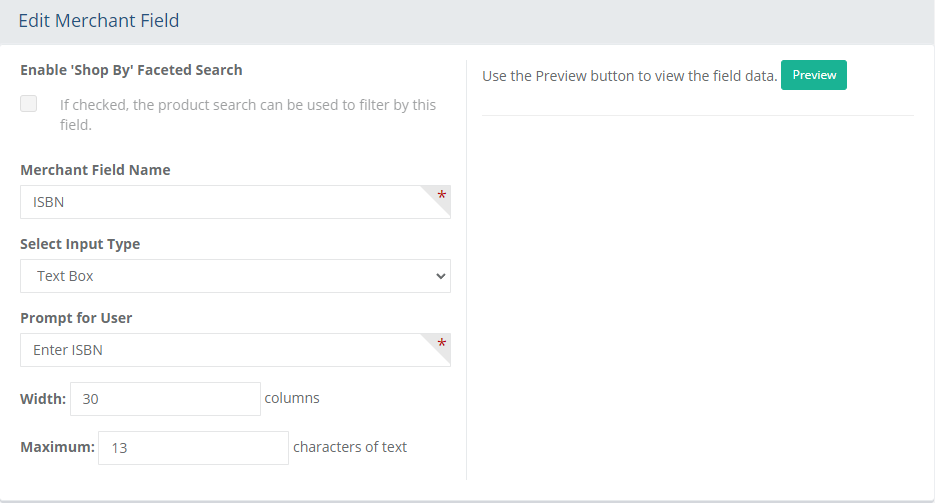
The Edit Merchant Field page will now appear and show some additional fields that can be used to further customize the input.
An option to Enable 'Shop By' Faceted Search will be available for any input type that has multiple selections. In this example case, an input type of Text Box will only use a single entry so this option has been disabled.
- Text Box and Text Area are the only two input options that are not valid for the 'Shop By' faceted search feature.The Merchant Field Name is shown and can be changed if needed.
Changing the Select Input Type will change the options and fields on this page because it is changing the type of input that will be used to collect or enter information.
The Prompt for User can be some text that will help the admin know what should be entered. This is not shown to the customer.
The Width field can be used to increase the size of the field used for input. This option does not apply to all input types.
The Maximum field can be used to limit the number of characters that can be entered into the field. This can be useful to make sure the data being entered is accurate for the field its used in. This option does not apply to all input types.
When finished, click the Save button.
Now, you can use the Preview button to see how this will look to the merchant from the product page.
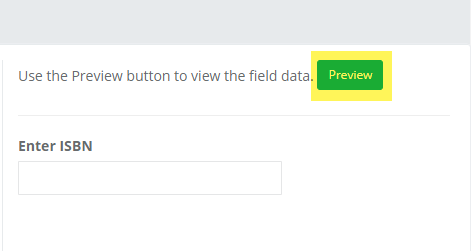
If the field looks correct, then click the Save and Close button to return to the Manage Product Template page.
Note: The field and data shown is not usable. The preview shows you how it will look from the product editing page.
Add Merchant Fields using the 'Shop By' Feature
For the 'Shop By' feature to be effective, it is recommended that you add as many fields and choices as possible to allow the customer to narrow down the search results to the products that most fit their buying requirements.
Find the "Merchant Fields" section of the Product Template page, and click the Add Merchant Field button.
Note: There is no real limit to the number of input fields that can be used with a product template.A pop-up screen appears as shown in the example image below.
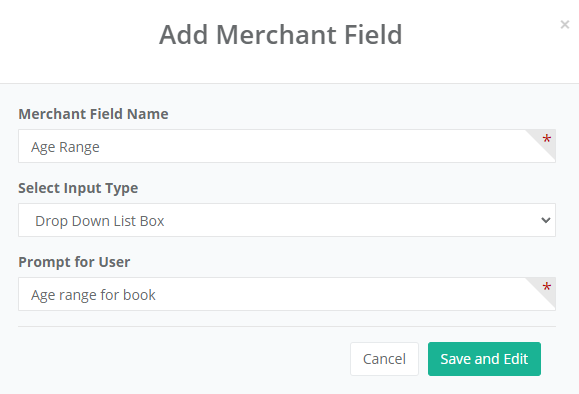
Enter the Merchant Field Name. This will be shown to customers and admins alike and should describe what data will be shown.
From the list provided, Select Input Type to determine how data will be need to be entered and how it will be shown.
To use the 'Shop By' feature, you will need to use one of the following input types:
- Drop Down List Box
- List Box
- Multiple List Box
- Radio Button List
- Check Box ListThe information entered into the Prompt for User field only appears for the merchant on the product editing pages.
Click the Save and Edit button to complete the template by adding required field choices.

Check the Enable 'Shop By' Faceted Search option so this template, when applied to multiple products, will offer additional filters that customers can use to find an item by using one or more of the input options available.
This option will be disabled for the input types: Text Box and Text Area.Click the Add Row button to add choices for this input.

Use the Name field to enter the first custom choice. This is the only field required.
Keep using the Add Row button to continue adding choices until finished.
In this next image, the field choices have been entered for an example Shop by Age field.
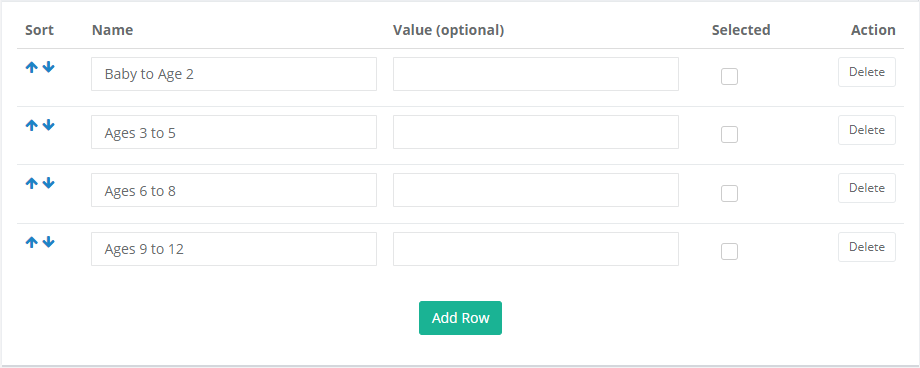
In the first column, you can use the blue up/down arrows to sort the choices. The sorting will appear this way for both the customer and the merchant.
The Name column can be changed as needed.
The Value column is optional. This information can be used for custom purposes. The information is passed as code.
The next Selected column is only applicable for the admin. This information will not be shown to the customer. To use, click the checkbox next to one of the choices and it will be selected when the template input is shown on the product editing page.
To remove any choices, click the Delete button.
When finished adding choices, click the Save button.
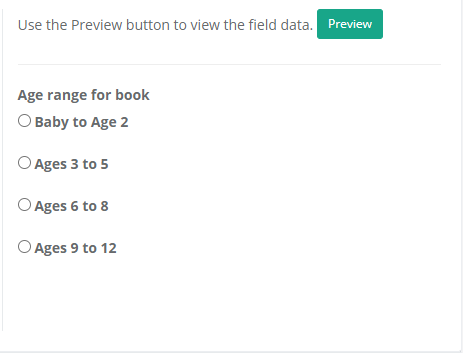
Now, you can use the Preview button to see how this will look to the admin from the product page.
Note: The preview shows you how it will look from the product editing page.
If the input type and options look correct, then click the Save and Close button to return to the Manage Product Template page and the Merchant Fields section is shown.
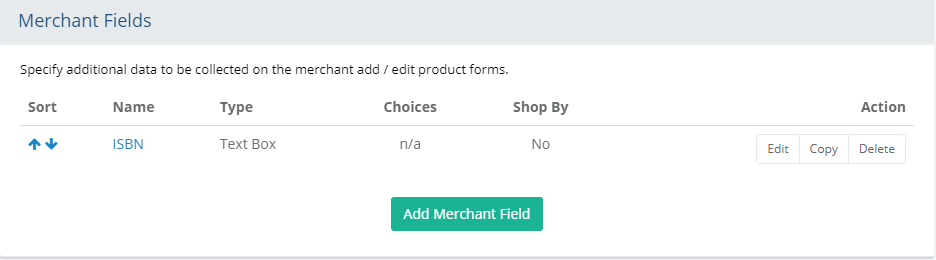
Manage Merchant Fields
From the Catalog > Product Templates page, find the Merchant Field you wish to manage and click the Manage button.
The example image below depicts Merchant Fields section for a product template.
Note: A single product template can include both merchant and customer fields.
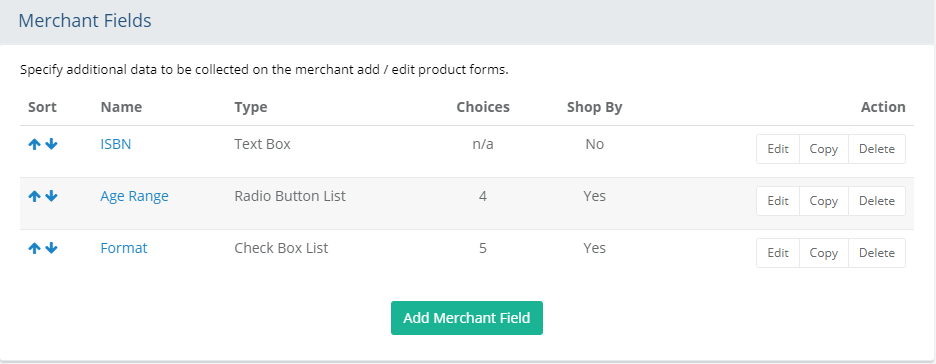
- In the first column, you can use the blue up/down arrows to sort the merchant fields. The sorting will appear this way for both the customer and the admin user.
- The next Name column shows the linked input field name. You can click the linked name to edit the field inputs and add options.
- The Type column indicates how the input choices or data is selected or entered.
- The Choices column indicates how many options are available for the input type. A text box will not include any choices.
- The Shop By column is used to indicate if the merchant field is being used for faceted searches on the storefront side.
- In the Action column, there are buttons to Edit the input field and its input choices, or Copy the field and all its choices, or Delete the field and any applicable choices.
Add Customer Fields
A product template can include both merchant and customer fields for input by the admin or customer respectively. The customer fields are specifically used to collect information for the purchase.
From the menu, go to the Catalog > Product Templates page.
Click on the Manage button for the Product Template you want to add customer fields to.
Note: For instructions on adding a new template, see Add Product TemplateFind the "Customer Fields" section of the Product Template page, and click the Add Customer Field button.
Take notice of the Input Type options. The different types are shown in the example below.
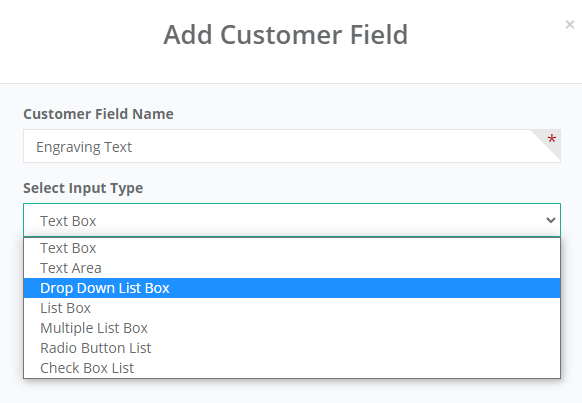
Each type of input selection will change the edit form accordingly. An example of each input type are shown in the sections below. For this example, we will use a drop down list box input type.
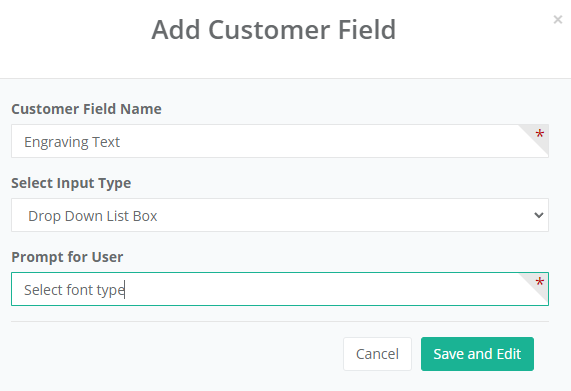
Enter the Customer Field Name. This will be shown to customers and should describe what data needs to be entered or selected.
From the list provided, Select Input Type to determine how data will be need to be entered or selected, and how it will be shown.
Enter a Prompt for User then click the Save and Edit button to view a page similar to the one shown below.
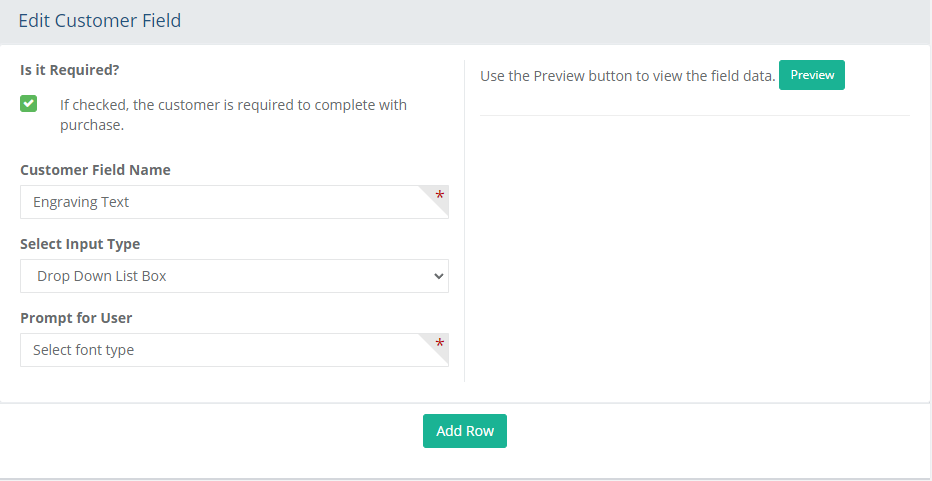
The Edit Customer Field page will now appear and show some additional fields that can be used to further customize the input.
For any input type that must be selected or included with the purchase, check the box for the Is it Required? option.
The Customer Field Name is shown and can be changed if needed.
Changing the Select Input Type will change the options and fields on this page because it is changing the type of input that will be used to collect or enter information.
The Prompt for User can be some text that will help the customer know what should be entered or selected.
When finished, click the Save button.
Click the Add Row button to add choices for this input.
Use the Name field to enter the first custom choice. This is the only field required.
Keep using the Add Row button to continue adding choices until finished.
In this next image, the field choices have been entered for an example Engraving Text field.
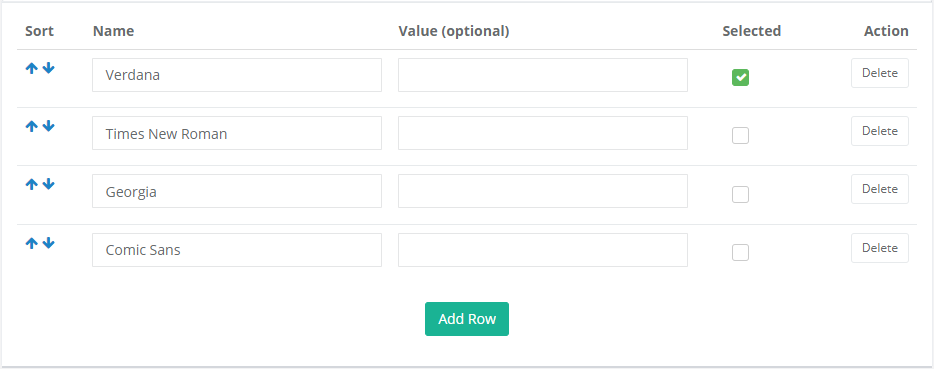
In the first column, you can use the blue up/down arrows to sort the choices. The sorting will appear this way for both the customer and the merchant.
The Name column can be changed as needed.
The Value column is optional. This information can be used for custom purposes. The information is passed as code.
The next Selected column can be used to make one of the choices selected when the template input is shown on the product page.
To remove any choices, click the Delete button.
When finished adding choices, click the Save button.
Now, you can use the Preview button to see how this will look to the admin from the product page.
Note: The preview shows you how it will look from the product page.
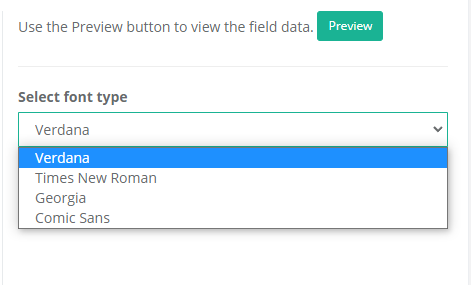
Note: The field and data shown is not usable. The preview shows you how it will look from the product page.If the input type and options look correct, then click the Save and Close button to return to the Manage Product Template page and the Customer Fields section is shown.
Manage Customer Fields
From the Catalog > Product Templates page, find the Customer Field you wish to manage and click the Manage button.
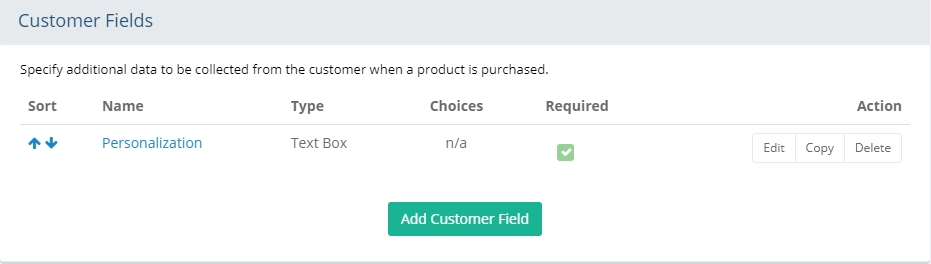
The example image below depicts Customer Fields section for a product template.
Note: A single product template can include both merchant and customer fields.
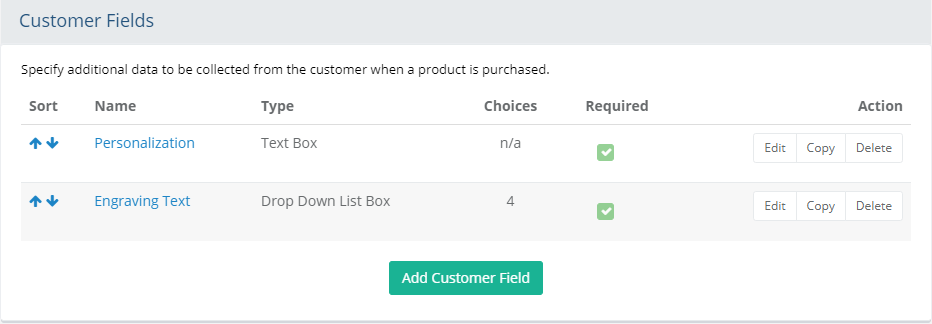
- In the first column, you can use the blue up/down arrows to sort the customer fields. The sorting will appear this way on the product page.
- The next Name column shows the linked input field name. You can click the linked name to edit the field inputs and add options.
- The Type column indicates how the input choices or data is selected or entered.
- The Choices column indicates how many options are available for the input type. A text box will not include any choices.
- The Required column is used to indicate if the customer must provide an entry or selection for that particular field.
- In the Action column, there are buttons to Edit the input field and its input choices, or Copy the field and all its choices, or Delete the field and any applicable choices.
Assigning Products to a Product Template
After creating a new product template, you can assign products to it. There are a few methods available:
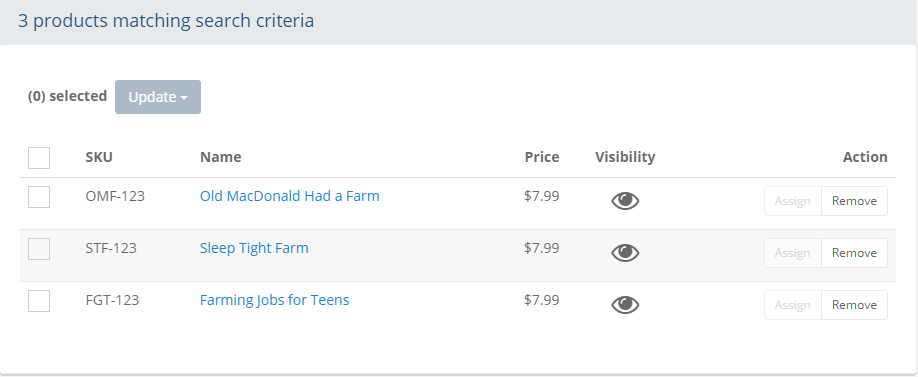
Search and Assign - to assign several products to a template, click on the linked number counter in the Products column for the template you want to assign.
Batch Edit - to change or update several products with different templates, go to the Catalog > Batch Edit > Products page and follow the instructions there.
Edit a Single Product - go to the product editing page, which is available from the Catalog > Products page. Select a product to edit. From the tab named 'Templates', click the button to Add Product Template.
Search and Assign Products to a Template
From the menu, go to the Catalog > Product Templates page.
To assign a Template to products, click on the linked number counter in the 'Products' column for the applicable template.
This will bring you to the Search Products form, which is similar to the one shown below.

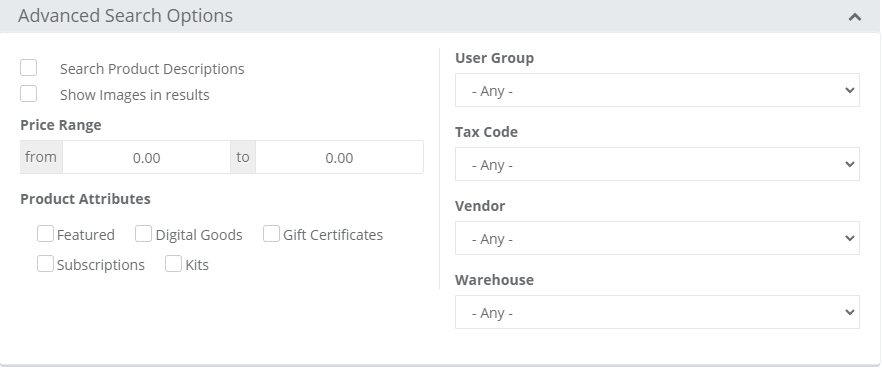
The top section provides common search fields and options that can be used to find a one or more products. If you want additional search options, then click on the Advanced Search Options header to expand a section with additional search criteria. Reference the sample screenshot below:
Using the search form(s) provided, find the products that will be assigned to the template selected from the prior page.
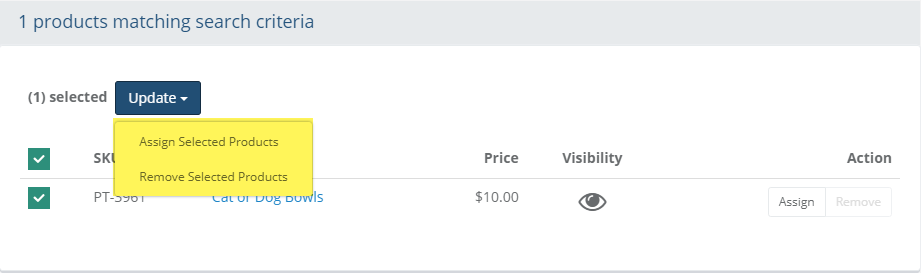
After entering the search criteria, press the Search button which will drop-down to provide 3 additional filters:
- All Products: results include all products regardless of their assignment to a template.
- Assigned Products: results include only the products that are assigned to the selected template.
- Unassigned Products: results include only products that are not assigned to the selected template.
By default, the search results show any products that are currently assigned to the selected template.
You can either use the buttons from the Action column to individually Assign or Remove product associations, or..
Check the box next to one or more products, or check the box at the top of the first column to quickly select all products in the search results.
This will activate the Update button, which will drop-down to provide 2 options: either Assign or Remove the selected products.
The update will take place immediately after selection.
When finished assigning products, click the Back button to return to the Product Templates page.
After assigning the Product Template, you will still need to edit the individual product and complete the inputs as needed. Follow the instructions in the next section.
Adding or Changing a Product's Template
From the Catalog menu, go to the Edit Product page for any product.
When you add or edit a product, the tab named Templates will need to be selected. As shown in the example below, this tab may be shown as a drop-down option from the More selection if the screen size is narrow.
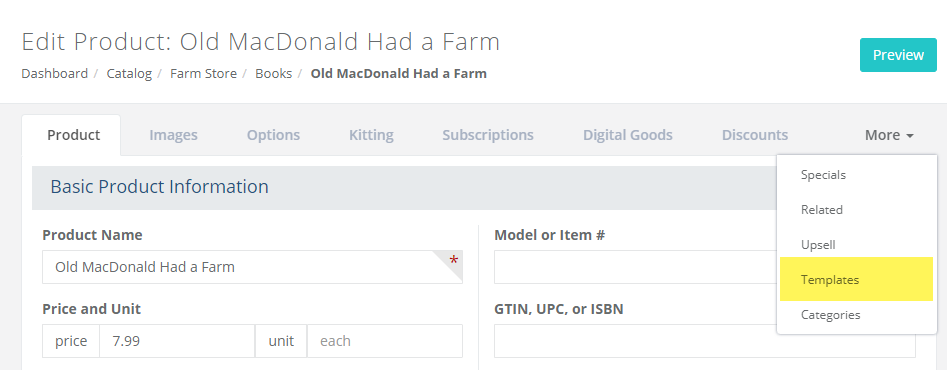
From the Templates tab, you should see a section where new templates can be assigned to a product.

Click the Add Product Template button to view a pop-up showing all the available templates that can be assigned.
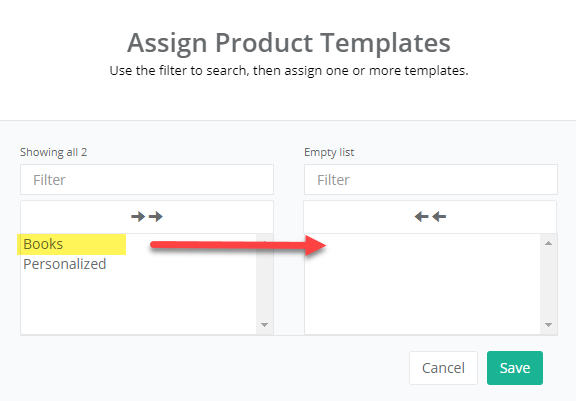
The left side shows all the templates available for assignment. Browse and select individual ones from the list. When you click on the template name, it will automatically assign it to the product and it will be shown on the right side.
The Filter field above the list allows you to search for a template by its name.
The button with double arrows allow you to move all templates from one side to the other.
When finished assigning one or more templates to the product, click the Save button.
Product Templates with Merchant Fields
After the template(s) is assigned, the screen will show the input selection(s) for any merchant fields of the template.
An example showing a template with merchant fields is shown below.
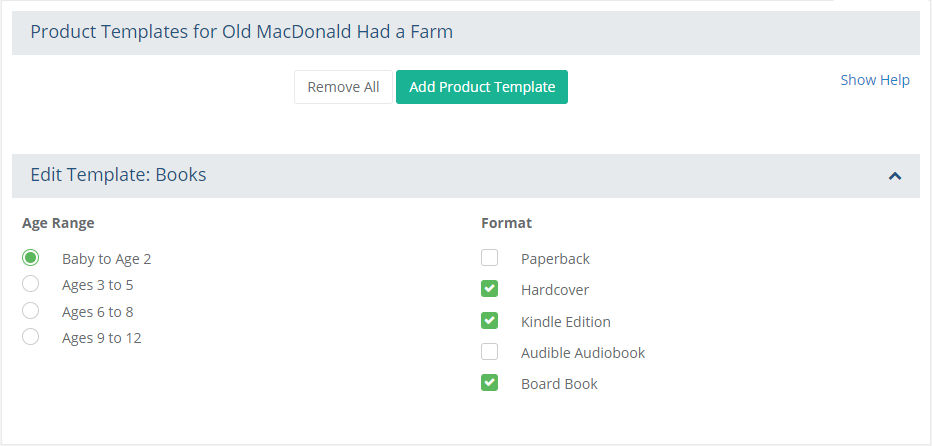
Choose options accordingly, or make selections depending on the type of input created with the merchant fields in the assigned template.
Click the Save All Template Data button when finished.
Product Templates with Customer Fields
In the case of having customer fields in a template that is assigned to a product, the admin can only view the field name(s) and type.
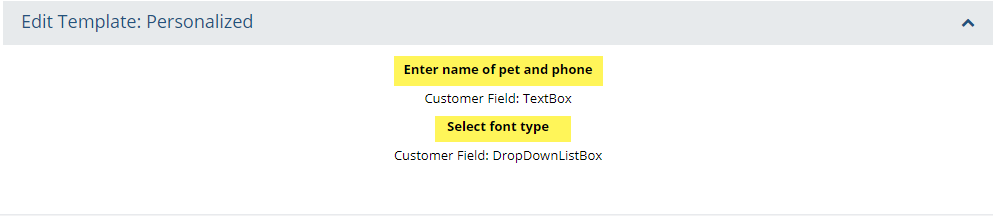
The actual field data being displayed and used is only from the product page represented from the store front.
An example showing a product with customer fields is shown below.
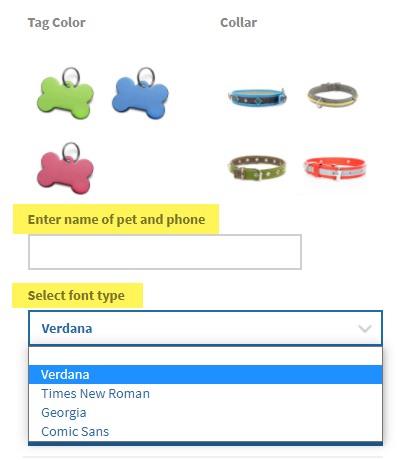
The customer can enter custom information into fields, or select from a list of data.
Upon purchase of the product, this custom information is collected and included with the order.

Product Finder page using 'Shop By' templates
In the example above, we assigned a template to a product and now that some input choices have been selected, the items will be part of the Shop By faceted search. From the storefront, find this page by going to Product Finder in the main store menu.
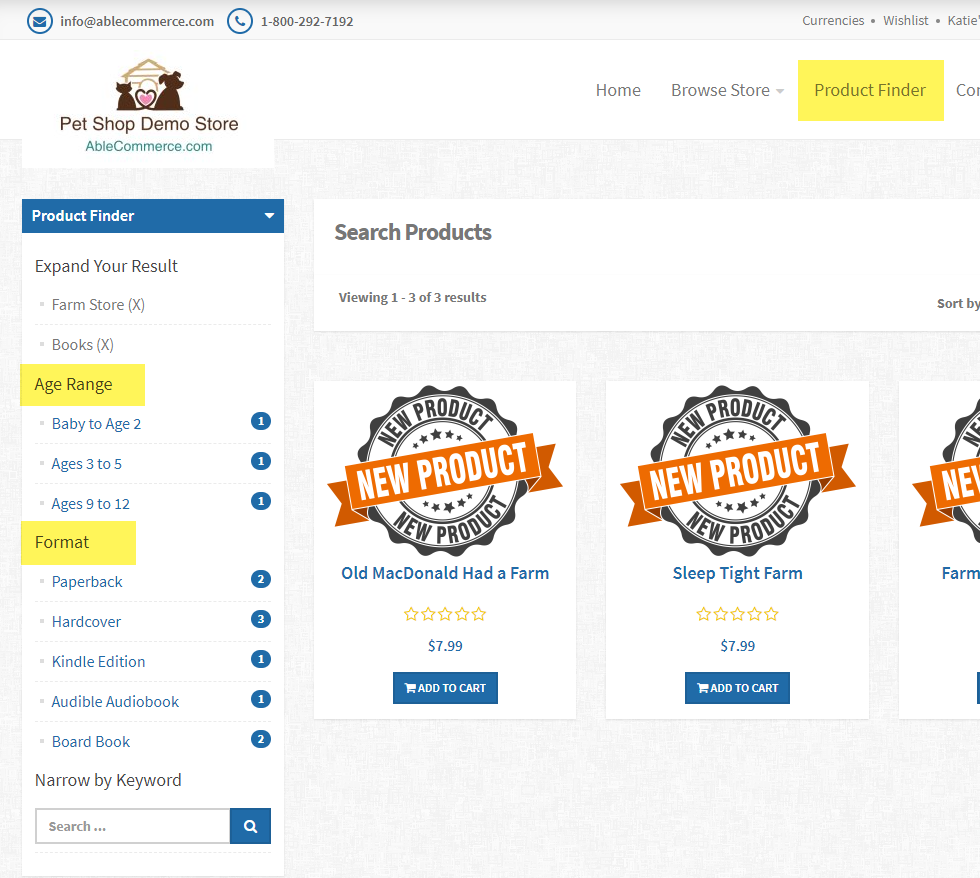
Now customers can use the Product Finder control to easily find the exact product that meets their needs.