ShipStation
Table of Contents Show
Features
Ready to save time & money on your shipping? Try ShipStation today and get all these features and much more!
Automatic order syncing with AbleCommerce software.
Super discounted USPS rates with included accounts.
Connect your own UPS, FedEx, DHL, & other carrier accounts to get your contracted rates.
Powerful, customizable tools to automate some decision points.
Customizable customer communication templates (e-mails, packing slips)
Before using the ShipStation feature within AbleCommerce, you must sign-up through www.shipstation.com to get started. They offer a free trial.
Note: You must connect
ShipStation to a valid account for UPS, USPS, and/or FedEx. Please
have this information available before beginning.
![]()
Getting Started with ShipStation
Before beginning, make sure you have created an account through ShipStation.com. Keep in mind that the instructions and screenshots taken below can change over time. If you need assistance creating a ShipStation account, please contact them directly.
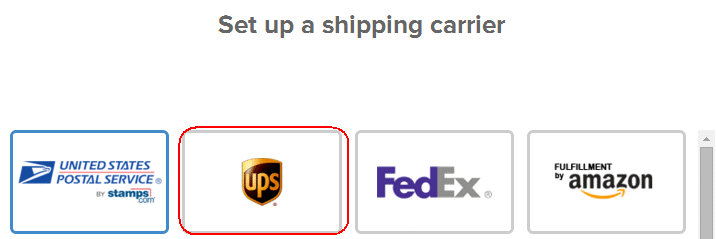
STEP 1: To begin, select the ShipStation option as shown in the screenshot below. This is the "Set up a Shipping Carrier" option in the middle. Click the green button to 'Set up a carrier'.

STEP 2: In the next step, you will need to select the Shipping Provider you wish to use with AbleCommerce and ShipStation. You may select more than one, but for this example, we will be using the UPS provider. You should make sure that AbleCommerce is using the same providers as ShipStation.
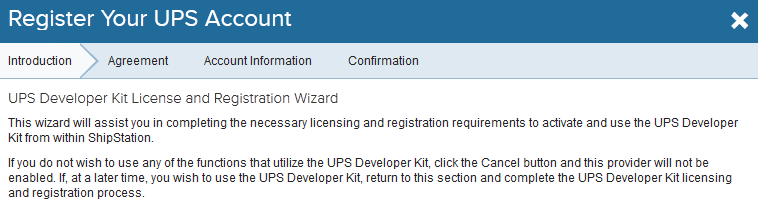
STEP 3: ShipStation
has a wizard which will help you register your account with UPS.
Each provider might be different, so follow
the instructions provided by ShipStation to complete this
process. Repeat for each shipping provider you plan to use.
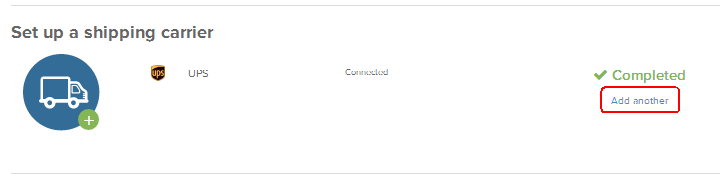
STEP 4: When finished, you should be automatically brought back to the getting started page and have confirmation that the account is successfully connected to your shipping carrier.
If you have additional shipping carriers to setup, you can click the "Add another" link to do that now. At any time, you can add additional carriers by going to the Account Settings > Shipping > Carriers & Fulfillment > Add a Provider Account page.
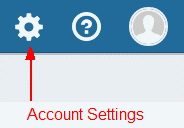
STEP 5: The next
section of getting started will require that you setup your account
settings. Please click the gear icon in the upper-right
corner of the ShipStation dashboard at any time to configure your
account.
Configure ShipStation and AbleCommerce
The account settings area within ShipStation has many features available. For the purpose of this integration, we will cover only the areas that are required for AbleCommerce to export orders into ShipStation. AbleCommerce does not support all features available in ShipStation.
STEP 1: Create your default Ship From Location
This should match the default warehouse address information that is configured through AbleCommerce.
- From the left-column menu of the ShipStation account settings page, open the "Shipping" menu item and click the "Ship From Locations" link.
- Enter your default ship from location. For all orders
that are imported, the default ship from (warehouse) location
automatically applies.
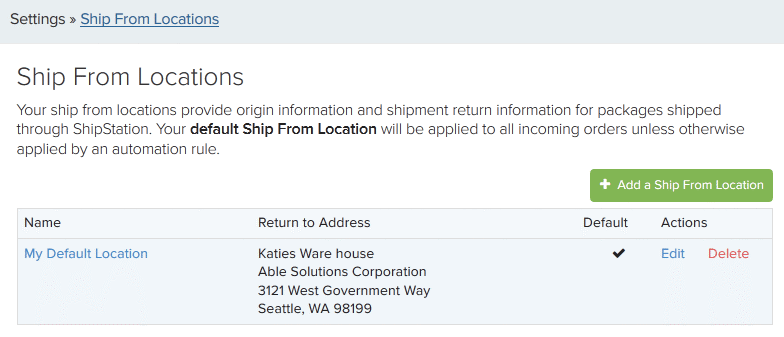
NOTE: If you have multiple warehouses locations, enter them
now. Then, refer to STEP 3 below for additional setup information.
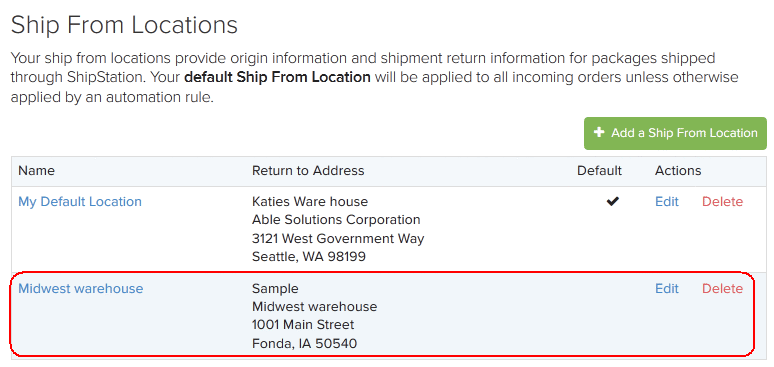
Multiple Warehouses - AbleCommerce does have the ability to support multiple warehouses through ShipStation's automation rule feature. However, it seems that some shipping providers like FedEx and UPS will only allow a single shipping origin through their shipper accounts. That said, the ShipStation application does not allow the merchant to setup different shipper accounts for each warehouse origin even though they do support multiple warehouses. This is a requested feature by other ShipStation users, so you should contact them directly for information on future development of this requested change.
STEP 2: Obtain the API connection keys
Click the API Settings
item from the left-column menu of the ShipStation account settings
page.
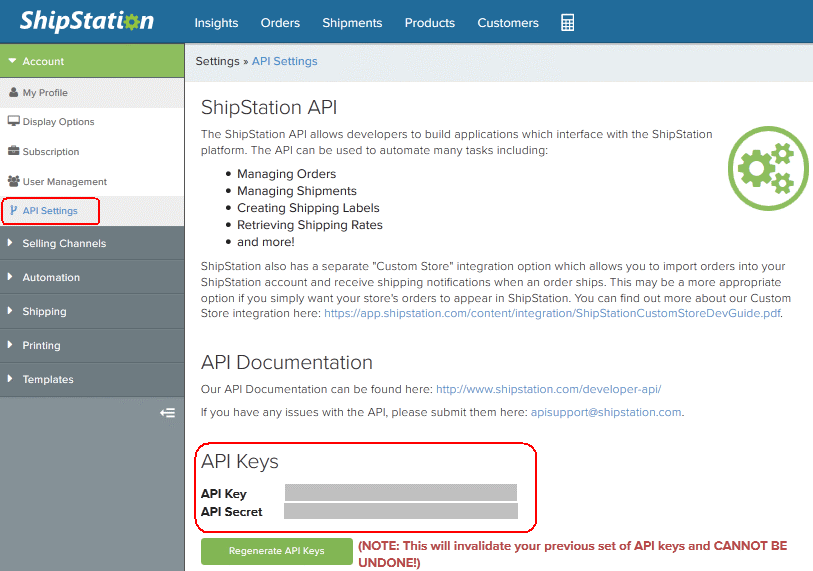
Two unique pieces of data will be required to connect AbleCommerce to ShipStation.
Generate the API Key, API Secret key.
This information is always available from the API Settings from the left-column menu within ShipStation. Make a note of this information because it will be used to configure AbleCommerce in the next step.Within AbleCommerce, go to the Data transfer > ShipStation > Settings page and enter all information as shown in the sample below.

Save this information to a secure location.
If you should ever need to change the API keys, then you will need to re-configure AbleCommerce.
Price Discounts (9.0.4 and higher versions)
The next section, Order Export Settings, can be used to send the order item prices with any discounts.

This is necessary when shipments are going through customs and the amount of the order total needs to be reflected on the customs form.
To send the actual discounted price with the order, check the box Use Net Price for product line items
STEP 3: Create Rule when using multiple warehouses (OPTIONAL)
Using multiple warehouses (ship from locations) will require that you create an automation rule within ShipStation.
This is one example of how you can create a shipping rule based on which states are designated for the orders being imported. ShipStation provides several options to create as many rules as needed to accommodate your shipping preferences.
From the left-column menu of the ShipStation account setting page, select Automation Rules.
Click the Create a Rule button.
Enter a Rule Name.
Select the option to 'Only apply these actions to orders that match specified criteria'.
Select the State option from the first field. Select Equals... from the second field. Then select the states which should be used for this filter.
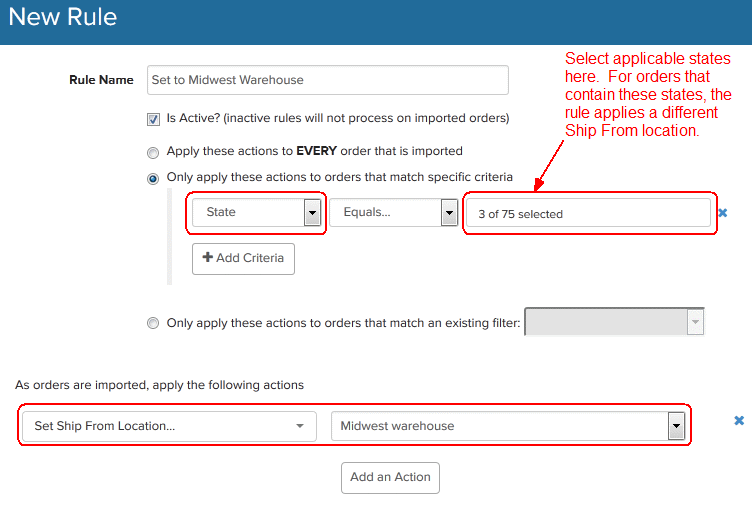
At the bottom of the form, set your import options by selecting 'Set Ship From Location...' and then pick the warehouse name that applies to this filter.
Save the Automation rule.
Again, this is one example of how you can create automation rules that are applied for your imported orders.
STEP 4: Map the shipping services (OPTIONAL)
This step is not required, but we recommend that you do it as you import orders. If you would like to map the shipping services in advance, follow the steps below.
From the left-column menu of the ShipStation account setting page, select Selling Channels.
Click the EDIT link in the Actions column for the store you wish to map services for.
Scroll down until you see the Service Mappings section.
In the example below, we have two service mappings established. Again, these can be created as you import your orders. It is not necessary to map the shipping services until you have orders ready to ship.
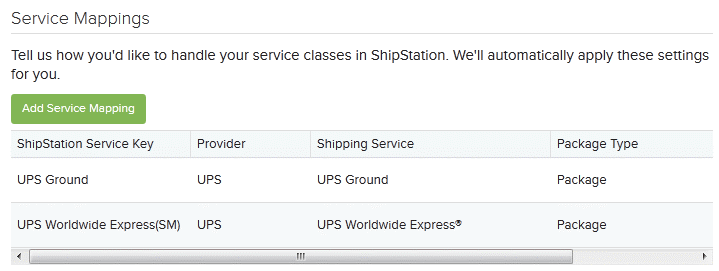
Click the Add Service Mapping button to view a page similar to the one below.
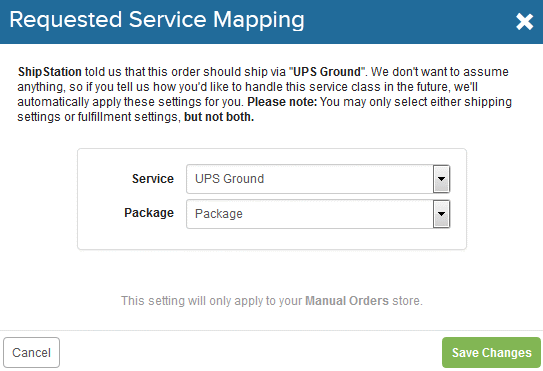
For each shipping method that is used within AbleCommerce, you will need to map it to the actual shipping service being used for the order.
For this reason, we recommend that you begin importing orders and map the services as you go.
The next steps to review are:
Publish Orders - Getting your orders from AbleCommerce to ShipStation.
Sync Statuses - Getting your shipments from ShipStation to AbleCommerce.