Add Vendor
A Vendor is associated to items in the store. The email address is used to send notification when an order is placed with items shipped or fulfilled by the Vendor.
Adding a New Vendor
-
From the Vendors page, or from the top-menu, go to People > Vendors.
-
From the right panel, enter the Name of your Vendor.

-
Click the ADD button to complete the new record.

-
The Name of the vendor is shown in the first field.
-
Enter an Email address for vendor notifications. Multiple addresses are supported in a comma delimited format.
-
Click the SAVE button when finished.
Assigning Products to a Vendor
After creating a new Vendor, you will need to assign products to the Vendor. Additionally, from the product editing page, you can select the Vendor for an individual item as well. The interface provided here on the Vendors page will make this step easy to complete.
-
To assign products to the Vendor, click on the linked number counter in the Products column.
-
This will bring you to a search form that looks similar to the one shown below

By default, you will see any Assigned Products that are currently associated to the Vendor.
Using the detailed search form provided, you will be able to easily find more products that can be assigned to this Vendor. -
Type in some search criteria, or select a filter, then click the SEARCH button.

In the results section below, you can check the top box in the first column to select all product results, or select individual items as needed. -
To associate product(s) to the Vendor, simply click the green PLUS icon in the Link column.
-
Or you may select one or more products using the checkbox, and then use the batch options to Assign or Remove Selected products to/from the Vendor.
-
You can remove the association by clicking the red delete icon.
-
When finished assigning products, click the CANCEL button to return to the Manage Vendors page.

-
After a Vendor record is created, you can edit information and (re)assign products by clicking the EDIT icon.
-
To delete a Vendor, click the red DELETE icon. Any associated products will be unassigned.
Additionally, you can assign a Vendor when editing a product.

Vendor Email Notification
The Vendor Notification is an email template included with the 'Basic Data' option when installing AbleCommerce software.
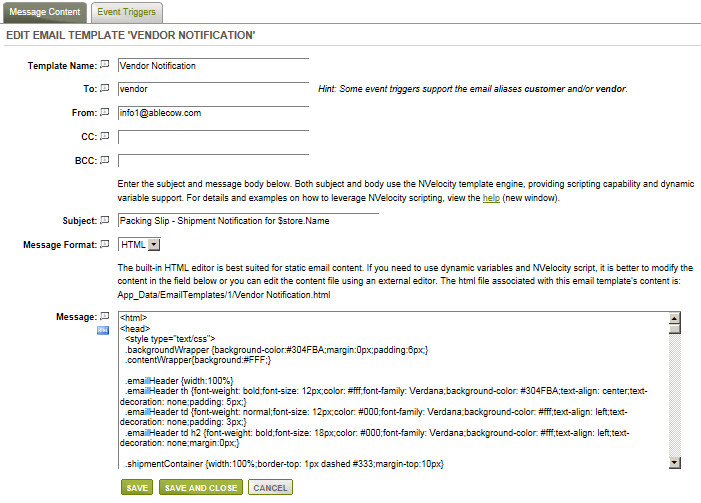
You can find the Vendor Notification template by going to Configure > Email > Email Templates from the Main Menu.

As needed, modify the sender, any recipient CC addresses, and subject and content.
|
NOTICE: |
The word 'vendor' is a system keyword, or email alias, and should be entered in the To field for notifications to work. |
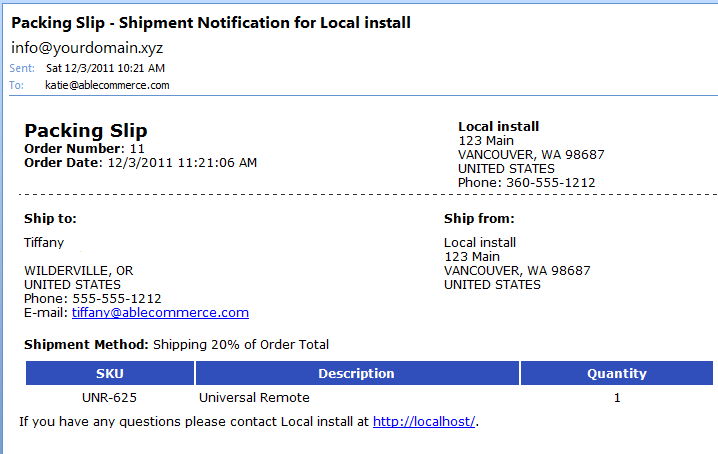
Sample of Vendor email (in html)
The screenshot below is a sample of the default Vendor notification. In the email, only items that are related to the vendor will be shown. If an order has multiple vendors, then an email will be sent to each vendor associated with item(s) in the order.

Vendor Event Triggers
The event trigger(s) determine when the email will be sent to the Vendor. This can be customized as needed.
-
To find this page, go to the Configure > Email > Email Templates menu.
-
Find the email template named "Vendor Notification" and click to edit.
-
From the Edit Email Template page, click on the Event Triggers tab to view a page similar to the following.

-
The Vendor Email template, by default, will be sent when either Event condition occurs:
- The Order with Shippable Items was Fully Paid
- The Order without Shippable Items was Fully Paid -
The Vendor Email template supports two Email Aliases, Customer and Vendor. These keywords can be used in the template's recipient fields to send an email to the related customer, or vendor for the products in the related order.
-
The Vendor Email template supports NVelocity Variables, $customer, $order and $payments. These are available to you when using dynamic information within your email content.
-
If desired, change the Event Trigger by checking the box next to the event(s) that should send the email.
-
Click SAVE when finished.
|
NOTICE: |
Even though email templates can have more than one event selected, rest assured, only one email will be sent to the recipient. |
Go to Site Map