Configure > Email
Email Settings
AbleCommerce's email system can send notifications when events take place, or by using certain features of the program. Features like digital delivery and mailing lists have their own way of using email templates. The other kind of email that is sent happens automatically when certain events take place. These events are called Triggers in AbleCommerce. For example, the Order Notification email is sent automatically using the event trigger "Order Placed". There are many triggers available and the email templates can be modified to suit your business needs.
All email templates can be conveniently managed from one location. AbleCommerce includes 16 pre-configured email templates. All you need to do is change the email addressing and modify the content, if you want.
For more information, see Email Templates
The Email Settings page has a few default settings and a place to connect to your SMTP email server. All email systems engage as soon as you add your email server settings.
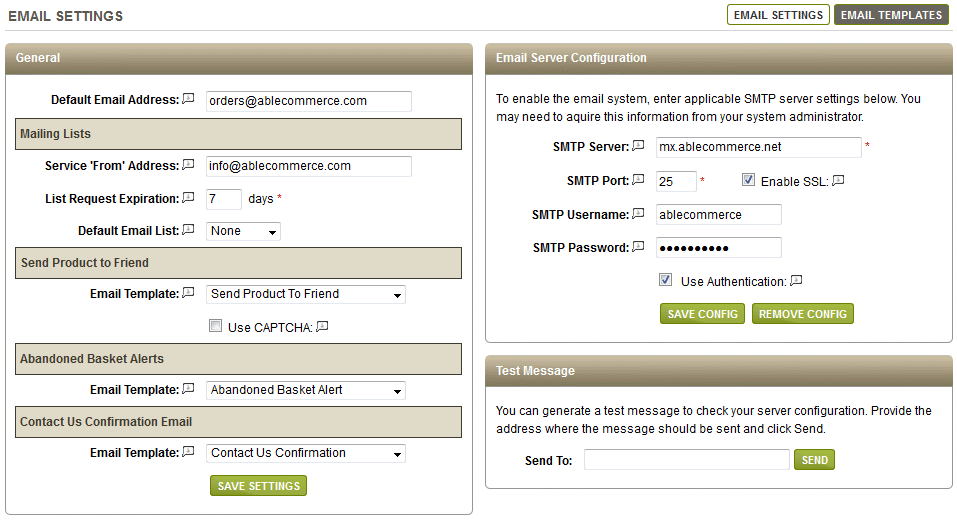
In the left section, you will find the General section. This is where you will designate the default addressing for your email templates. You will also be able to setup default values for your mailing lists and other features.
In the right section, are the Email Server Configuration settings. You will need to enter your email server IP address or domain, and a port number. Make sure the port is open for two-way communication between the server AbleCommerce is running on and your email server.
General Email Settings
The settings apply to new email templates. Any changes will not affect existing templates.
-
Go to Configure > Email > Settings using the top menu.
-
Find the General section on the left side of the page.
-
In the first field, enter the Default 'from' address. This value can be designated by using the $merchant keyword in your email messages.

This is the address that will appear in the from field of your email messages using the $merchant variable. You can always alter the from address on a per-message basis. -
In the next section, Mailing Lists, enter the Service 'From' Address.
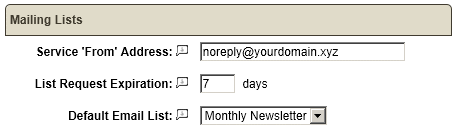
If you configure mailing lists, this is the email address that will be used for opt-in confirmation and/or verification service messages. If no value is provided, the default from address above will be used.
It will also be the from address for some generated system messages. It is recommended this be set to some unattended email account. -
If needed, change the value (days) in the List Request Expiration field. By default, 7 days is used.
Used with the Opt-in Mailing List with Verification option. This is the number of days a customer has to verify the request before it is considered expired and removed from the database. -
Select an email for the Default Email List. There are no mailing lists created by default.
This is the default email list for your store. If you allow anonymous users to signup for your mailing list, this is the one that will be used.
To create a new email list, go to Marketing > Email Lists -
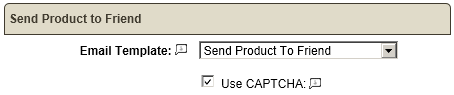
In the next section, select the email template that will be used for the Send to Friend Email feature. This is the template that is used when a customer uses the Send to a Friend email feature.
-
If you want to require the secure CAPTCHA feature, then check the box.
-
In the next section, you can select the email template that will populate the Abandoned Basket alert feature. This is not automated. You can access this feature by going to the Reports > Customers > Abandoned Baskets page.

-
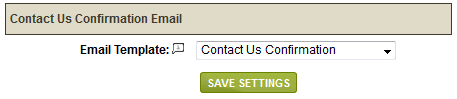
In the next section, you can select the email template that will be used for the Contact form. It is the email that is sent to the customer after they submit the Contact Us form.
-
Click the SAVE SETTINGS button when finished.
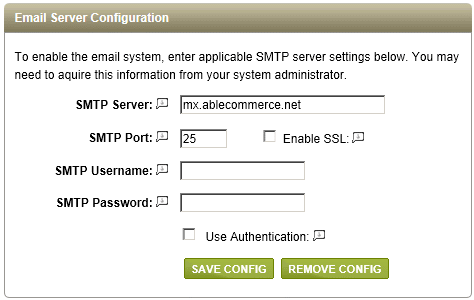
Email Server Configuration
You should enable email right away. It can be very useful for retrieving lost passwords!
-
Go to Configure > Email > Settings using the top menu.
-
Find the Email Server Configuration section in the right-section of the page.
-
In the first field, enter the IP or domain for the SMTP Server. (e.g. mail.ablecommerce.com)
-
Enter the SMTP Port for the email server. (25 is the default port for most email servers)
-
Check the box to Enable SSL if your server uses SMTP over SSL. This is not the same as having an SSL certificate on your website.
-
If your email server requires authentication, enter the SMTP Username and SMTP Password. in the fields provided.
-
Check the box next to Use Authentication, but ONLY if your email server requires it.
-
Click the SAVE CONFIG button when finished.
-
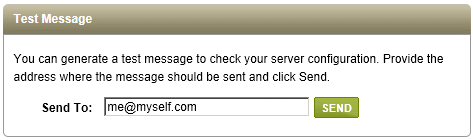
The page refreshes with the Test Message section and a Send To field. Enter an email address and click the SEND button.
-
If the communication was successful, then you will get confirmation on this page. If it was not successful, you can check your error log from the About > Error Log page. This attempted email should be shown with the responding error from the server.
If you are having trouble getting your email to work, consult with your email administrator. -
You can remove your email server settings by clicking the REMOVE CONFIG button.