Manage > Low Inventory
|
|
Manage Low InventoryWhen you enable the Inventory Management system, then AbleCommerce will begin tracking your inventory levels. This means for each order that has shipped or paid for an inventoried item, the stock amount will be depleted. If an order item is returned to inventory, the stock levels are increased. When you enter the initial stock level for an item, you can set the threshold for low stock notification. The notification can be sent by email, and it will contain a link to your Manage Inventory report. The Manage Low Inventory page is a tool for merchants to easily find any items that are low in stock (below the set threshold) and replenish the inventory levels on any item as needed.
|
Managing your Inventory Levels
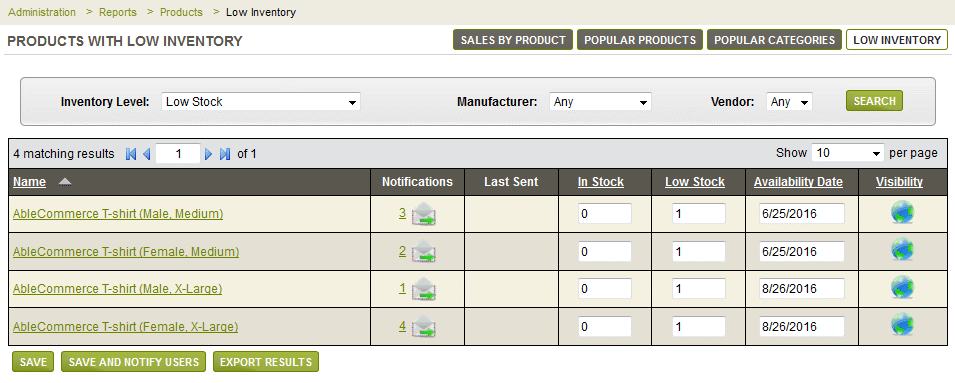
From the merchant administration, you can find any products that have low inventory levels by going to Manage > Low Inventory. This page will list out each product and the current stock level. In AbleCommerce Gold R9, we've added additional search filters so you can easily find products that need inventory management.
At the top of the page, you will have some search filters available:
- Inventory Level - select Low Stock items only, Out of Stock items only, or all items.
- Manufacturer - filter results by manufacturer, if available.
- Vendor - filter results by vendor, if available.
Restock Notifications
In AbleCommerce Gold R12, a new feature was added so you can enable inventory notifications for your customers. You will be able to notify your customers manually or send an automated email as new stock is added.
To use the Restock Notifications feature, you'll need to go to the Inventory Settings page and make sure that the Enable Inventory Management feature is enabled. Confirm the "Restock Notification" email template is selected and that your Notification Link is worded as you like.
Then, for each product, you will need to enable inventory control (product or variant tracking) and enable notifications. For more information on how to do this, see the "Product Shipping, Tax, and Inventory" section on the Add Product page.
Once inventory and restock notifications are enabled, the customer will be able to be notified when the product has 0 for In Stock level and the option to allow back-orders is unchecked or disabled. When this condition is met, then the customer will see a page that looks similar to this:
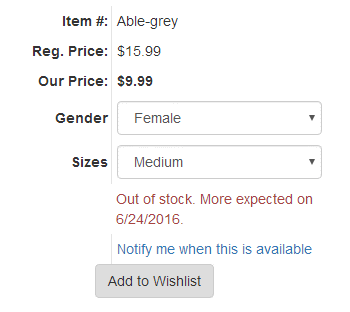
The customer can click the configurable link "Notify me when this is available" and enter a valid email address.
After the email address is entered, you will be able to view the Low Inventory report and see the number of persons signed up for notifications for each product. If you are tracking inventory with product variants, then each unique variant is shown with it's own notification list. In the example screenshot below, you can see a "Notifications" column with the number of customers who have signed up to be notified when the product is back in stock.
Sending Email Notifications
You can send inventory notifications through two methods. A manual method where you'll have the option to leave users signed up for notifications, or an automated option where you can notify and remove all users for any number of products that have been restocked.
To Send a Manual Notification
The manual notification feature would typically be used to send your customers an update on the availability of stock. For example, if there will be a delay in getting the product restocked, then this notification option should be used so the customer can remain on the notification list and receive future updates.
- You do not have to adjust the In Stock level to send the customer an update.
- If you want to update the In Stock level before sending a manual notification, make sure to use the SAVE button instead of the SAVE AND NOTIFY USERS button.
-
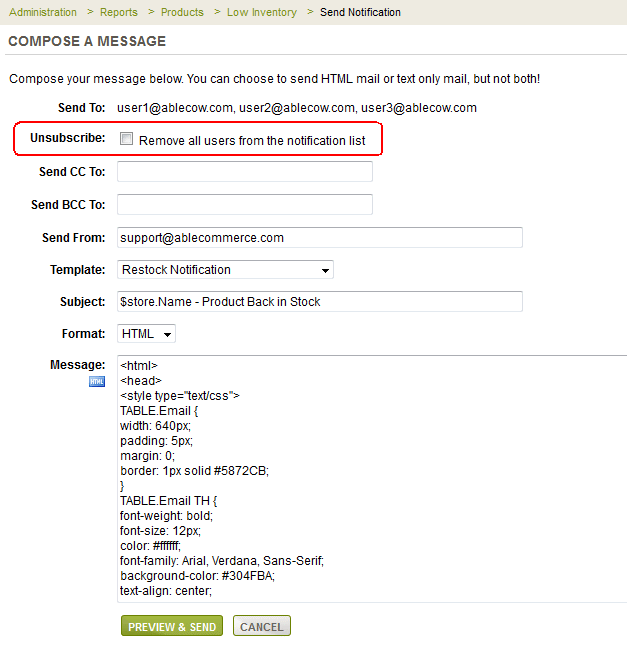
Click the send email icon or the linked number in the Notifications column next to the product that you wish to update.
-
Next, you will be on a page where you can send an email to the notification list. Note that the first row will show you all the email addresses that will be sent this email.
-
The second line has an option for you to remove all users after sending this email. By default, this is left unchecked so all the users will remain in the list for a future notification.
-
If your notification is to simply give the customer an update, then you may type a message into the field and send it. You can also choose from an existing template or use the "Restock Notification" template in the case where new stock has been added.
-
Click the PREVIEW & SEND button to confirm and finish.
To Send an Automated Notification
The automated notification feature would typically be used to send your customers an update when the inventory level of your products has been updated. For example, the warehouse received a shipment and several products are now back in stock. You can update all your stock levels and use the option to notify all users.
- Using this option will remove all users from the notification list. If you do not want to remove users from the notification list, then do not use the Automated Notification option.
-
Enter a value of 1 or more in the In stock column of the Low Inventory report results. Any number of products can be updated at the same time.
-
Click the SAVE & NOTIFY USERS button.
-
All users that had signed up for inventory notification for the product(s) will be notified and removed from the list.
Making Inventory Updates
To increase the inventory level of any product, enter a new In Stock value.
In the second column, you can modify the Low Stock threshold if you want to change when the notification of low stock is triggered.
You may enter the Availability Date, which is shown to the customer if the product does not allow back orders.
The product Visibility is indicated in the last column as a convenience to the merchant.
Click the SAVE button to update.
You may also Export these results in a CSV format.
For more information, see the Inventory Settings page for configuration options. You can also enable inventory tracking for a product or it's variants.
See Add Product for instructions on inventory management at the product level.