In this Topic Show
XML Sitemap
XML SiteMap is an XML file that lists URLs for a site along with additional metadata about each URL (when it was last updated, how often it usually changes, and how important it is, relative to other URLs in the site) so that search engines can more intelligently crawl the site. XML SiteMap has wide adoption, including support from Google, Yahoo!, and Microsoft.
Once you have created your Sitemap, let search engines know about it by submitting directly to them, pinging them, or adding the Sitemap location to your robots.txt file.
When you create a SiteMap, the SiteMap file is placed in your store's home directory. If the sitemap grows beyond 50,000 URLs, then multiple sitemap files are created along with a sitemap index file. Sitemap index file is always named as SiteMapIndex.xml.
For more information please visit www.sitemaps.org ![]()
Create your XML Sitemap
-
From the SEO page, or from the top-menu, go to Configure > SEO> XML Sitemap.
-
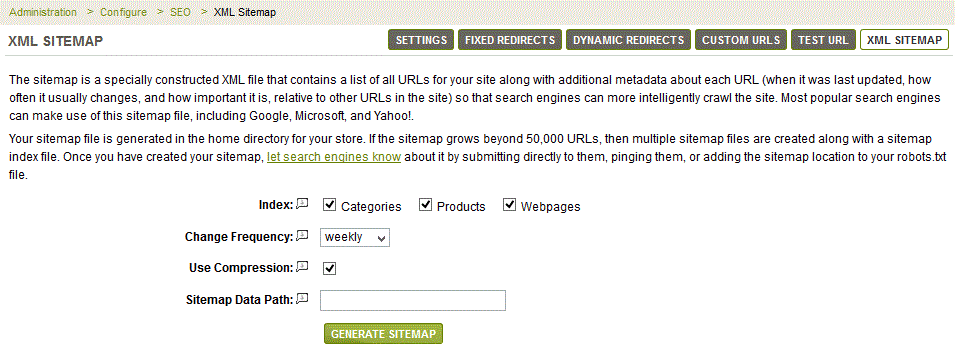
From the XML Sitemap page, you will see a variety of configuration options.

-
Select which URL's you want to include in your sitemap Index. The default is 'Yes' for all Categories, Products, and Webpages.
-
Select the Change Frequency. The default value is "weekly". Other values include always, hourly, daily, weekly, monthly, yearly, never. These tell the search engine how often to return to your site.
-
By default, the Use Compression option is checked. AbleCommerce supports compressed sitemap files that have a .gz file extension. It is typically used for large sized files. The default value is "SiteMap.xml.gz" and will only be used if the option to create a compressed sitemap file is active.
This setting will be ignored if sitemap grows beyond 50,000 URLs and multiple sitemap files are created. The file names will be SiteMap1.xml.gz, SiteMap2.xml.gz and so on. -
If you do not wish to use the default path for the Sitemap Data Path, or if your installation path should change, then you can use this field to enter a new path. Note that the path will not appear until the sitemap is actually created for the first time.
-
Click the GENERATE SITEMAP button when finished.
|
NOTE: |
If you have trouble with the sitemap file creation, then make sure the ASPNET user account (Network Service/Asp.Net) has write and delete permission to the root folder where AbleCommerce is installed. This is where the search engines are expecting the sitemap file to be located. |
Go to Site Map