Configure > Order Statuses
Configure Order Statuses
Order Statuses are used to create a systematic work flow for processing your orders. The Order Statuses can be triggered automatically by certain events, or used as a manual selection by the merchant. AbleCommerce comes with pre-configured Order Statuses that are designed for a simple fulfillment scenario. Of course, you will be able to customize the Order Statuses and create new ones, but for the purpose of this document, we shall use the default settings.
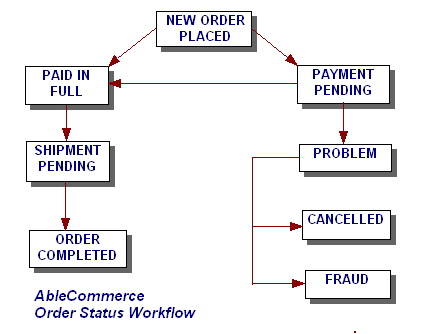
Order Status Work Flow
The illustration and steps below describe a typical fulfillment process using the built-in AbleCommerce Order Statuses.
-
A NEW ORDER is placed, the order status typically begins with PAYMENT PENDING (credit card authorizations do not qualify as paid orders). If you capture funds at the time of sale, then the order is PAID IN FULL and the status begins with SHIPMENT PENDING.
-
The merchant receives a payment, or captures the pending credit card authorization through AbleCommerce. The order status automatically changes to SHIPMENT PENDING.
-
The shipment is sent, any tracking numbers are entered, and order status updates automatically to COMPLETED.
-
If the credit card authorization fails, the order will be updated with a PROBLEM status so the merchant can quickly identify it.
-
The CANCELLED and FRAUD statuses can be used by the merchant and are not triggered automatically by events.
AbleCommerce includes four automated order statuses and two manual order statuses.
The automated type of Order Status change happens when an event occurs. These events are called Triggers and AbleCommerce has to know exactly when they happen, so it is not a configurable feature. A trigger can be an order being placed, an order that is paid, order that is shipped, etc. There are many triggers that are used for very specific purposes.
A manual type of Order Status is simply any named status that will appear for the merchant during the processing of orders. The status can do nothing more than be displayed to the customer and merchant. Or the status, when manually changed by the merchant, could send an email. What defines a manual type of order status is that it does not use triggers.
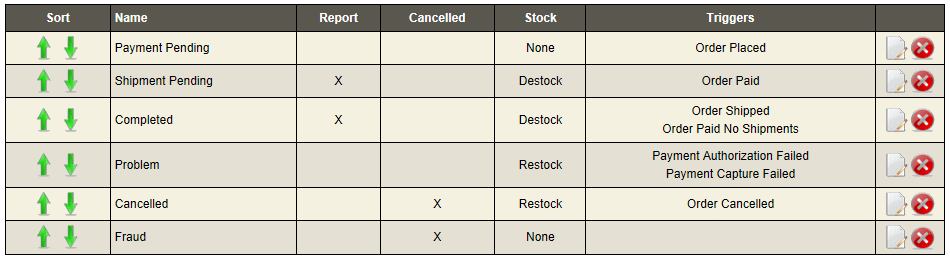
AbleCommerce pre-configured Order Statuses are:
-
Payment Pending - A new, unpaid order is placed. (An unpaid order can be an order that has a pending credit card authorization)
-
Shipment Pending - When an order is paid, and has shippable items, this will be the new order status.
-
Completed - After all shipments for an order have been marked as shipped through order admin, or when any non-shippable orders are paid, the order status changes to completed.
-
Problem - For credit card processing failures, the Problem order status is automatically assigned to those orders.
-
Cancelled - This order status does not use Triggers. The merchant can manually change the order status to Cancelled.
-
Fraud - This order status does not use Triggers. The merchant can manually change the order status to Fraud to help distinguish a fraudulent order from other orders.
See below how Order Statuses (in Status column) are used with the Payment and Shipment statuses. These tools make it easy for the merchant to quickly identify the overall progress of an order.
|
|
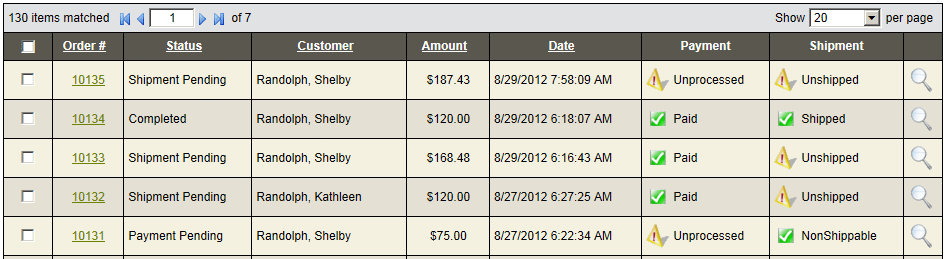
If you want more information about Payment and Shipment statuses, please go to Manage > Orders (Order Statuses).
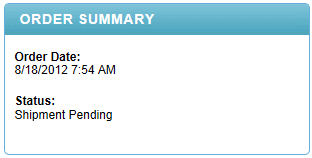
The Order Status names are displayed to the customer from their online invoice, as shown in this example.
Additionally, you can send email notifications when an order status changes. Typically, email notifications are managed from the Configure > Email > Templates menu. However, you do have the option to send email when an order status is updated. This can be effective when a merchant's internal order processing includes multiple steps or requires more than one person to be involved in fulfilling an order.
Edit an Order Status
-
Go to Configure > Store > Order Statuses using the top menu.
-
Click the EDIT icon for the Shipment Pending status, or the status you want to change.
-
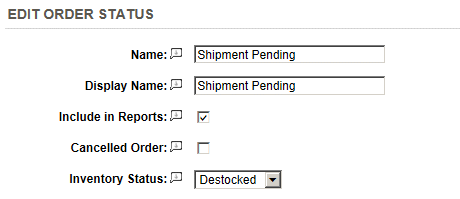
This will take you to the Edit Order Status page as shown.
-
In the first field, enter the Name of the status as will appear to the merchant.
-
Enter the Display Name next. This is what your customer will see when they view their order online.
-
The Include in Reports option should be checked if orders with this status are to be included in any of the AbleCommerce reports.
-
If the order status represents any fraudulent, canceled, or otherwise invalidated orders, check the box for the Cancelled Order option.
-
For Inventory Status, select 'Unspecified', 'Destocked', or 'Restocked'. (Disregard this feature if you are not using the Inventory Management feature.)
-
Unspecified - Not all order statuses have an effect on inventory, so those would always be set to 'Unspecified'. (e.g. a new unpaid order)
-
Destocked - When an order is changed to this status, inventory levels are decreased. (e.g. order shipped)
-
Restocked - When an order is changed to the status, inventory levels are increased. (e.g. order cancelled)
-
Select the inventory rule that should be enforced on order items when this status is assigned to an order.
|
NOTE: |
Inventory will never be restocked or destocked twice. |
-
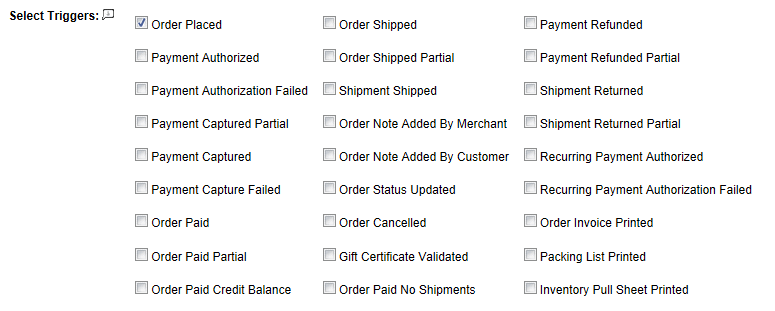
If this is an automated order status, then you will be selecting the event(s) that, if taken place, will automatically update an order with this status. Select Triggers from the list provided.
-
If you want to send an email when an order is updated to this status, then check one or more email templates for Select Emails.
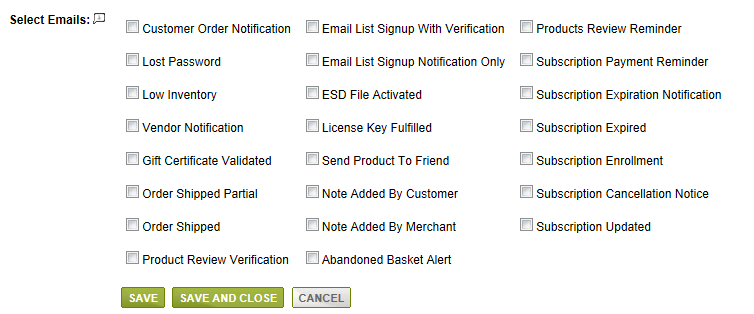
Selecting email templates from the Order Status page would typically only be used with custom order statuses. For most email notifications, you should create and manage them from the Configure > Email > Templates menu. From that page, you can add new templates and assign them to the same triggers available here.
-
Click the SAVE button when finished, or CANCEL to quit and return to the Order Statuses menu.
Add, Sort, or Delete Order Statuses
-
Go to Configure > Store > Order Statuses using the top menu.
-
-
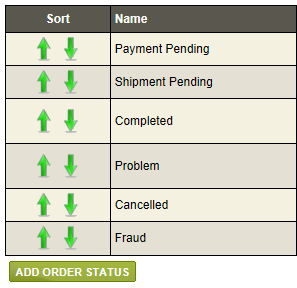
To sort, click the SORTING arrows up and down. The sort order only impacts the merchant administration, it has no bearing on what will be displayed to customers.
-
Click the ADD ORDER STATUS button to view the Add Order Status page. For instructions, see the section above, Edit an Order Status.
-
Click the DELETE icon for an order status. You will get a pop-up message to confirm/cancel before it is removed.
-