|
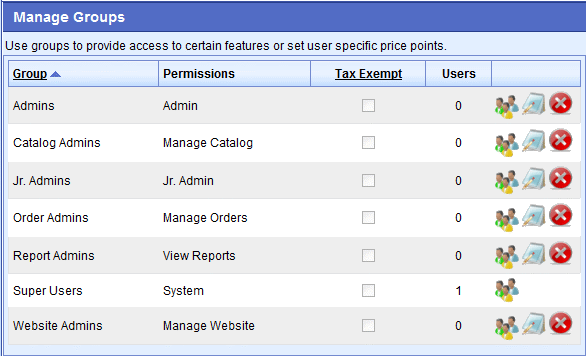
The Manage Groups menu displays all the groups in your store. In a default installation, there are seven groups used for administering the entire system. Only one of those groups as full access to every area - this is the Super User group. Any user who is assigned to this group will have full access to all pages within the Merchant Menu, including the Audit Logs and Licensing.
Other store management groups are included for your convenience. These are shown in the example, and the permissions of each group are described below. You can create any number of custom groups to manage and organize your customers. These groups would not have admin permissions, but instead, they can be used to activate particular features or pricing for members of the group.

Displayed alphabetically on the page, the groups names and permissions are shown:
-
Admins - These second-level administrator can do 'almost' everything. Limitations are as follows:
- cannot view other admin user profiles
- cannot assign admin permissions to other users
- cannot view the audit log
- cannot change installation settings or encryption key
-
Catalog Admins - Users of this group can change and update features within the Catalog menu, such as adding products or categories.
-
Jr. Admins - Users of this group can access all store administration pages except for features within the Configure or User menus.
-
Order Admins - Users of this group can manage orders, payments and shipping.
-
Report Admins - Users of this group can only view the reports.
-
Super Users - This is the top-level group. Any member of this group will have full access to every feature in the Merchant Menu.
-
Website Admins - Users of this group can modify website content pages, themes and settings.
In the far right column, you can manage users, edit, or delete* a group by selecting the applicable action icon.

* It is not possible to delete the "Super Users" group.
Adding and Removing Users from a Group
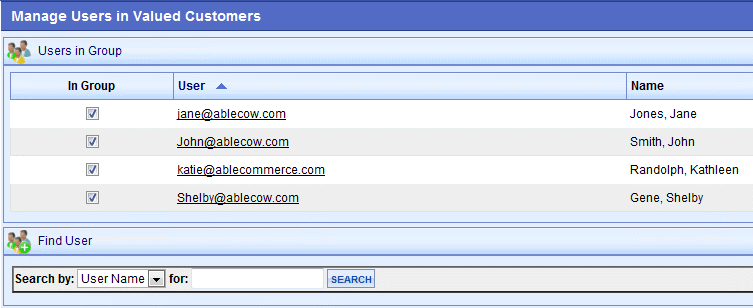
Click the Manage Users action icon for any group. If there are members assigned, then you will see them listed in the top section "Users in Group".

-
To remove a user assignment, you can uncheck the box in the In Group column.
-
To add a user, search for them using the form provided. Check the box next to a user record, and it will be automatically added to the group.
-
Group assignments can also be changed by editing individual User records.
|

