|
Create email lists to keep your customers informed.
Add Email List
-
From the Email Lists page, or from the top-menu, go to Marketing > Email Lists.
-
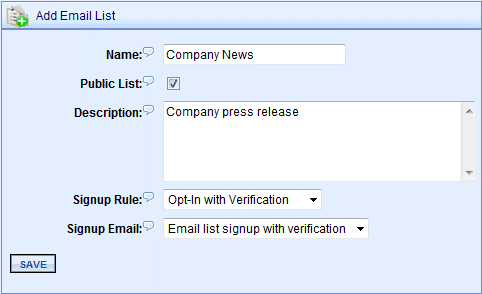
In the right section of the page, you will see the Add Email List form.

-
Enter a Name your list. This will be displayed to users if this is a public list.
-
Uncheck the box if this is a not a Public List. A public list will automatically appear for the customer on the checkout page or My Account page. A private list will only be available through the administration side.
-
If desired, enter a Description for the list. This information will display next to the name of the mailing list when viewed publicly.
-
Select a Signup Rule.
-
Opt-in with Verification: requires user to respond to the email list signup using a link within the email that is sent to them. If the user does not respond, they will not be added to the email list.
-
Opt-in with Confirmation: will send user an email to let them know they signed up for the email list. The user is immediately added to the email list.
-
Select a Signup Email. The signup email is a requirement so the user can acknowledge, or have confirmation, that they have signed up for a mailing list.
There are three stock emails that can be used:
-
Default Signup Message: A simple text email message. This cannot be customized. It can be used with either Signup Rule.
-
Email list signup with verification: An email message that is sent in html or text form. This can be customized. It provides a link that the user must click on to validate their address and be added to the list. It should be used with the signup rule "Opt-in with Verification".
-
Email list signup with notification only: An email message that is sent in html or text form. This can be customized. It provides confirmation to the user that they have signed up for the email list. It should be used with the signup rule "Opt-in with Confirmation".
-
Click the SAVE button when finished.
What does the customer see for mailing list options?
For each public mailing list you add to your store, it will automatically appear in the following locations:
Checkout Page
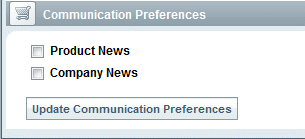
After the customer selects a shipping method, the communication preferences section will appear with each of your mailing lists shown.

My Account Page
Customers can also manage their communication preferences after creating an account.

Adding a Mail List to your Store
If you want to manually add the mailing list option to other places in your store, you can simply use the "SubscribeToEmailList" control.
Usage:
[[ConLib:SubscribeToEmailList Caption="Subscribe To Email List" EmailListId="0"]]
Properties:
Caption - Possible value can be any string. Title of the control.
EmailListId - Possible value can be any integer. This is the ID of the Email List to be subscribed to. If no email list is specified the store's default email list is used.
|


