Configure > Store

General Settings

The general settings section allows you to change your store name, URL, and enable SSL for secure pages.  You may also include a site disclaimer message that will be presented to users before they can view your store.

Before accepting orders, you should make sure that your AbleCommerce license key is installed and that your website has a working secure certificate.  This document will explain how to enable the SSL setting.  It is not intended to explain the process of installing a secure certificate.  For that purpose, you will need to contact a company who issues SSL certificates.  There are many SSL providers to choose from, but we recommend Comodo, GeoTrust, Thawte, or Verisign because they are compatible with most browsers.  

Update the General Settings

The General settings section is where you can change the name of your store, the URL, and the secure mode of your store.  

  1. From the Configure Store page or using the top-menu, go to Configure > Store.

  2. Find the General section as shown in the example below.

    general.gif

  3. In the Store Name field, enter a name for your store.  This information will appear in your email and invoices.  It will not change the domain or URL for your store.

  4. In the Store URL field, enter the web address for your store.  This information will not change your installation parameters.  It will appear anywhere a link to your store is generated.

  5. To change your SSL mode, click the "Yes" or "No" link next to SSL Enabled.  Follow the instructions in the next section, "Change the SSL Mode".

Change the SSL Mode

When SSL is enabled in your store, any page accepting sensitive information will automatically switch to a secure page.  This means that the web address changes from http to https, where the "s" designates secure.  Before accepting orders in your store, make sure you have installed an SSL certificate and enabled SSL mode in AbleCommerce.  If you do not use SSL encryption, your customer's sensitive credit card information or passwords could be compromised.

NOTE:

Before enabling SSL mode, make sure that you have previously installed and TESTED your SSL certificate.   

  1. After clicking on the link next to SSL Enabled, you will be on the Configure Security page.

  2. Find the section named Secure Sockets Layer (SSL).

    ssl_on.gif

  3. The current status of your SSL mode will be indicated by a yes or no.  Click the CHANGE button.

  4. To disable SSL for your store, un-check the box and click the FINISH button.  

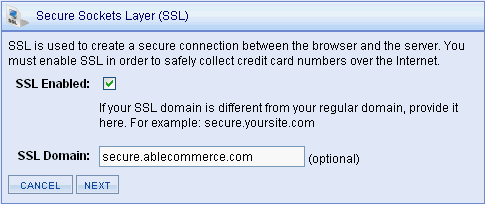
  5.  To enable SSL for your store, check the box SSL Enabled and the page will refresh with an optional SSL Domain field.

    ssl_on2.gif

  6.  If you have your store running on different domains for secure and non-secure, then enter the SSL Domain.  Otherwise, leave this field blank.

    NOTE:

    To use this feature, you MUST have a license key that responds to the secure and non-secure domains.    

  7. Click the NEXT button to continue.

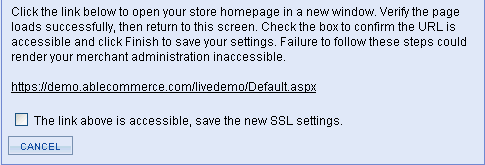
  8. To ensure that your site will continue to function properly, AbleCommerce provides an SSL test link.

    ssl_warning.gif

  9. Click the link provided and confirm the URL is accessible and that your SSL certificate is installed properly.  

  10. If your SSL page is working then check the box "The link above is accessible, save the new SSL setttings."

  11. Click the FINISH button.

Using a Site Disclaimer

A site disclaimer can be used to require users to agree to the terms and conditions you set forth before they may enter your store.  This feature can be used if you sell products or services that require an agreement before users can view the products in your store.  Additionally, AbleCommerce provides a similar feature where the user must agree to terms and conditions before a purchase can be completed.  These features can be used together or alone.

  1. In the General section of the Configure Store page, you will see a field for Site Disclaimer Message.

    disclaimer.gif

  2. Enter your terms or conditions into this field.  The field accepts html code.

  3. Click the SAVE button to update.  The change will take effect immediately.  


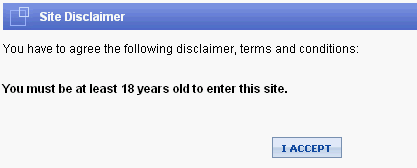
As shown in the example below, the user will be presented with a special "disclaimer" page before they may enter your store.

user_disclaimer.gif


The user must click the I ACCEPT button before they can view any page in your store.


Related Topics

Configure > Security > Licensing
Update the software with a new license key.

Configure > Security > General
Turn on secure SSL pages and configure credit card settings.

Configure > Store (Order Settings)
Change the order numbers, or terms & conditions.