Zones
An AbleCommerce Zone is a defined geographical area using countries, provinces, or postal codes. The zones can then be selected when you create shipping methods, setup shipping services such as UPS, FedEx, USPS, etc., or define your tax rules. When you assign a shipping method or tax to a zone, the calculation will only appear for customers who are using an address within that zone.
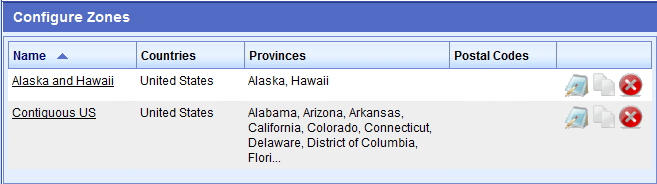
In a sample data store, there are two pre-defined zones. One for Alaska and Hawaii and the second for the Contiguous US. A common scenario used by merchants is to offer USPS to the 'Alaska and Hawaii' zone, and offer UPS/FedEx to the 'Contiguous US' zone.
By using zones, you will be able to customize the way shipping services are offered to customers in different locations. You will also be able to define the specific tax regions that you will use when setting up your tax rules.
Add or Edit a Zone
You can add, edit, copy, or delete a zone.
-
From the top menu, go to Configure > Regions > Zones.
-
On the Configure Zones page, you will see a list of all defined zones in the left section, and the Add Zone form in the right section.

-
To add a new zone, enter a zone name into the Add Zone section, click the ADD button to configure the zone.
-
Use the EDIT icon to modify an existing zone.
-
Use the COPY icon to duplicate an existing zone.
-
Use the DELETE icon to remove a zone.
-
In the example below, we are going to add a new zone for Canadian customers. In the Add Zone section, enter a zone Name. (e.g. Canada)
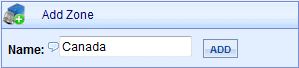
Click the ADD button.
-
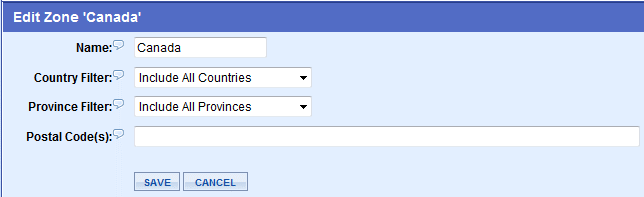
This will take you to the Edit Zone page.
-
If needed, change the Name for the zone. This is for merchant reference only. This value is not displayed to customers.
-
Select a Country Filter option to begin.
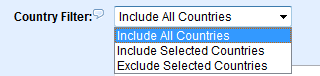
Choose the 'Include All Countries', 'Include Selected Countries', or 'Exclude Selected Countries' option. After making your selection the screen will refresh with your next step. For our example, we will select the 'Include Selected Countries' option.
-
The page will refresh showing the Selected Countries link. Click the link change so a pop-up menu will appear.
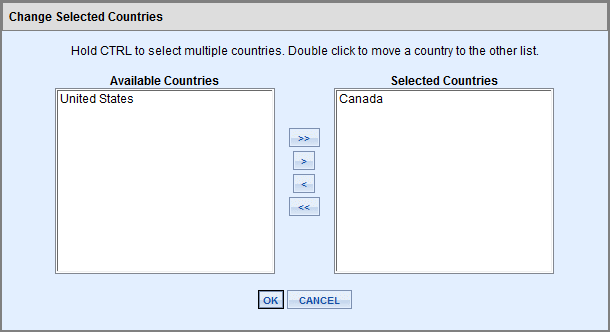
In a default installation, you have the option to install AbleCommerce with ALL countries or only Canada and United States. In the example above, the installation included only Canada and U.S.A., otherwise a full list of all countries would be shown here.
-
Click on the country name from the Available Countries section and use the button to move it over to the Selected Countries section. You can add all countries or just one at a time. You can also remove all countries or one at a time. When finished, click the OK button.
>> : Moves ALL countries from available to selected, adding them to the zone.
> : Moves the selected country(ies) from available to selected, adding them to the zone.
< : Moves the selected country(ies) from selected to available, removing them from the zone.
<< : Moves ALL countries from available to selected, removing them from the zone.
-
From the Edit Zone page, select a Province Filter if necessary.
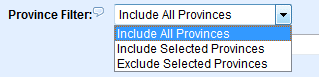
Choose the 'Include All Provinces', 'Include Selected Provinces', or 'Exclude Selected Provinces' option. After making your selection the screen will refresh with your next step. For our example, we will select the 'Include Selected Provinces' option.
-
The page will refresh showing the Selected Provinces link. Click the link change so a pop-up menu will appear.

-
Similar to how you can add and remove countries, click on the province name from the Available Provinces section and use the button to move it over to the Selected Provinces section. When finished, click the OK button.
-
You also define a zone to a single postal code or range of postal codes. These would be zip or postal codes that fall into a shipping or tax zone. You may enter multiple codes separated by a comma. You may also use the * wildcard to match multiple postal codes.
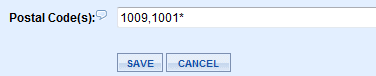
For example, the string 10009,1001* would match all zip codes from 10009 through 10019.
10009,
10010
10011
10012
10013
10014
10015
10016
10017
10018
10019
Where "*" represents numeric values (0,1,2,3,4,5,6,7,8, and 9) taking the place of the symbol.
|
NOTE:
|
If you create zones that are based on states or provinces, and also have zones that are based on postal codes WITHIN those states, this can result in conflicting or over-lapping zone areas. If you use postal codes to define a zone, then we suggest that you do not create zones using the entire state where the postal codes apply to unless you have a specific reason to do so.
|
-
Click the SAVE button when finished. This will bring you back to the Configure Zones menu.
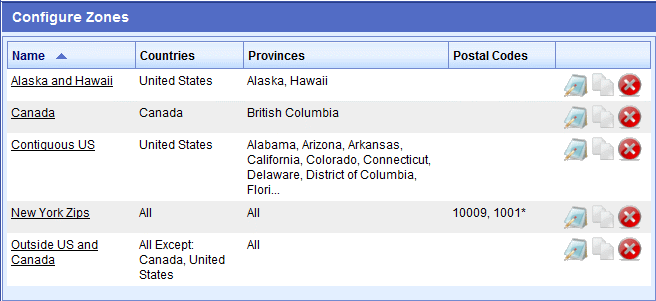
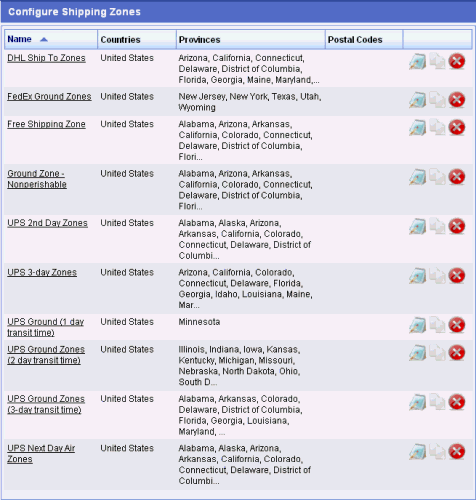
The menu displays the zone name, countries, provinces, or postal codes.
-
Use the EDIT icon to modify an existing zone.
-
Use the COPY icon to duplicate an existing zone.
-
Use the DELETE icon to remove a zone.
Add as many zones as needed. The following example shows how one merchant setup zones so they could meet shipping requirements for perishable foods.
|
TIPS:
|
Shipping gateways like UPS, FedEx, USPS, etc will automatically determine what services are available to the designated address.
Zones can be used to include or exclude areas for a particular shipping service or taxation.
|
|