Quick Start Guide to AbleCommerce 7.0
Part 3 - Building your store
The last part of the Quick Start Guide covers the Catalog system. This is the area where you will create categories and products. We will show you how to setup your store categories so your store will be organized and navigable. We will also introduce you to product editing where you'll finally be able to create your first product! Once this section is complete, your store will be fully functional and you'll be able to place your first test order.
Covered in Part Three:
-
Catalog Menu - working with your store's catalog system
-
Product Management - view examples and create a product
-
Place a test order - create a new order
-
Order Management - post-order processing
Catalog Menu
The Catalog menu is where you will find features for managing your store content. You can either browse the catalog system using the categories you create, or search for products.
From the top menu, you can mouse-over Catalog to view the submenu items available.
|
|
Browse: View and edit your catalog items by navigating the category structure. Search: Find and edit your catalog items with the search form. Find Kits: Search and display links to your Kit products. Product Templates: Create a template that can be used to collect data from an admin or a customer. Product Reviews: Edit, delete, or approve customer reviews. Gift Wrap: Create wrapping groups. Add gift wrap styles, images, prices. Digital Goods: Submenu items include Manage Digital Goods, Search, Readme's and License Agreements. |
To begin working with your Catalog system, click the Catalog icon from the upper-right corner of the Merchant Dashboard. Or, from the top menu, go to Catalog > Browse.
The example below shows what a completed catalog might look like from the administration.
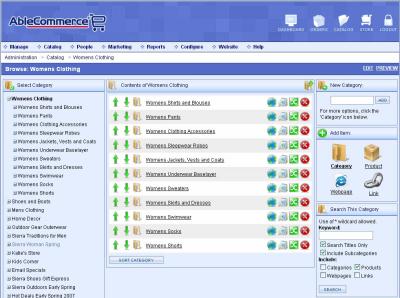
In your new store, you will see just one "Sample Category".
You can create several new categories to organize your products. Products can be associated to as many categories as you like.
You will also be able to create Webpages and Links for a basic content management system. In the image above, note the icons used to represent each catalog item.
Create a new Category
-
In the upper-right corner of the Browse Catalog page, you will see the New Category section.
-
Enter a name for your category into the field provided. (e.g. Shoes)
-
Click the ADD button.
-
Your new category will be displayed...

-
After you create a few more categories, you can use the Sorting options.
-
Each Category you create can have attributes like images and descriptions. To add a category description or image, simply click the EDIT icon.
|
TIP |
After a category has products within it, you can PREVIEW the category to see how the page will look to your customers. |
Product Management
One of the most important parts of a shopping cart system are your products. Before you begin adding products of your own, we highly recommend that you take some time to review the sample products in your store.
To find your sample products, mouse-over the Catalog menu item and then select Browse. Or, click the CATALOG icon in the upper-right corner.
Then click on the linked "Sample Category" name to view the subcategories as shown.
Each subcategory has various products created to demonstrate some of the key features of AbleCommerce.
-
Computers and Electronics: This category has a product, Build-your-own-Computer, which demonstrates a how a Kit can be setup, and the use of product options.
-
Accessories: This category has various products that are used as 'Related Products' to other products, or used as 'Product Accessories' (presented as a recommended purchase to customer on checkout)
-
Gift Ideas: This category has gift certificates and a T-shirt with gift wrapping options.
-
Software and Subscriptions: This category demonstrates products that use Digital Goods and Subscriptions.
View a Sample Product
-
For this demonstration, we are going to look at a sample Kit product, so click on the "Computers and Electronics" link in your catalog.
-
Click the "Build-your-Own Computer" product link.
-
This will display the Edit Product page and all the available product features.
-
From the left column, click the Kits/Bundles tab.
-
Kitting is one of the more sophisticated product features available.

-
The computer product is a good example of how you can create Kits by adding member products. You can organize your member products by using component groups. A component is simply a way to organize the products, and choose how you want to display them to the customer. There are a number of display options for components and the sample Computer product shows most of them.
-
Click on the EDIT icon to view the Edit Kit Part page.
-
Notice that you have the option to change the product name and quantity included with the kit. You can also change the price or weight of a product so that it is different if included with the Kit.
-
Go ahead and click the Preview tab to see how this Kit looks in your store.
-
You might want to EXPLORE other products to see more examples.
|
TIP |
For each sample product, you can go to the Edit Product page and find the Summary field in the DESCRIPTIONS section. You will see some text that describes the specific features it demonstrates. |
Adding a Product
-
From the Browse Catalog page, click on any of the existing category names or use a new one that you've created.
-
On the right side of the page, look in the Add Items section.
-
Click on the PRODUCT link/icon to view the Add Product page.
-
For now, just enter a product name and price. This is the minimum amount of data required to create a product.
-
Click on the SAVE button. A new product is created.
There are many features available when you create a product. Take a minute to review a brief description of the items in the Product Menu, so you will be familiar with the types of things you can do when you create a product.
Product Menu
|
|
Product Details: The summary page for your product. This is where you would enter basic data, tax, shipping, and descriptions. Images and Assets: You can upload a new image or attach additional images to a product. Options and Variants: A product variant is a unique combination of options. Variants can be used to control inventory. Options can be used to display image swatches. Digital Goods: Attach an existing digital file to a product or it's variants. Kits/Bundles: Create a kit product by adding components. A component can be a group of products that are either required or an optional part of the master kit product. Volume Discounts: Attach an existing discount method to a product. Pricing Rules: You can set multiple price points for a product based on date or member group. Similar Products: These are the products that are related, that should be highlighted in cross-selling scenarios. Product Accessories: Select the products that are used in up-selling scenarios during checkout. Categories: Select additional categories that should display this product. Product Template: Attach an existing product template. A product template can be used to gather information from the merchant and/or the customer. Subscriptions: Add a subscription plan. A subscription is a recurring billing option. Preview: Opens a new browser window so you can view your product as a customer would see it. |
Add Basic Product information
-
With the product you just created, you should still be in the Edit Product area.
-
Click the Product Details tab to return to the primary product edit page.
-
In the first section, you'll see BASIC INFO for the product.
-
Additional fields for SKU, MSRP, Manufacturer, and Part No. are provided. These fields are optional and used for display and search purposes.
-
If the product is a Gift Certificate, check the box so the system will automatically generate gift certificate serial numbers as part of the fulfillment process.
-
If the Variable Price box is checked, a customer can enter their own price for the product. This would typically be used with a Gift Certificate.
-
The Prohibited checkbox is used when an item needs to be excluded from the Google Checkout system.
-
The Hide Price checkbox will remove the product price from view. The customer will need to click a link to view the product price. This would typically be required by vendors of electronics.
Change the Product Display options
-
In the DISPLAY OPTIONS section, you can change how this product will be shown to your customer.

-
The Visibility choices are Public, Hidden, or Private.
-
Choose a Display Page if different than the store's default product display page.
-
If you want to show this product in your store, but not allow customers to purchase, then check Disable Purchase.
-
If you want this product to appear on the home page, as a featured product, then check Featured.
-
If you want to choose a different Theme, for only this page, then select one from the list of choices.
-
If you want to upload product feeds such as Google, Yahoo, and Shopping.com, and exclude this product, then check Exclude from Feeds.
Add Tax and Shipping options
-
In the TAXES & SHIPPING section, you can add the information needed to calculate shipping and taxes.

-
The Shippable option is set to 'Yes' by default so that shipping rates are calculated on checkout. For digital delivery, you would use a Shippable option of 'No'. For items that need to have their own shipment calculated, select 'Ship Separately'. This will calculate a separate shipping rate for this product, and that gets included in the final shipping cost for the order's shipment.
-
Enter the product Weight in the units specified. You must have a product weight to produce live shipping rates.
-
Enter the product Dimensions. It is not always necessary to enter product dimensions, however, the rates calculated may be more accurate if you do. If the dimensions are entered for large packages, the dimensional weight will be used if it exceeds the actual weight.
-
If this product uses a different Warehouse, then select it here. This is the origin of shipment. A different warehouse will create a new shipment during checkout.
-
If you have setup Gift Wrap, and want to offer gift wrap options for this product, select the gift wrap group here.
-
If this product should be taxed, according to how you previously setup your tax rules, then select 'Taxable' for the Tax Code.
Use Inventory Control for your product
If you have setup inventory control for your store, then you will be able to use the product-level inventory options. Even if you do not use inventory control, you can still use the minimum and maximum purchase feature.
-
In the INVENTORY CONTROL section, you can enable inventory tracking and control over quantities purchased.
-
If desired, enter the Cost of Goods. This will information will only appear in some reports.
-
If you want to setup a Vendor for this product, you may select it here. Enabling this feature will send your vendor a 'Packing Slip' email notification.
-
The fields for Min. Quantity and Max. Quantity. can be used individually or together, to require a customer to purchase a minimum or maximum number of the product.
-
To enable inventory control for a product, change the Inventory Tracking option to 'Track Product'.
NOTE: If a product uses Options/Variants, then an additional selection for 'Track Variants' will appear. When tracking inventory at the option level, you will enter the inventory levels from the Options/Variants page instead. -
Enter the amount In Stock. This is the actual amount of product in your inventory. If desired, this can be shown to your customers.
-
Enter the amount for Low Stock notification. When this level is reached, you will be notified with a Low Inventory email.
-
If you want to allow customers to purchase a product that has 0 (or less) in stock, then check the box for Allow Backorder. If you leave this box unchecked, then a customer will not be able to purchase an item that is not in your inventory.
|
TIP |
When you are using Inventory Control, you can easily restock your inventory levels by going to Manage > Inventory. By default, any product that has met the Low Stock threshold will appear on the low inventory management page. |
Add Product Descriptions
-
In the DESCRIPTIONS section, you will be able to enter product information into any of the fields provided. Each field is described as follows.
-
Summary: A brief description of the product that can be used for the category listings or featured products. Also used for Product Feeds.
-
Description: The standard product description. Use the built-in HTML editor or enter your own HTML formatted text. (no limit)
-
More Details: If you would like to include some additional product information, you can enter HTML into this field. When there is data in this field, a link to more details will appear next to the Description title. (no limit)
-
HTML HEAD: Enter the data to include in the HTML HEAD portion of the display page, such as Meta keywords and description, javascript, etc.
example input into the HTML HEAD field -
<meta name="description" content="my page description." />
<meta name="keywords" content="my keywords" />
-
Search Keywords: Enter product data like keywords and frequent misspellings. The information you enter here will always be used to find this product when your customers use the search form.
-
When finished, click the SAVE button.
Add Product Images
These are the steps to add a product image that has not been uploaded to the store. The Upload Image page will allow you to pick an image from your local hard drive and automatically resize it into three different sized images. When finished you will have a product icon, thumbnail, and standard size product image.
-
From the left-column menu, click the Images and Assets tab.
-
Click the UPLOAD IMAGE button to view a page similar to the one shown below.
-
Click the BROWSE button to select a new image from your local hard drive.
TIP
For best results, you should use an image that is at least 500 pixels wide.
-
After selecting the image, click in the Save as field. This will automatically enter the name of your image. You can change the name if you want.
-
To improve performance of your pages, you can adjust the image Quality of a JPG, which will reduce the file size. It may be necessary to experiment with image quality percentages to obtain a reasonable file size and maintain image quality on-screen.
-
Click the UPLOAD button and wait a moment for processing to complete.
-
When the upload of your image is complete, you will be shown the three image sizes generated for this product.
-
If you have additional product images to add, just click the ADDITIONAL IMAGES button to upload them one at a time. You will be given the option to resize and adjust image quality, however, only one image will be created for each additional upload.
-
When finished adding your product information and images, click the Preview tab to see how it looks in your store.
Place a test order
After all the hard work you've done, it's time to place your first test order!
-
In the top-right corner of your merchant administration pages, you'll see an icon that represents your STORE.

-
Click the STORE icon to view the public side of your store.
-
Select a product, and purchase it. From the shopping basket, you'll see a Checkout Now button.
-
This brings you to the One-Page-Checkout form.
-
Enter your address and phone number, and select your shipping option. Click Continue.
-
Now that your shipping address is known, AbleCommerce can calculate any taxes and shipping. You should see the UPS services and rates returned if you had previously registered for UPS shipping.
-
In the Order Summary, notice that taxes have also been calculated.
-
We had previously setup a test payment gateway, so let's go ahead and place an order using the Credit/Debit card option.
-
Select Visa for the Card Type.
-
Enter a test Visa number 4111111111111111 in the Card Number field.
-
Choose an Expiration Month and Year in the future.
-
Enter 111 for the Verification Code.
-
Click the Pay With Card button to complete your order. A new order is placed.
-
You will then see your Receipt page. If email systems are running, then you should also receive an email confirmation of your order.
Order Management
To complete the circle, we'll show you how to process your first order.
-
In the upper-right corner, click on the ADMIN tab to return to the Merchant Dashboard. If you do not see this tab, then you are not logged in.

-
From the Merchant Dashboard, click the ORDERS icon in the upper-right corner.

-
This will bring you to the Order Manager. This is a key page that will give you a quick overview of all orders awaiting processing.
-
Looking left to right, notice in the Status column it indicates "Payment Pending". This is the overall status of the order.
-
The Payment and Shipment columns to the right will show you the specific status of a payment, and the status of the shipments in the order. In this example, the payment status was successfully Authorized and is awaiting to be captured.
-
Click on the "details" link in the far right column. This will bring you to the Order Management summary page.
-
From the left-column, click the Payments menu item.
-
The Payments page will show each transaction and give you post-order processing options from the Tasks selection box.
-
Select "Capture Payment" option under Tasks, and click the GO button.
-
From the next page, you'll be able to make any adjustments to the payment.
-
Click the CAPTURE button. The Transaction History is updated and the payment status shows CAPTURED.
-
If you view this order from the main Order Manager search page, you'll see that the order has been updated to reflect new statuses. This happens automatically when you process orders from the administration.

-
Let's return to the order for shipping. Click on the "details" link again.
-
From the left-column, click the Shipments menu item.
-
Click the SHIP ITEMS button.
-
From the next page, you can enter a Tracking Number into the field provided. Be sure to select the correct shipping gateway so the customer will be provided a link to view their tracking details. Click the SHIP button.
-
Notice the Shipment date and time is recorded and the tracking number is linked.
-
You can print a packing list, edit the shipment, or cancel and return the items to inventory.
-
If you view this order from the main Order Manager search page again, you'll see that the order has been updated to reflect new statuses.

-
The overall Order status now shows Completed.
This concludes the Quick Start Guide. We hope you've found this introduction helpful.
Take some time to create a category structure for your store and start entering products. An organized and thoughtful layout will provide a better shopping experience for your customers. Remember that each page will have helpful Tool Tip text.
Congratulations! You have completed Part Three of the Quick Start Guide. |