Quick Start Guide to AbleCommerce 7.0
Part 2 - Configuring your store
This section covers some important areas of the Configure menu. These are settings that are generally configured at a global level and may affect which features are available for your store. Keep in mind that this document is not intended to be a detailed description of every feature available, but instead, to make you familiar with the most common configuration settings for you store.
Covered in Part Two:
-
Common Store Configurations - global settings
-
Accepting Payments - setup a payment gateway
-
Shipping Services - setup a shipping service
-
Zones - create a zone
-
Taxes - create a tax rule
![]() Detailed information is available within the online User Guide. Please visit the Configure Menu
Detailed information is available within the online User Guide. Please visit the Configure Menu
Configure Menu
From the Merchant Dashboard, or any page in the administration area, you'll see a menu system built into the top-bar. This is the navigation system to all features within AbleCommerce, so it may be a good idea to spend a few minutes and mouse-over each top menu item to become more familiar with the location and types of features available in your new store.
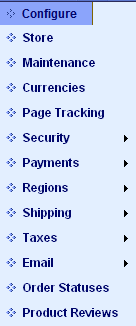
Hold your mouse over the Configure menu item to view the submenu items available. Mouse-over the list from top to bottom to view the additional submenu items. A brief description of each item in the Configure Menu is shown below.
|
|
Store: Configure global settings for your store such as time-zone, weights, units, inventory control, and more. Maintenance: Set options for removal of abandoned baskets, anonymous user records, and open or close your store. Currencies: Define currencies that your customers can choose from to get locale specific prices. Page Tracking: Enable tracking of page views for reporting, and setup Google Analytics. Security: Submenu items include General/SSL, Licensing, Database, IP Firewall, Password Policy, Encryption Key, and System Settings. Payments: Submenu items include Methods and Gateways to establish how you will accept money. Regions: Submenu items include Countries and Zones to establish your regions for shipping and taxes. Shipping: Submenu items include Methods, Integrated Carriers, and Warehouses. Taxes: Submenu items include Settings, Tax Codes, Tax Rules, and Third-Party providers. Email: Submenu items include Settings and Templates. Order Statuses: Customize the workflow of your store, from getting new orders to shipping them. Product Reviews: Enable product reviews and criteria for submitting a review. |
Configure Global Store Settings
-
From the top menu, mouse-over Configure and select Store to view the Configure Store page.
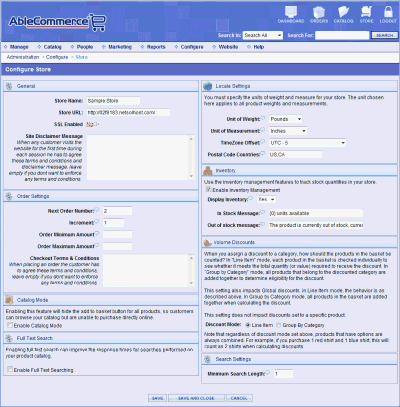
The Store configuration page gives you many different options and all features cannot be covered here. However, if you look over this page, you will see a brief description for many of these global configuration options. Take a few minutes and review these settings and their descriptions.
-
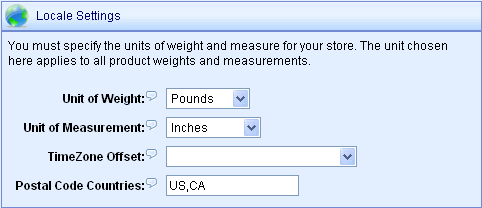
In the top-right corner of this page, find the Locale Settings section.
-
Set the Unit of Weight to Pounds, Kilograms, Grams, or Ounces. This should correspond to how you plan to enter your product weights.
-
Set the Unit of Measurement to Inches or Centimeters. Again, to match the dimensions for your products.
-
Select the Time Zone that your store will be doing business in. This is used to generate timestamps on orders and other activities.
-
If desired, enter the two-digit ISO
 code used for countries that require a postal code. This will change all address entry forms. If a country is not in this list, then the postal code field is displayed but not required to submit the form.
 -
Find the Inventory section next. If you are not going to use inventory control, then uncheck the box next to Enable Inventory Management
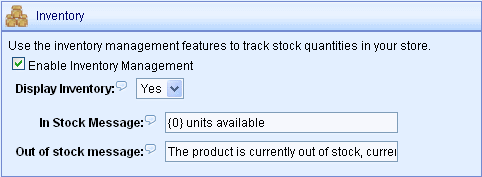
The inventory settings here determine if your products can use inventory control. Inventory is maintained at a product level and not all products are required to use inventory control if it is enabled. -
If you are going to use inventory control, then select your display options:
-
Choose whether to Display Inventory levels to your customer. Pick Yes or No.
-
If you picked Yes, then you may want to customize the In Stock Message shown to your customers for products using inventory control. The {0} variable indicates the number of units available for each product.
-
The Out of Stock Message is displayed to your customers when a product is no longer available for purchase. This message will only appear if the stock levels have dropped to zero and you have decided to not allow backorders on the product.
-
-
-
Click the SAVE button at the bottom.
-
If there are any other settings on the Configure Store page that you would like to change, go ahead and do that now.
-
When finished, click the SAVE AND CLOSE button.
|
TIP |
From the Configure > Maintenance menu, you can temporarily close your store to visitors. |
Accepting Payments
In order to process credit card payments automatically through your store, you will need to setup a payment gateway. There are many payment gateways available on the market today. AbleCommerce has built-in support for the most common payment processing services. Refer to the illustration below for supported payment processing gateways.
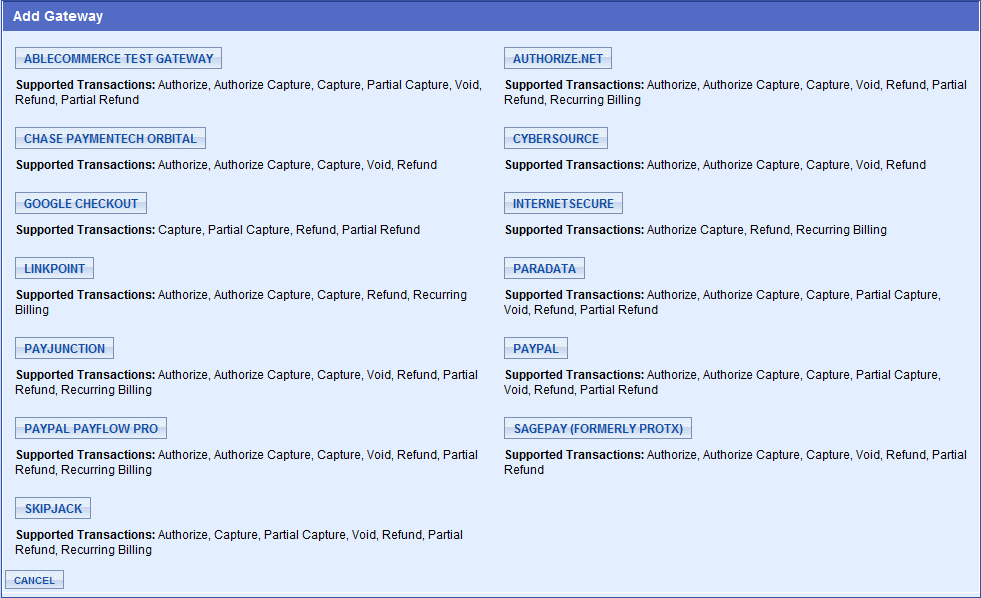
Note that each payment gateway offers different features. For example, if you want to use recurring billing, then you need to select a payment gateway that supports this feature. If you want to be able to process refunds through AbleCommerce, then choose a payment gateway that offers this feature.
If you want to setup your live payment gateway now, make sure that you have your merchant account setup information available. For this demonstration, we'll setup the AbleCommerce Test Gateway.
Setup a Payment Gateway
-
Using the top menu, go to Configure > Payments > Gateways
-
From the Payment Gateways page, click the ADD GATEWAY button.
-
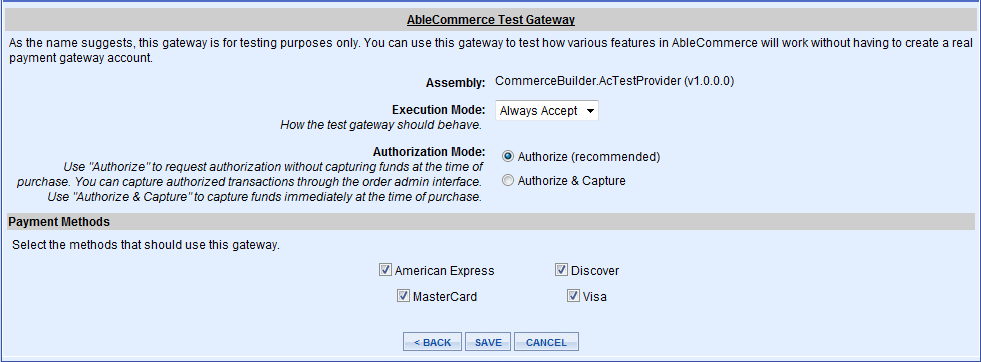
Click the AbleCommerce Test Gateway button, or choose the Payment Gateway of your choice.

-
Each payment gateway varies, so read the screen carefully and enter, or change, any settings as needed. The AbleCommerce Test Gateway is for testing purposes only. You can use this gateway to test how various features in AbleCommerce will work without having to create a real payment gateway account.
-
On the bottom of this page, you'll see four payment methods for American Express, Discover, MasterCard, and Visa. These are checked by default because your payment gateway must be associated to at least one payment method.
A default installation will include these common Payment Methods. You can create as many payment methods as you need. This is covered in the next section. -
Click the SAVE button when finished.
-
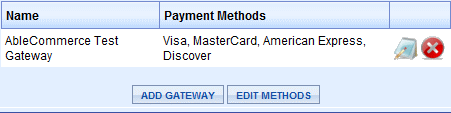
The new gateway will be shown on Configure > Payments > Gateways page. From here, you can edit or delete the gateway, or add more payment gateways.
Adding a new Payment Method
-
From the Payment Gateways page, click the EDIT METHODS button, or using the top menu, go to Configure > Payments > Methods
-
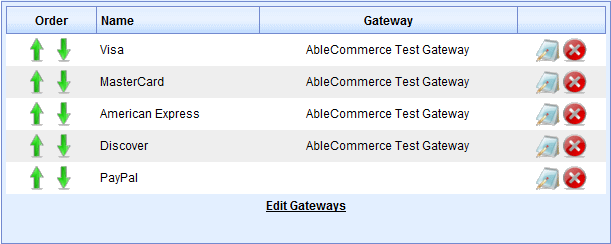
On the left side, you'll see the existing payment methods that are available in your store.
-
You can adjust the sorting, which is the order of how they appear to your customer. You can also edit and delete payment methods from here.
-
On the right side of the Payment Methods page, you will see the Add Payment Method section.
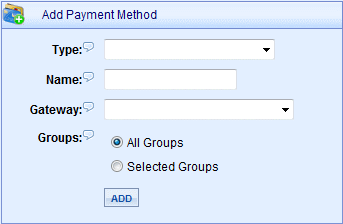
-
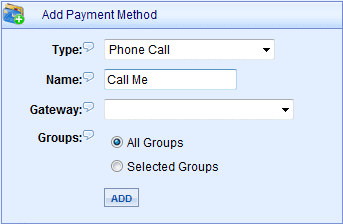
Select the Type of payment method from the list of pre-defined values. There are many types, but for this example, we are going to choose "Phone Call". The type of payment method determines how the payment form is setup during the checkout process.
-
Type in a custom Name for your payment method. We will use the name "Call Me" for this example.
-
Since there is no payment gateway associated with this type of payment method, leave the Gateway selection blank. Otherwise, you could associate the payment gateway with a payment method here.
-
The Groups selection determines who will see this payment method on checkout. If you want all your customers to be able to use the payment method, then leave the selection as "All Groups". An example use of payment methods with groups:
e.g. Create a Purchase Order payment method and assign it to a Pre-approved Customer group -
Make sure your Phone Call payment method looks like the sample below.
-
Click the ADD button. Your new payment method will appear in the existing list.
-
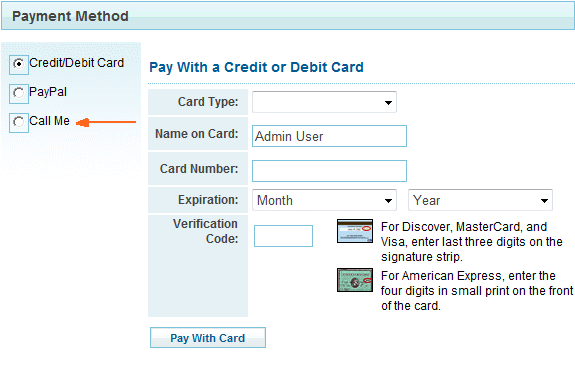
During the checkout process, the customer will be able to view all the payment methods you've created.
|
30 DAY EVALS |
When you are ready to take online orders, make sure that you have installed the software license key. Without the license key, the customer order information will be replaced with DEMO, DEMO. |
Shipping Services
AbleCommerce offers an extremely flexible shipping system. Within minutes, you can setup one of the integrated carriers like UPS or FedEx and provide real-time shipping rates to your customers. You can also create your own shipping methods based on a flat rate, custom weight, or order total. For example, easily offer FREE shipping on orders over $50.
Create customized geographical regions, or Zones, that can be used to determine shipping destinations and taxation. A store's warehouses are used to determine the origin of shipment for a product. By using Zones and Warehouses together, you can create the ultimate shipping system. So, for example, if you sell perishable or oversized items, you can assign those products to their own (virtual) warehouse. By changing individual shipping services so they are specific to regions and product warehouses, you can easily require air service for perishable items, or freight service for heavy items. When these items are purchased with other items that ship normally, multiple shipments will be created, and only those products' shipping services will be available to the customer for selection.
Keep in mind that the above paragraph explains how AbleCommerce shipping can be used to accommodate even the most complex shipping requirements. In most cases, all you need to ship products is an account with one or more of the integrated shipping services available.

Adding a Shipping Service
-
From the Configure menu, go to Shipping > Integrated Carriers.
-
Click the ADD CARRIER button.
-
Choose your shipping service from the list available. For a quick shipping demonstration, select UPS OnLine® Tools.
-
On the following page, you will need to accept the agreement and click the NEXT button to continue.
-
On the registration form, enter information required. (It is not necessary to enter a UPS Account Number)
-
When finished, click the NEXT button.
-
When you reach the Configure Settings page, check the default settings and make any changes as needed.
-
If you are testing shipping right now, then change Test Mode to Enabled.

-
Click the UPDATE button.
-
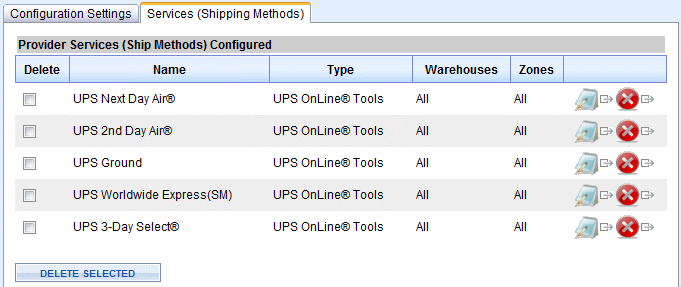
At the top of the Configure page, find the tab labeled "Services (Shipping Methods)" and click it.
-
Check all the shipping services that you wish to offer. (International services are listed here as well)
-
Click the ADD DEFAULT CONFIGURATION button to view a section similar to the example below:
-
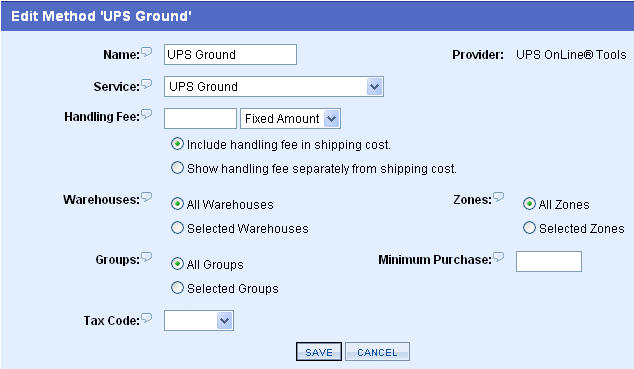
To further customize each shipping method, you can click the EDIT icon to view a page similar to the example below:
-
For each shipping method, you can specify additional configuration settings. A brief description of each is shown:
-
Name: How this shipping method name will appear to you and your customer.
-
Service: The actual service name if this shipping method is using an integrated shipping service.
-
Handling Fee: This can be a fixed amount, or percentage of the actual shipping costs. Show separately or included in the shipping cost.
-
Warehouses: Select the warehouse that will use this shipping method, or the default setting is All Warehouses.
-
Groups: Select the customer group that will have this shipping method available, or the default setting is All Groups (all customers).
-
Zones: Specify the shipping zone(s) that this method will be used for, or the default setting is All Zones.
-
Minimum Purchase: If you enter a value here, the order total must be equal to or greater than the value before the shipping method will appear. (e.g. "Free Shipping on all orders $100 or more")
-
Tax Code: If the shipping charges are taxable in your area, then set the Tax Code here. (Taxes are covered in the next section)
-
-
Click the SAVE button when finished.
-
Repeat if needed for each shipping method.
|
TIP |
You must enter product weights before live shipping rates will be available in your store. This will be covered in Part Three of the Quick Start Guide. |
Zones
An AbleCommerce Zone is a defined geographical area using countries, provinces, or postal codes. The zones can then be selected when you create custom shipping methods, setup shipping services such as UPS, FedEx, USPS, etc., or define your tax rules.
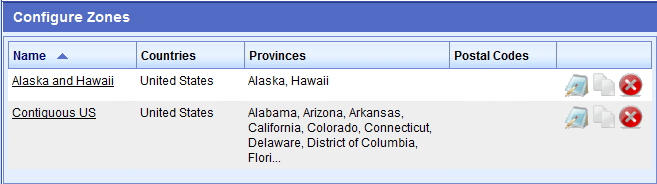
In the sample data, there are two pre-defined zones. One for Alaska and Hawaii and the second for the Contiguous US. A common scenario used by merchants is to offer USPS to the 'Alaska and Hawaii' zone, and offer UPS/FedEx to the 'Contiguous US' zone.
By using zones, you'll be able to customize the way shipping services are offered to customers in different locations. You'll also be able to define the specific tax regions that you will use when setting up your tax rules. So, when creating your Zones, keep in mind that they can be used for both taxes and shipping.
Adding a Zone
-
From the top menu, go to Configure > Regions > Zones.
-
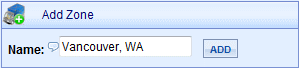
On the Configure Zones page, you'll see a list of all defined zones in the left section, and the Add Zone form in the right section.

-
From the Add Zone section, enter a new Zone Name and click the ADD button. For our example, we'll use Vancouver, WA.
-
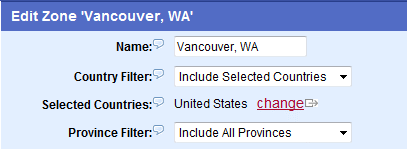
From the Edit Zone page, select the Country Filter option, and pick 'Include Selected Countries'. A change link will appear. Go ahead and click the "change" link to open a pop-up menu. From the left side, in the Available Countries list, pick United States and click the ">" button to move the item to the Selected Countries list.
-
Click OK when finished. Your screen should look similar to the following image.
-
Next, in the Postal Code field provided, enter a few valid zip codes separated by a comma.
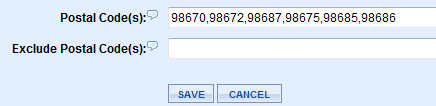
-
Click the SAVE button. A new Zone will be created encompassing the zip codes entered.

Taxes
If you need to collect taxes, then make sure you understand the tax laws according to your local tax authority. If you do not need to collect taxes, then you can skip this section.
AbleCommerce gives you precise control over your tax setup. By using tax rules, you can assign a tax rate to geographical zones defined by a country, state, zip code range, or single zip code. You can have as many tax rules as needed and apply them all to a taxable product by using a tax code.
Taxes are accurately calculated based on each shipment of an order. Optionally, shipping charges or gift wrapping can be taxed.
For ease of record keeping, AbleCommerce provides a Tax Report where you can view the taxes for each order. The information is itemized and can be sorted by time period.
The Tax Menu can be found under Configure > Taxes.
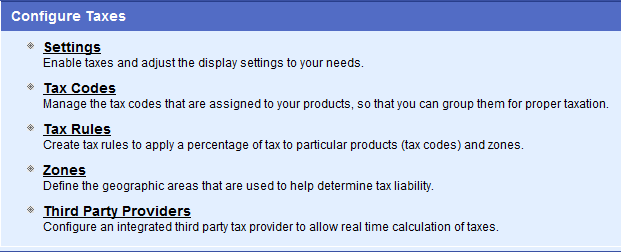
Third Party Providers
At this time, AbleCommerce has built-in support for the AvaTax Service. When installed, the AvaTax connector will provide tax calculation services through AbleCommerce. It is a full featured integration that includes tax calculation and address validation. It is compatible with all major features of the AbleCommerce shopping cart, for example quantity discounts, shipping charges, and multiple origin/destination addresses.
The AvaTax service must be purchased separately from Avalara.com in order to make use of the connector.
Enable Taxes
-
From the top menu, go to Configure > Taxes > Settings.
-
By default, taxes will be disabled as indicated in the example below.
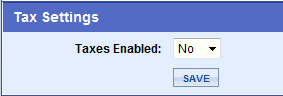
-
To enable taxes, select 'Yes' for the Taxes Enabled option. The page will refresh with your display options.
-
There are several display options available:
-
Shopping Display - When users are shopping for products, how do you want the taxes to display in the catalog and shopping cart? If you show taxes for all users, anonymous shoppers, without known addresses, have taxes calculated based on your store's default warehouse address.
-
Invoice Display -When users are checking out or viewing order invoices, how do you want the taxes to display? If you show taxes for all users, anonymous shoppers, without known addresses, have taxes calculated based on your store's default warehouse. Once the user enters an address as part of checkout, any tax will be adjusted accordingly.
-
Tax Column - Invoice pages will display a column with the tax rate applied to that item. (Used for VAT)
-
-
Unless you have a specific reason to change the display settings, we recommend that you use the default values. (For merchants in the U.S.)
-
Click the SAVE button when finished.
Create a Tax Rule
-
From top menu, go to Configure > Taxes > Tax Rules.
-
Click the ADD TAX RULE button.
-
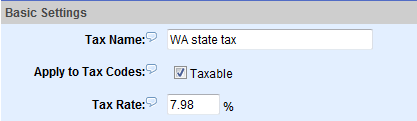
Enter a Name for your tax rule. This is how it will be displayed to you and your customer. (e.g. WA state tax)
-
You will need to check the box next to Taxable. This will assign the new tax rule to a code, that is in turn, assigned to a product. This allows you to create multiple tiers of tax for support of Canadian taxation. Typically, most U.S. stores would have a single tax code that is assigned to any taxable product.
-
Enter the Tax Rate in percent. (e.g. 7.98)
-
The next section allows you to configure some specific tax options that may vary depending on your location. For this example, we will use most of the default values.
-
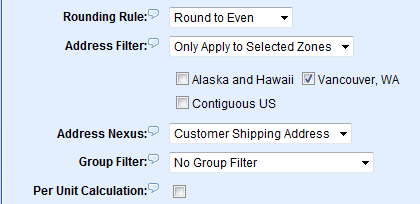
For Address Filter, select the 'Only Apply to Selected Zones' option. This will refresh the page with a list of Zones that have been created.
-
Check the box next to Vancouver, WA as shown above.
TIP
Make sure to select an Address Filter for each tax rule you create. Otherwise, taxes could be applied to ALL orders, regardless of location.
-
Click the SAVE button when finished.
-
You should see your new Tax Rule as shown in the example below.

-
You can add more tax rules as needed. But, before taxes can be calculated, we'll need to create some taxable products.
This will be covered in the last part of the Quick Start Guide.
Congratulations! You have completed Part Two of the Quick Start Guide. |