Quick Start Guide to AbleCommerce 7.0
Welcome to the Quick Start Guide for AbleCommerce, version 7. This guide will explain the first steps taken immediately after installing a new store. There are many features within AbleCommerce that cannot be explained here. Feel free to explore each menu selection to become familiar with your new store. All pages within your Merchant Administration will have ToolTips. Simply hold your mouse over the little bubble (![]() ) and a description of the feature will appear.
) and a description of the feature will appear.
During the installation process, you were given a choice to populate your store with Basic data or include some additional Sample data. For the purpose of this demonstration, the guide's illustrations may reference the sample data in some cases. By choosing to install the sample data, you will have products in your catalog that demonstrate many of the features of AbleCommerce.
There are also up to 15 different Store Themes that can be selected. Our example illustrations will be using the standard "AbleCommerce" theme. The Themes vary by color and style, so the location of items displayed will usually be the same.
Part 1 - Securing your store
This first section of the guide explains how to access your store as an administrator. We'll bring you to the Merchant Dashboard, where you can see the day-to-day management page of the AbleCommerce administration. We will also cover setting up your email and securing your store. If you are evaluating AbleCommerce, you may want to quickly review this page and move onto Part Two.
Covered in Part One:
-
Administration - accessing your store
-
Merchant Dashboard - daily operations
-
Email - enable email systems
-
SSL - turning on secure pages
-
Encryption Key - creating a key
Accessing your Merchant Administration
There are two ways you can login to your Merchant Administration. The first is by accessing the home page of your new store and using the same login page as your customer would. The second is by accessing the merchant administration URL directly.
Login through your Storefront
-
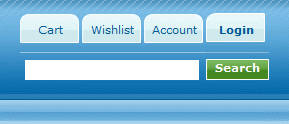
Look in the upper-right corner of any store page.
-
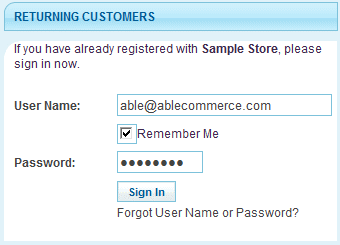
Click on the LOGIN icon to view the standard customer login/registration page. On the left, you'll see the login form for Returning Customers.
-
Enter your administrator Username and Password. This information was established by the person who installed AbleCommerce.
-
Once you attempt to login, your account will be automatically recognized as an administrative user. This will require you to enter the Verification Number shown in the image. This is a common system of form verification called CAPTCHA. If you can't read the verification number, click on the link "different image" for a new one.

-
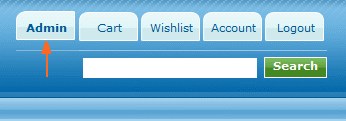
Click the Sign In button. After a successful login, you will now see a new tab for Admin in the upper-right corner of any store page.
-
Click on the Admin tab to access the Merchant Dashboard as shown in the example below.
Login by accessing the Merchant Dashboard directly
Another easy way to access your Merchant Dashboard, is to simply create a bookmark to the administration side.
-
You must already know your Merchant Admin URL. It should look something like the following:
e.g. http://www.your-domain.com/Admin/Default.aspx -
You will be automatically redirected to the merchant's login page. (refer to the example in Step 4. above)
-
Enter your administrator Username and Password.
-
Using the image for form verification, type in the number shown.
-
After a successful login, you will be at the Merchant Dashboard. (refer to the example in Step 6. above)
-
You should bookmark this page now.
|
TIP |
If you have lost your password, click on the link "Forgot Password?" to get a new one. You must have an email server configured first. |
![]() For Login configuration options, go to: Configure > Security > Password Policy
For Login configuration options, go to: Configure > Security > Password Policy
The Merchant Dashboard
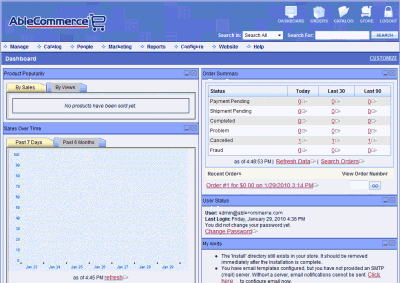
Once you have successfully logged into your store's administration area, you will be viewing the Merchant Dashboard. Your dashboard displays various sales and product reports, a summary of all orders within the last 90 days, links to the most recent orders, store alerts, and the AbleCommerce product news feed. Most of the reports will be empty until new orders are placed.
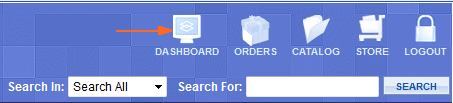
You can access the Merchant Dashboard at any time by clicking the DASHBOARD icon in the upper-right corner of the navigation bar.
The first thing you should do when accessing the Merchant Dashboard is to look for any ALERTS. These are warnings that advise you of configuration issues or low inventory. So, scroll down the page until you see the My Alerts section as shown in the example below.
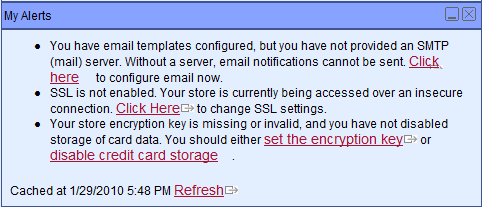
The first alert you should see is a warning that you have not provided an SMTP mail server. You should configure your email server as soon as possible. That way, if you accidentally lose your password, you can go to the login page and reset it.
Setup your Email Service
-
From the My Alerts menu, click on the link given to configure your email, or using the menu system, go to the Configure > Email > Settings page.
-
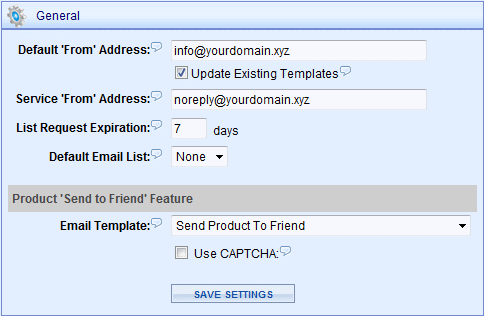
On the left-side of the Email Settings page, you can see the General settings as shown in the example below.
-
Change the Default 'from' address. This is the address that appears in the FROM field for new email templates that you create.
-
Check the box to Update Existing Templates so that all fifteen sample email templates will be updated with your email information.
-
The next three options apply only to mailing lists. (You may want to return to this page after setting up a mailing list)
-
Enter a Service 'from' address. This is the email address that will send notifications when a user signs-up for a mailing list.
-
The List Request Expiration is the number of days that a user has to join a mailing list that requires verification of the email. Default value is 7 days.
-
If you allow anonymous users to sign-up for a mailing list, this is the Default Email List that will be used. (You will need to create a new list before it will appear here)
-
-
The last section allows you to set the email template for the 'Send to Friend' feature. The default email template is already selected here.
-
For extra security, you may want to Use CAPTCHA with the Send to Friend feature. Remember, these are the numbers within an image that must be typed in to prevent bots from using forms in your store.
-
Click the SAVE SETTINGS button.
-
On the right-side of the Email Settings page, you will see the Server Configuration section as shown in the example below.
-
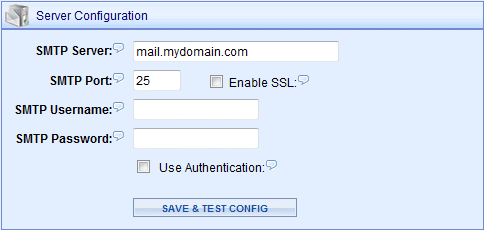
Enter your mail server's IP address, or domain record, into the SMTP Server field.
-
The SMTP Port number is typically 25, but could be different depending on your email server configuration.
-
If your email server requires a secure connection, then check the box to Enable SSL.
-
If your mail server requires authentication, enter the SMTP username and password and check the box to Use Authentication.
-
When finished, click the SAVE & TEST CONFIG button. A temporary Send To field will appear where you should enter your email address.
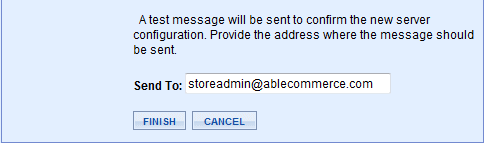
-
Click the FINISH button. The system will send a test message to confirm that email is working properly.
-
If you get the message, "Failure sending mail.", then verify the information entered is accurate and re-test.
-
Upon successful configuration, you will see the message, "A test message has been sent to 'youremail@yourdomain'."
-
|
HINT |
If you do not know your mail server information or have trouble connecting, you should contact your email or system administrator for connection details. |
![]() To return to the Email Settings page, go to: Configure > Email > Settings
To return to the Email Settings page, go to: Configure > Email > Settings
Return to the Merchant Dashboard
-
Click the DASHBOARD icon in the upper-right navigation bar.

-
Check your Alerts again. You may need to click the "Refresh" link.

-
You should have two more ALERTS to take care of.
-
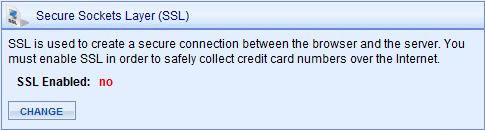
The SSL alert means that your store does not have a secure connection enabled for private information, such as passwords and user information.
-
Your store encryption key should be set before you accept new orders. This will encrypt any credit card information stored in the database.
-
|
SSL Certificates |
Before you enable SSL, make sure you have installed an SSL certificate for the domain that is running your store. There are many companies that sell SSL certificates and provide support for installation. |
Confirm your SSL certificate is working
-
Open a browser window using the same domain name that AbleCommerce is installed to.
e.g. http://www.my-domain.com -
Then, in the Address bar, change HTTP to HTTPS. The "S" tells the browser to use a secure (encrypted) connection.
e.g. https://www.my-domain.com -
If you can continue to access the page under a secure connection, then your SSL is working. You should see a lock
 icon or confirmation by your browser that the connection is secured.
(This will vary depending on your browser)
|
SSL Errors |
If you get a message like, "The page cannot be displayed" or "The connection was interrupted", then your SSL certificate is either not installed or improperly configured. If this happens, ask your System Administrator for assistance before continuing. |
Enable SSL in AbleCommerce
-
From the My Alerts menu, click on the link given to change your SSL settings, or using the menu system, go to the Configure > Security > General/SSL page.
-
On the right side of the Configure Security page, you can see the Secure Sockets Layer (SSL) section as shown in the example below.
-
Click the CHANGE button.
-
Check the box next to SSL Enabled to view the settings shown.
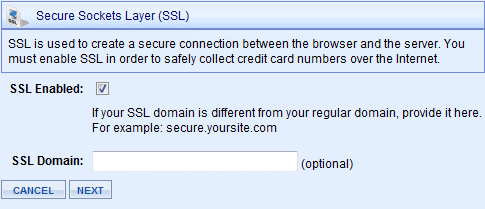
-
(OPTIONAL) If your secured domain is different from your regular domain, enter it into the SSL Domain field provided. This is not common.
e.g. secure.yoursite.com -
Click the NEXT button to continue.
-
A message will appear telling you to open the SSL link shown before confirming the change. Click the link as instructed.
-
If you were able to access the page, then check the box next to "The link above is accessible, save the new SSL settings." If you were not able to access the page, then return to the section above "To Confirm your SSL is working".
-
Click FINISH to save your settings.
![]()
To return to the SSL Settings page, go to: Configure > Security > General/SSL
Setting an Encryption Key
-
Return to the Merchant Dashboard by clicking the DASHBOARD icon in the upper-right navigation bar.
-
From the My Alerts menu, click on the link given to set the encryption key, or using the menu system, go to the Configure > Security > General/SSL page.
-
On the left side of the Encryption Key page, you can see the Change Encryption Key section as shown in the example below.

-
Enter some Random Text into the field provided.
-
Click the CHANGE ENCRYPTION KEY button. You will be asked to Confirm (or Cancel) the key change.
-
Confirm the change, and your key will be updated. At the top of the page, you'll see a timestamp for the last key update.
|
Important Note about Keys |
Changing an encryption key is easy, but this can have a significant impact on any sensitive information previously stored in the database. Once a key is changed, it will only take effect on new orders. So, if you need to retrieve card information, from an order placed before the key was changed, you'll need to use your Backup Key. |
Backup an Encryption Key
-
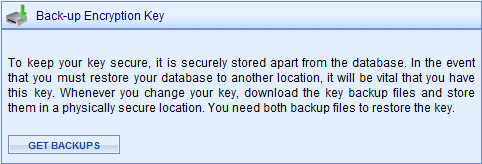
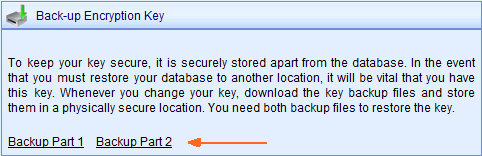
On the right side of the Encryption Key page, you can see the Backup Encryption Key section as shown in the example below.
-
Click the GET BACKUPS button.
-
Two Backup Parts will be created. You must have BOTH parts to restore this key.
-
Click the link "Backup Part 1" and save this file to a safe location, preferably on a different computer than the AbleCommerce installation.
-
Repeat for the linked file "Backup Part 2".
-
When finished, return to the Merchant Dashboard by clicking the DASHBOARD icon in the upper-right navigation bar.
![]()
To return to the Encryption Key page, go to: Configure > Security > Encryption Key
Congratulations! You have completed Part One of the Quick Start Guide. |