Password Requirements
Table of Contents Show
PCI Compliance and Practices
The password policy configuration page gives you total control over password and account policies. AbleCommerce uses two types of password policies, one for the merchant and the other for the customer. Each policy can be modified accordingly.
You can use the built-in controls to change the minimum password length, number of login failures before account lockout, and much more.
Before making changes, you should follow the recommendations in the PCI Implementation Guide to ensure that AbleCommerce is configured as securely as possible, in a PCI compliant manner. To comply with the latest standards, merchants shall enable the multi-factor authentication feature.
For more information, please go to PCI Certification
and Implementation Questions  in the community forums. There,
you will find a link to the PCI guide, and a place to discuss
any questions you might have about securing your online store.
Change the Merchant Password Policy
The default settings, after a new installation, meet the requirements for PCI compliance. By reducing the security of these settings, the application will not meet the minimum standards set by the payment card industry.
From the menu, go to the Configure > Security > Passwords page.
Find the Merchant Policy section as shown in the example below.
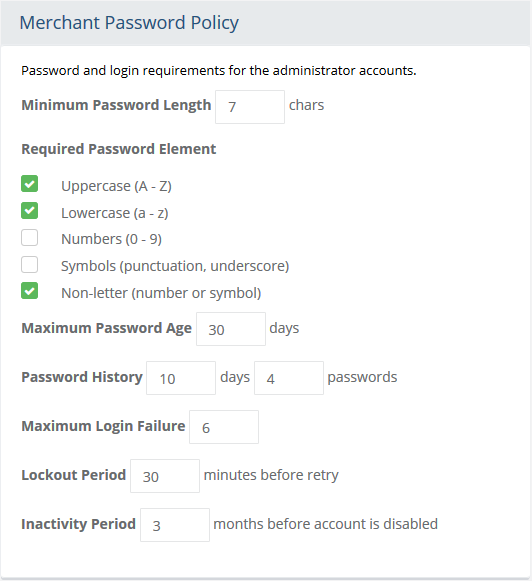
Enter the minimum length required for a password in the Minimum Password Length field. The default value is "7" characters.
Check or uncheck the box for each of the Required Password Elements you will require for new passwords. Use at least one of Uppercase, Lowercase, Numbers, Symbols, and Non-letter elements. When a user creates a new password, they will be required to use at least one character for each of the password element groups checked. The more elements you have checked, the stronger the password must be. For an administrative role, we recommend using strong passwords.
The Maximum Password Age is how long (in days) your password can be used. When this time expires, you must create a new password. The default value is "30" days.
The Password History determines how long your old passwords will be stored. The minimum number of days (10 is default) or the minimum number of passwords (4 is default). Passwords cannot be reused while they remain in the password history.
The number of times that a login can be attempted before the account is locked out can be changed in the Maximum Login Failures field. The default value is 6 times.
The Lockout Period is the number of minutes an account will be locked after the maximum number of failed login attempts is reached. The default value is 30 minutes before retry.
The number of months a merchant or administrator account can go unused before it will be deactivated is the Inactivity Period. The default value is 3 months before an admin account is deactivated. To re-enable the account, you can edit the user record and uncheck the box for disabled.
Click the Save Settings button when finished.
Change the Customer Password Policy
Requirements for customer accounts and passwords are set by the payment card industry. By reducing the security of these settings, the application will not meet the minimum standards set for PCI compliance.
From the menu, go to the Configure > Security > Passwords page.
In you will see the Customer Policy section as shown.
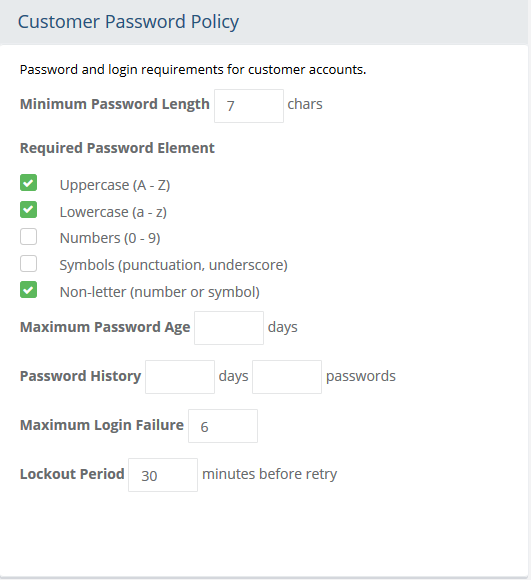
Enter the minimum length required for a password in the Minimum Password Length field. The default value is "7" characters.
Check or uncheck the box for each of the Required Password Elements you will require for new passwords. Use at least one of Uppercase, Lowercase, Numbers, Symbols, and Non-letter elements. When a user creates a new password, they will be required to use at least one character for each of the password element groups checked. The more elements you have checked, the stronger the password must be. For a customer role, we don't recommend making the password requirement too difficult.
The Maximum Password Age is how long (in days) your password can be used. When this time expires, you must create a new password. A customer would not typically be required to change their password, so the default value is blank, for no requirement.
The Password History determines how long your old passwords will be stored. The minimum number of days or the minimum number of passwords. Passwords cannot be reused while they remain in the password history. A customer would not typically be required to change their password, so the default value is blank, for no requirement.
The number of times that a login can be attempted before the account is locked out can be changed in the Maximum Login Failures field. The default value is 6 times.
The Lockout Period is the number of minutes an account will be locked after the maximum number of failed login attempts is reached. The default value is 30 minutes before retry.
Click the Save Settings button when finished.
Password Compliance
In order to achieve PCI compliance, AbleCommerce has features that you must be aware of in regards to user accounts:
User passwords are stored in a one-way SHA2 hash. Passwords cannot be decrypted or recovered, they can only be reset.
All accounts, including the admin accounts, can become locked out due to too many login attempts or disabled due to inactivity.
Additionally, you are advised to use strong passwords for all other systems and applications, including, but not limited to your database passwords and your payment gateway merchant accounts. This also applies to accounts that are not regularly used, such as the default ”sa” super-user account within your SQL Server database. Default accounts that are not in use should also be disabled whenever possible.
If you have forgotten your password, use the Forgot Password link from the login page. An email will be sent with instructions on how to reset a password.
User Authentication Settings
As a secondary measure to ensure a user is verified for access, a CAPTCHA (Completely Automated Public Turing test to tell Computers and Humans Apart) feature can be implemented for customer and merchant accounts.
From the menu, go to the Configure > Security > Passwords page.
You will see the User Authentication Settings section as shown.
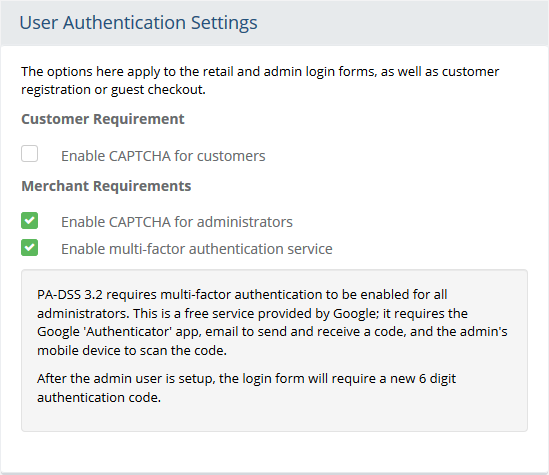
To enable CAPTCHA for all non-administrative users on the login form, check the box Enable CAPTCHA for customers. By default, this is not turned on for customers, but it is recommended to ensure that the login is being performed by a human.
NOTE: When this option is enabled, the CAPTCHA will appear on the retail /Login page, Contact Form, Product Review and Edit forms (if enabled), and the Edit Billing Address form if the user is not already signed in.The secure CAPTCHA system should be turned on for administrator accounts. To comply with PCI requirements, make sure the box Enable CAPTCHA for administrators is checked. By default, this is not enabled for customers.
NOTE: When this option is enabled, the CAPTCHA will appear on the /admin/Login page only.To enable the multi-factor authentication (MFA) service, you will need to have each administrative user install the Google Authenticator app on his or her smart phone or mobile device. The app is available from play.google.com and it will be required to comply with PCI requirements if you accept credit cards through the storefront.
Make certain the email system is enabled and functioning before continuing.
Each admin user must download and install the Google 'Authenticator' app to a personal mobile device.
From the User Authentication Settings section (shown above), check the box to Enable multi-factor authentication service.
Once enabled, all admin users must login through the Merchant Login page. It will not be possible for an administrator to use the customer-facing storefront login form when MFA is active. Go to the admin login page directly to continue.
First time users will see a link "Setup Google Authenticator" from the Merchant Login page. Click this to begin setup.
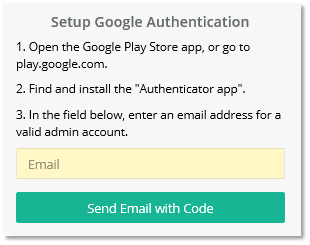
Enter an email address for a valid admin user account. This shall belong to a single user. Sharing of accounts is prohibited.
Click the Send Email with Code button. This will send an email to the user which contains an embedded barcode image.
Google authenticator app offers two ways to input the code: scan the image by pointing the phone at the barcode image, or manually enter the key code which is also available within the contents of the email message.
The admin user should now see a 6-digit code that is continuously updating within the app. This code will be used in conjunction with the Admin user's login credentials.
Click the Return to Login button to complete the setup. The merchant admin login form will have a field for Authentication Code. To successfully login, the user must enter the active 6-digit code into the form provided.
Click the SAVE CHANGES button when finished.
CAPTCHA Services
CAPTCHA is a type of challenge-response test used in computing to determine whether or not the user is human. There are three CAPTCHA services available:
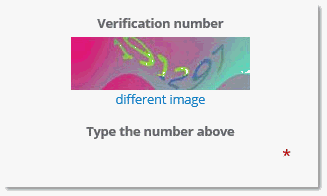
The standard CAPTCHA option will display a 6-digit verification number embedded within an image. The user is required to enter the number from the image into the form field provided. This option requires no additional configuration.
Google reCAPTCHA services:
Score based (v3) - verifies requests with a score and gives you the ability to take action. For v3, Google returns a score for each request without user friction and provides you more flexibility and control.
Challenge (v2) - verifies if an interaction is legitimate with the "I am not a robot" checkbox and invisible reCAPTCHA badge challenges.
NOTE: With a new installation, AbleCommerce provides test keys for Google's reCAPTCHA service. You will need to obtain your own keys by registering or sign in at the following link https://www.google.com/recaptcha/admin#list and obtain Site and Secret keys.
From the menu, go to go to the Configure > Security > Passwords page.
Find the CAPTCHA Services section
as shown.
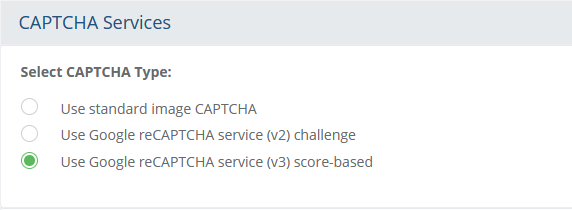
Using standard image CAPTCHA
Select the option "Use standard image CAPTCHA" from the CAPTCHA Services section.
Click the SAVE CHANGES button when finished.
This CAPTCHA service does not require any additional configuration. The user will see an image during the login process. The verification number within the image will need to be correctly typed into the field provided.
Google reCAPTCHA Services v2 (challenge) or v3 (score based)
Select the either of "Use Google reCAPTCHA service (v2) challenge" from the CAPTCHA Services section.
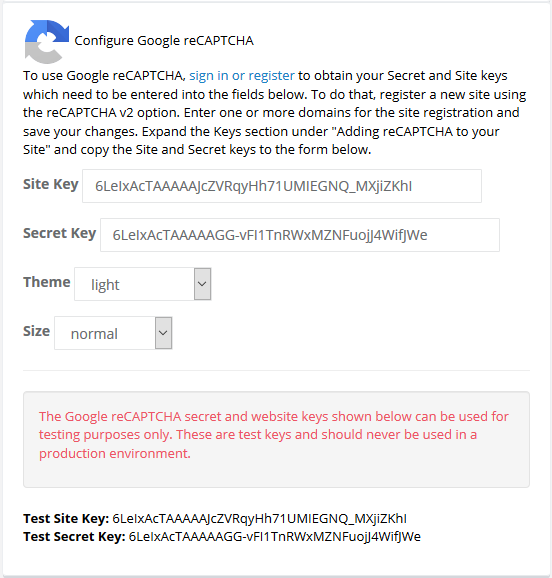
A link to register or sign in to Google is available in the opening text. Reference screenshot above.
Go to https://www.google.com/recaptcha/admin#list and obtain your own Site Key and Secret Key depending on the version you wish to implement. An example screenshot is shown below for reference. Note the selection for reCAPTCHA type. Make sure to select the appropriate version to match the AbleCommerce setting.
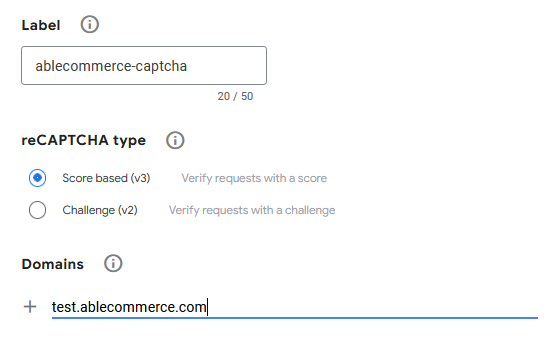
After entering your domain name into the form, you can generate the keys.
Enter this information into the fields shown.
For v2, there are two display options that allow you to change the size or color (Theme) of the CAPTCHA image.For reCAPTCHA v3, a Score based field with a default value of 0.5 is used.

If desired, adjust the score threshold using values between 0 and 1.0, where 1.0 is very likely a good interaction, and 0.0 is very likely a bot.When finished, click the Save Settings button. The screenshot below shows a portion of the login page using Google's reCAPTCHA (v2) service with a set of test keys. Be sure to use your own keys to remove the red warning text.

If you are using Google reCAPTCHA (v3), the pages with CAPTCHA enabled will display this instead:

It appears in the lower-left corner of the page.Make sure that CAPTCHA services are enabled. You can turn this feature on for customers and/or administrators. Please refer back to the User Authentication Settings above.
CAPTCHA Options only found in Widgets
There are a few other widget that have Captcha options that can only be enabled or disabled through the widget itself. You may change the setting from either the retail facing pages, or by logging into the admin.
From the retail pages, you must be logged in as an admin user with sufficient permissions to enable the CMS system.
From the admin, go to the Website > Store Design > Widgets page. Find the widget and use the EDIT button.
Contact Form Widget
This widget is shown on the Contact Us page. The Captcha setting is enabled by default.
For additional security settings available on the contact form, please see System Settings.
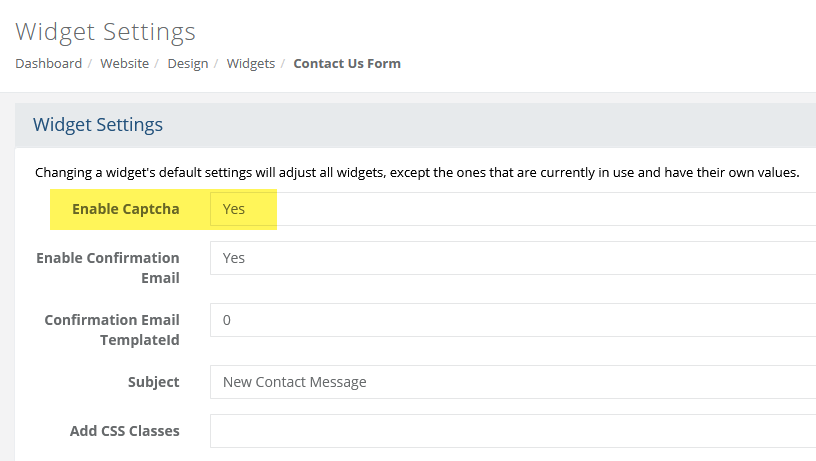
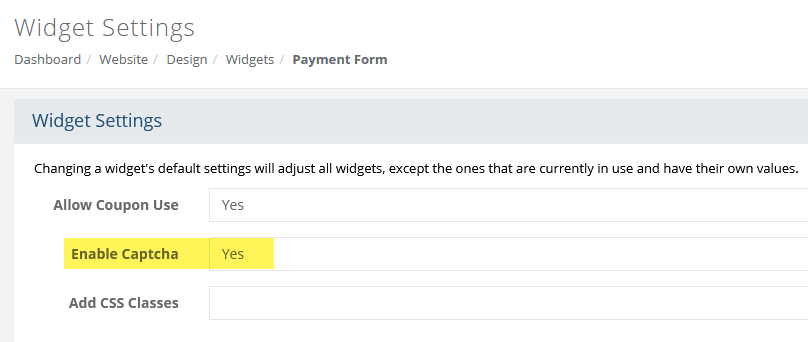
Payment Form
This widget is shown on the final payment page when credit/debit card payment forms is in use. This feature will be in AbleCommerce 9.0.11 and higher. It is turned on by default to prevent the credit card payment form from abuse by bots.
