AbleCommerce DataPort utility
Version: AbleCommerce DataPort utility
Applies to: Upgrading to AbleCommerce 7.0 Asp.Net from version 5
Download: To obtain the latest release for AbleCommerce 7.0.x, please see the DataPort Support Page.
DETAILS
AbleCommerce DataPort Overview of Features
AbleCommerce DataPort Utility is a separate download and installation of a client application that can be used with the latest versions of AbleCommerce 7.0 Asp.Net.
The AbleCommerce data port utility greatly reduces the time to upload large catalogs into AbleCommerce. There are many exciting features:
-
Download or upload your entire store as an XML package.
-
Download or upload your products, categories, users and orders in CSV or XML format.
-
Create templates to map CSV data from other sources to the AbleCommerce fields and save the template for later.
-
Import AbleCommerce 5.5 XML stores to AbleCommerce 7.0 *
* This document applies only to the upgrade of AbleCommerce 5.x stores. For more information on using other features, please see - http://wiki.ablecommerce.com/index.php/Data_Port_Utility
Prerequisites
-
Windows XP, Vista, or Server
-
Review the Migrating to AbleCommerce 7 documentation.
-
A working installation of AbleCommerce 7.0. You may want to install AbleCommerce to a temporary website for the purpose of upgrading and migrating data.
-
A new store without any "sample data" installed during the initial installation of AbleCommerce.
-
Install AbleCommerce 7 with a username (email) that does not exist in your AbleCommerce 5.5 store.
-
Before exporting, make sure all your orders are processed.
-
Latest version of the CommerceBuilder.DataClient.Api.dll installed in the \bin\ folder of AbleCommerce.
Installation
-
Unpack the "AbleCommerceDataPort.msi" in a temporary folder.
-
Double-click to begin.
-
Click NEXT to begin the installation and Select Installation Folder.
-
Browse to the folder or accept the default value. Click NEXT.
-
Click NEXT to begin installing files.
-
Click CLOSE to exit.
-
The DataPort Utility can be accessed through Program Files > AbleCommerce > DataPort
Configuration Steps
-
Initiate the DataPort program by going to Program Files > AbleCommerce > DataPort
-
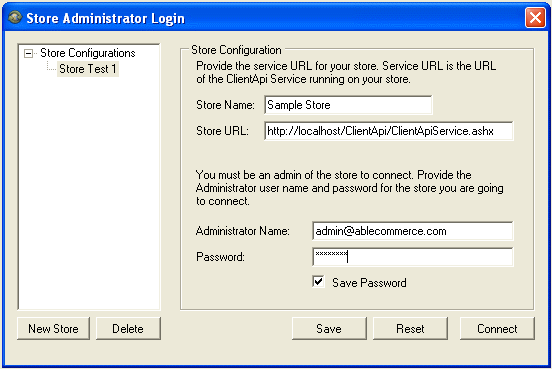
On first visit, you will see the Store Administrator Login page.

-
Enter a Store Name (used for multiple DataPort utility store configurations)
-
Enter the Store URL. (e.g. http://[YourStoreURL]/ClientApi/ClientApiService.ashx)
-
Enter an Administrator Name and Password. (User must be part of the 'SuperUser' group and should not exist as part of the XML export from your AbleCommerce 5.x store)
-
If desired, check the box to Save Password.
-
Click the Save button. This will save the information entered as a new store configuration. Notice in the left side, you can see all saved store configurations.
-
Click the Connect button. Please wait a moment for a successful connection to your AbleCommerce 7 store.
-
You are now ready to begin. There are many features available, however, the purpose of this document is to describe the steps to upgrade from a prior version of AbleCommerce.
NOTE: If you cannot connect to your store, then make sure you have updated to the latest versions of CommerceBuilder.DataClient.Api and ClientApiService.ashx. These must match the version of the DataPort client utility you are using. If not, a warning message will be displayed.
Store Upload AbleCommerce 5.x
Importing your 5.5 store using the DataPort utility.
Prerequisites
You must have already created an XML file using the older client tool application designed for AbleCommerce versions 5.5. If you haven't done this yet, then Download the client tool utility here and create an XML file of an existing AbleCommerce store.
For best results, run the new DataPort utility from the same server that has your AbleCommerce store installed. This will remove the extra time it takes to transfer data over an internet or network connection.
-
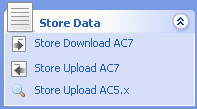
From the left column, select Store Upload AC5.x from the Store Data menu.

-
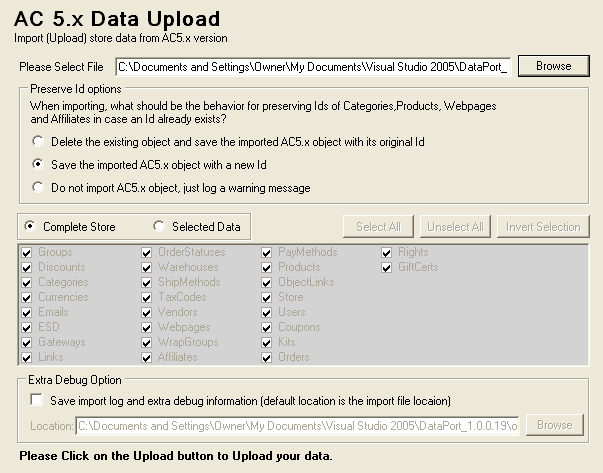
You will see the AC 5.x Data Upload page.

-
Use the Browse button to select your existing 5.5 store's exported XML file.
-
There are Preserve ID options available. These are optional import options that can retain the database Ids for Affiliates, Categories, Products, Orders, Webpages, and Users only. The choices below are available when the same Id already exists.
-
Delete the existing object and save the imported AC5.x object with its original Id
-
Save the imported AC5.x object with a new Id (default)
-
Do not import AC5.x object, just log a warning message
-
-
The next section allows you to import the Complete Store (default and recommended choice), or Selected Data. If you do not want to import all store data, then you can select only those tables to import. If you do not select enough items to import, you may have undesirable results or missing features.
-
Check the box to create a log file that can be used to debug if anything should go wrong. (recommended)
You can choose the location of the log file. -
When finished, click the Upload button to begin.
-
Pre-processing begins. This will create "chunks" of data that will be used to import. This is done so that large files can be imported without error.
-
Final importing can take a considerable amount of time depending on the size of the store.

-
Upon completion, click the FINISH button.
-
Continue following instructions in the Migrating to AbleCommerce 7 documentation.