CanadaPost
CanadaPost's Sell Online™ Shipping Module is one of the most sophisticated online shipping services available today. AbleCommerce uses your product's weight and dimensions to calculate the most accurate rates possible using CanadaPost's unique features.
A CanadaPost Sell Online™ account records information such as the warehouse postal code, handling charges, pick-up times, fulfillment times, delivery options, and box sizes. Using the Sell Online account, you will be able to enter the types of boxes used for packaging. AbleCommerce and CanadaPost use this information to determine the appropriate box size for a customer’s order, as well as calculate the specific delivery costs. Using Canada Post’s Sell Online™ shipping module, as integrated with AbleCommerce, you can present accurate shipping costs for any delivery point in Canada, USA, and worldwide.
In order for Sell Online™ to calculate order specific rates you will need to record the dimension and weight of your inventory. Remember that once this data is captured, you will not be required to measure and weigh each parcel for shipment.
CanadaPost Features and Requirements
-
A Sell Online™ account that is ready for production use and your Merchant CPC ID number.
-
CanadaPost requires that your products ship from an origin within Canada. It will not be able to calculate rates for shipments that originate outside of Canada.
-
CanadaPost expects all product measurements to be in Centimeters (cm). Rates will still be calculated if you use a different unit of measurement, but there is additional overhead in converting the measurements. You will have the best performance if you use Centimeters to begin with.
-
CanadaPost supports the following services, Surface International, Air International, Purolator International, and Puropak International for international destinations.
Register with CanadaPost
In order to use CanadaPost you must have an active account with them.
-
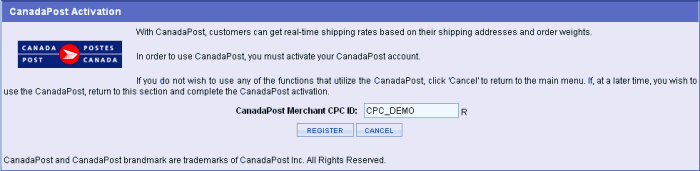
From the Integrated Carriers page, click the ADD CARRIER button to choose the CanadaPost link or click the CanadaPost link directly from this page, whichever is available.
-
On the CanadaPost Activation page, enter your CanadaPost Merchant CPC ID. This information is provided by CanadaPost.
-
Click the REGISTER button to continue, or CANCEL to quit.
-
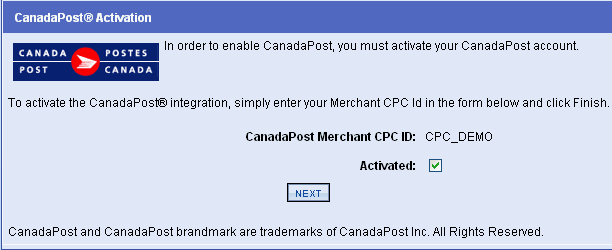
On the next page, you will need to check the box to Activate this integration. Click the NEXT button.
-
After completing the short registration process, you will be on the Configure CanadaPost page as shown in the example below.
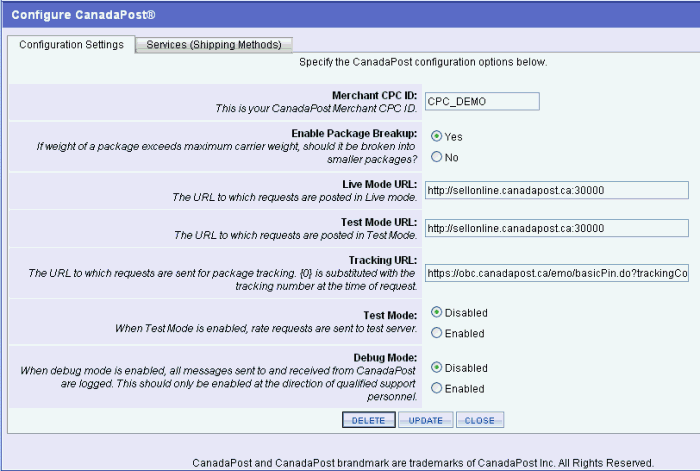
The settings on this page will impact the services and rates in your store. See Configure CanadaPost in the next section.
-
After configuration of the shipping gateway, you can return to this page by going to Configure > Shipping > Integrated Carriers.

-
Click the EDIT icon to access the configuration pages for any of the integrated carriers.
Configure CanadaPost
You must have an existing account setup for CanadaPost and you must use a warehouse with a Canadian address.
-
From the Integrated Carriers page, click the EDIT icon for CanadaPost. This will bring you to the Configuration Settings menu.

-
Confirm your Merchant CPC ID is correct.
-
Enable Package Breakup. If a shipment exceeds the maximum weight a carrier specifies, do you want the calculations to break the shipment into smaller packages. This will not create new shipments. It will calculate a single rate based on the total shipment weight, divided, to create two or more shipments within the rate allowance.
e.g. A customer orders 100 pounds of assorted items. The maximum weight for a single package has been exceeded. AbleCommerce divides 100 pounds by 2 for a result of 50 pounds in two packages that are both within the allowed shipping weight. The rates for each package are calculated and added together so the customer will see just one rate for the shipment.

-
The URL settings come pre-configured when you create the shipping account through AbleCommerce. These URL's can change so the fields are available for modification. It is not advisable to modify the URL's here unless specifically instructed to do so.
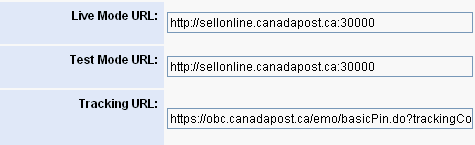
Live Mode URL: The URL to which requests are posted in Live mode.
Test Mode URL: The URL to which requests are posted in Test Mode.
Tracking URL: The URL to which requests are sent for package tracking. {0} is substituted with the tracking number at the time of request.
-
The Mode settings are used to enable/disable rates from the test server. Debugging can also be enabled which can help with any communication problems.
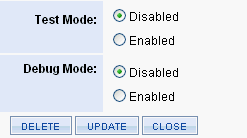
Test Mode: When Test Mode is enabled, rate requests are sent to test server using the Test Mode URL.
Debug Mode: When debug mode is enabled, all messages sent to and received from CanadaPost are logged. This should only be enabled at the direction of qualified support personnel.
Default Log File Location: ..\App_Data\Logs\[gatewayname].log
-
When finished, click the UPDATE button. This DOES NOT COMPLETE setup of the shipping gateway. Please see Configuring Shipping Services for CanadaPost in the next section.
Or, you can click the CLOSE button to return to the Integrated Carriers page.
Configuring Shipping Services for CanadaPost
You must select the services you want to be available to your customers. Each service (shipping method) is configured separately.
-
From the Integrated Carriers page, click the EDIT icon for CanadaPost.
-
At the top of the menu, click the Services (Shipping Methods) tab. This will bring you to the Provider Services/Shipping Methods menu.
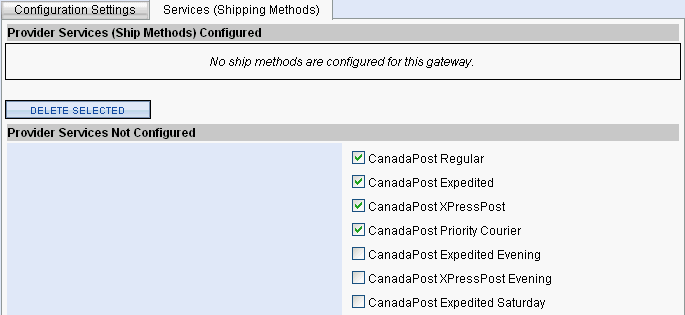
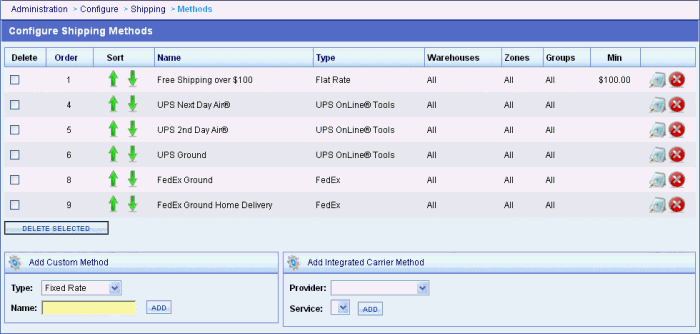
In the top section, you will see the Provider Services that are configured and in use for your store. After registering a new shipping account through AbleCommerce, the gateway will have nothing configured by default.
In the bottom section, you will see a list of all available Provider Services for CanadaPost. When the service is listed in this section, it is unavailable and will not be offered as a shipping option in your store. You should review the entire list of shipping services offered and decide which ones you want to make available.
-
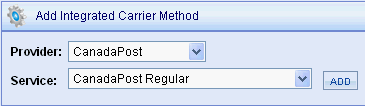
In our example, we will add and configure the CanadaPost Regular service. In the bottom section, Provider Services Not Configured, check the box next to CanadaPost Regular and any others you want to offer as a shipping service.
-
Click the ADD DEFAULT CONFIGURATION button. The selected shipping services now appear in the Provider Services (Ship Methods) Configured section.

-
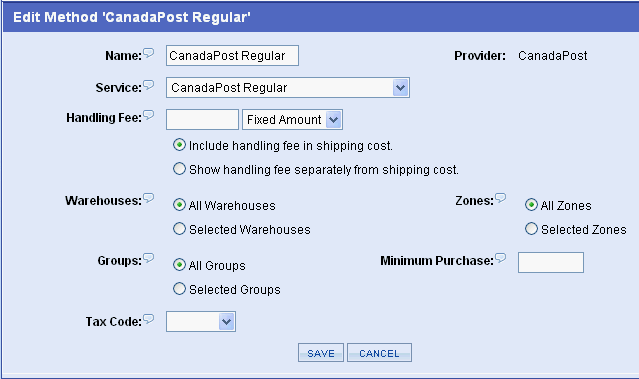
Each shipping service will use it's own configuration settings. To configure a shipping service, click the EDIT icon to view the Edit Method page.
-
The above example shows the default configuration values for all shipping services added.
-
Change the method Name if needed. This is the name that will be displayed to the customer and the merchant on all invoices and receipts.
-
The Service is a list of all services available through this shipping gateway. They can be selected and configured from this page.
-
Enter a surcharge or Handling Fee to be included with the selected shipping service. This can be a fixed amount or percentage of the shipping amount.

-
You also have the option to include the fee in the shipping charge, or show it as a separate item on the invoices.
-
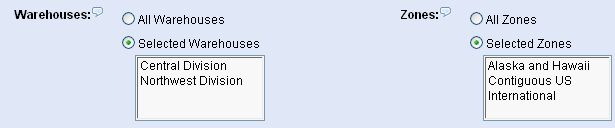
If this shipping service applies to a specific Warehouse(s), select it from Selected Warehouses list. Otherwise, use the All Warehouses option.
A warehouse determines the shipping origin. All CanadaPost services must use a warehouse with an address in Canada.
-
If this shipping service applies to a specific Zone(s), select it from the Selected Zones list. Otherwise, use the All Zones option.
A zone determines the shipping destination.
-
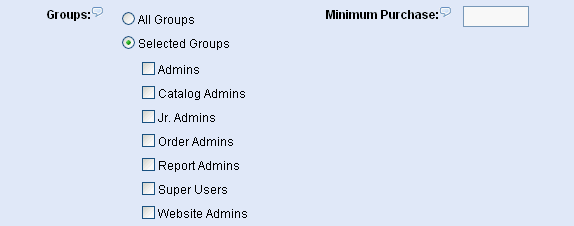
When you apply a shipping service to a user group, then it will only appear for the users who are logged in as members of that group. Check the box(es) for Selected Groups or use All Groups if this shipping service is available to everyone.
-
The Minimum Purchase field is the minimum amount that must be purchased before this shipping service will be available. Until this limit is met, the shipping method will not display.
A minimum purchase value applies to the total of each shipment, not the total of the order.
-
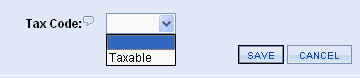
If these shipping charges are taxable, then select a Tax Code. Make sure you understand the tax laws according to your local tax authority.
Taxes on shipping charges are combined with any other taxes calculated for the shipment.
-
Click the SAVE button when finished. This will bring you back to the Configure Shipping Methods menu.
-
From this page, you can continue to add and configure shipping services from the Add Integrated Carrier Method section.
-
To add a new shipping service, select the Provider and then select the Service. Click the ADD button to edit as needed.
After editing and saving, you will be returned to the Configure Shipping Methods page.
CanadaPost and CanadaPost brandmark are trademarks of CanadaPost Inc. All Rights Reserved.
|