When you create a store, AbleCommerce makes a physical directory for the scripts, images, and other files used. The files for the new store can be copied from another existing store. More commonly, they are copied from a store template. Store templates contain a set of files that power the retail storefront.
AbleCommerce ships with a single template called AbleWizard. A list of each file and directory found in the template is described below. When you use the AbleWizard template to create your store, a copy of these files will be placed in your store directory.
|
File |
Description |
|
agreement.aspx |
Displays the licensing agreement for ESD products. |
|
basket.aspx |
Displays the customer basket and allows the user to begin the check out process. |
|
billinfo.aspx |
Displays a form to collect the user’s billing address. This is the first page in the checkout sequence. |
|
category.aspx |
Displays the details of a category in the store. |
|
directory.aspx |
Displays a store directory that can include categories and optionally any of the following: products, links, web pages. |
|
download.aspx |
This script is used to access and download ESD files. It validates access to the file and upon success sends the file back to the requesting browser. |
|
faxorder.aspx |
Displays a faxable / printable invoice for an order. |
|
forgotpassword.aspx |
Displays a form for a user to recover a lost password. |
|
index.aspx |
Displays the home page of the store. |
|
login.aspx |
Displays a login form for access to the store. |
|
newprods.aspx |
Displays a list of the most recently added or updated products in the store. |
|
orders.aspx |
Displays the current users past order history and other account related information. |
|
password.aspx |
Displays a form to allow the user to change their current password. |
|
paymeth.aspx |
Displays a form to allow the user to enter their payment information for the current order. This is the third and final page of the checkout sequence. |
|
product1.aspx |
Displays the details of a product in the store. |
|
product2.aspx |
Displays additional details about a product in the store. This page is also referred to as the “more detail” page and includes the Detailed Description of a product. |
|
readme.aspx |
Displays the readme for an ESD file. |
|
register.aspx |
Displays a form that allows a user to register and create an account for the store. |
|
registeraffiliate.aspx |
Displays a form that allows a user to register as an affiliate for the store. |
|
search.aspx |
Displays an interface for searching the categories, products, web pages, and links in the store. |
|
sendlink.aspx |
Displays a form allowing a user to send the link for a product to an email address. |
|
sendwishlist.aspx |
Displays a form allowing a user to send a link for their wishlist to an email address. |
|
shipaddr.aspx |
Displays a form allowing a user to enter their shipping address if it differs from their billing. When shown the page is second in the checkout process, but it is optional. It will not be shown if disabled by the merchant or if the customer indicates that billing and shipping addresses are the same. |
|
shipmeth.aspx |
Displays a form allowing the user to select shipping options for their order during checkout. This is the second page in the checkout process. |
|
specials.aspx |
Displays a page listing all products currently on sale in the store. |
|
vieworder.aspx |
Displays the details of an order. |
|
viewshipments.aspx |
Displays the details about the shipments in an order. |
|
viewtrackinginfo.aspx |
Displays the tracking information for a shipment in an order. If an integrated shipping gateway is used, real time tracking information will be displayed. |
|
viewwishlist.aspx |
Displays the wishlist for another user. Tis page may require a password to access. The password is set by the wishlist owner. |
|
webpage.aspx |
Displays the contents of a web page as defined in the AbleCommerce content management. |
|
wishlist.aspx |
Displays a wishlist for the current user and allows them to manage the items it contains. |
|
css/ |
This directory contains the cascading style sheets available for your store. |
|
css/BlueGray.css |
This is the default style sheet that uses a blue-gray color scheme. |
|
images/ |
This directory contains the images used by the store web pages. The individual files in this directory will not be detailed. |
|
includes/ |
This directory contains files intended to be included by other scripts in the store. |
|
includes/leftnav.aspx |
This file displays the left hand navigation bar. |
|
includes/rightnav.aspx |
This file displays the right hand navigation bar. |
|
includes/sessionfooter.aspx |
This file performs cleanup tasks that are common to all files in the store. This file should be included at the end of every store file. |
|
includes/sessionheader.aspx |
This file performs the initialization tasks that are common to all files in the store. It also creates the session and database tokens needed by all AbleCommerce functions. This file should be included at the beginning of every store file. |
|
includes/storefooter.aspx |
This file displays the store footer. |
|
includes/storeheader.aspx |
This file displays the store header. |
|
includes/storeid.aspx |
This is a dynamic file that is created by AbleCommerce. It contains a single line that specifies the ID of the current store. This file is included by includes/sessionheader.aspx. |
|
includes/storenav.aspx |
This file is not actively used by the store template. It gives an alternative example for either the leftnav or rightnav code. |
|
js/ |
This directory contains javascript files commonly used by the store web pages. |
|
js/addresses.js |
This file contains javascript functions used for the validation of addresses. |
|
js/common.js |
This file contains javascript utility functions that are commonly used for form validation. |
|
js/isblank.js |
This file contains a javascript function that can check if a form field is empty. |
|
js/isCreditCard.js |
This file contains javascript functions used to validate credit card numbers. |
|
js/payments.js |
This file contains javascript functions used to validate payment information, including credit cards. |
|
logs/ |
This directory stores log files that are generated for the store. The individual files in this directory will not be detailed and are subject to change. |
|
themes/ |
This directory contains the themes configured for this store. For more details on the theme files please see the Wizard Framework section later in this document. |
|
wizards/ |
This directory contains the custom wizards available for this store. For more details on the wizard files please see the Wizard Framework section later in this document. |
Nearly every script in the AbleWizard template includes the files sessionheader.aspx and sessionfooter.aspx. These includes perform initialization and cleanup tasks common to all AbleCommerce pages. They are responsible for maintaining the user session and making the appropriate database connections.
Specifically, the session header initializes the “token” object. The token is an instance of the CommerceBuilder5L.cbToken class. It contains the current session information and provides access to the store group and master databases. The token is used by nearly every other function of AbleCommerce, making the session header and footer files mandatory for any page that works with the CommerceBuilder API.
You can make changes to the session files if desired. Chapter 4 has detailed information on
modifying the session management aspect of these files. This would also be a suitable place to
initialize variables that would be used by all of the scripts in your store.
AbleCommerce Checkout
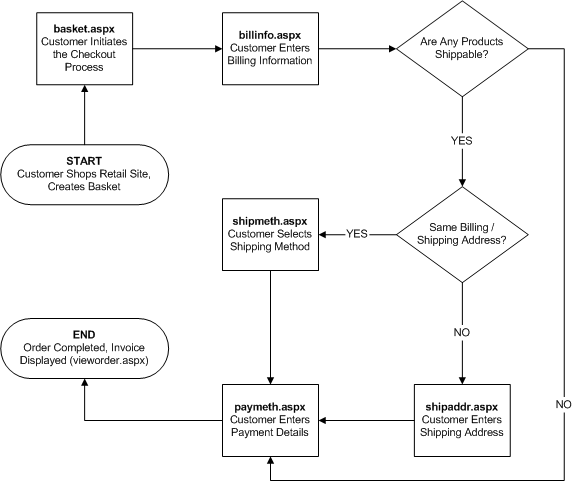
The figure below displays a flow chart of the AbleCommerce checkout process in the AbleWizard template.
Figure 4.1: Flow of Checkout in AbleWizard Template
The customer initiates the checkout process after they have completed their shopping session. This is done by clicking the “Checkout” button on the basket page, which opens the billinfo.aspx page.
When billinfo.aspx first loads, the items in the basket are analyzed and distributed into shipment containers. This is referred to as “packaging” the basket and is performed by the cbBasket.Package() method. Items are placed into shipments taking several factors into account, including the warehouse location and product shipping options.
The customer is then presented with a form allowing them to enter the billing address for the order. Upon submission of the form with valid data, the checkout process decides the next appropriate page. If there are no shippable items, the customer is taken directly to the payment page. If there are shippable items, further shipping information must be gathered.
If the customer indicated that the shipping address is not the same as billing, a form is presented for the user to enter the shipping address by shipaddr.aspx. Upon completion of the form, the user is sent to the shipmeth.aspx page. If the billing and shipping addresses are the same, shipaddr.aspx is skipped.
When shipmeth.aspx loads, all possible shipping methods and their costs are determined. The customer is then presented with a list of shipping methods available for each shipment in their order. The customer can select the desired shipping method and continue.
Finally the process moves to the paymeth.aspx page, where payment information is gathered. When the payment page first loads, taxes are calculated for the order based on the current order information. The customer is then presented with a final order invoice showing all line items, including taxes, shipping, discounts, coupons, etc. The customer can review the information and then enter their payment details.
Upon submission of payment.aspx, the payment data is validated and sent to a real time processor if configured. When the payment has been successfully applied, all data regarding the order is recorded into static tables. This includes the billing and shipping address as well as details on all products purchased. Recording the data prevents the order details from being lost or altered if a product is later deleted or an address record is changed.
After all data has been recorded, the user is shown the final order invoice by vieworder.aspx. This concludes the order for the customer. The order is ready to be processed by the merchant.
You can safely edit any of the files in your store to achieve a fully customized storefront. Before changing a file, it is a good practice to make a backup copy first. That way if your changes do not work as planned, you will still have a copy of the original file to refer back to.
Since the store files are all ASP.NET files, you can use any valid feature of the language. In addition, you can access the AbleCommerce objects provided by the CommerceBuilder API.
There is one notable difference between AbleCommerce scripts and any other ASP.NET script. If the file uses the AbleCommerce “wizard framework”, it will have some additional information near the top of the script. It might look something like this:
'The following line is used for wizard identification. 'acbwizard:ac_product_01;
The specially formatted comment line is used to identify the name of the wizard for AbleCommerce. This allows the admin pages to determine which wizard form is needed to customize settings for the file.
Much of the code that follows this comment is likely to be specific to
wizards. For example, the script must
load the XML data that contains the wizard configuration. It will also load the theme file associated
with the wizard. The wizard script then
uses the configuration and theme data to customize the output. For complete details on how the wizard framework
functions, see the Appendix A – AbleCommerce Wizard Framework.
It is not required for AbleCommerce files to use this wizard framework. If you are editing a file and you wish to disable the wizard features, you can safely remove the comment line that identifies the wizard. Keep in mind that this will disable the ability to customize wizard options from the admin side for the file. If desired, you can also remove any code that loads and/or uses the configuration and theme data.
The wizard framework sacrifices some speed in exchange for the ability to edit the file from a web page from within the merchant admin. This is very useful in the sense that merchant administrators can make modifications to the page output without having any scripting knowledge or ever seeing the script itself.
However, the wizard structure will not be the right choice for everyone. A script file that does not use wizards would be shorter, simpler to edit, and faster. And although this would eliminate the ability to customize the output from a web form, some merchants will not need this feature. In this case, merchants who have a good working knowledge of ASP.NET may find it more suitable to customize files without using the wizard framework.
AbleCommerce makes extensive use of the objects provided by the CommerceBuilder API. Working with the objects is very simple. Each object generally represents a unique record. For example, the “cbProduct” object is designed to provide access to a record in the PRODUCTS table, along with the associated data.
Before an object can be used, a variable has to be defined for an instance of the appropriate class. The cbProduct object might be defined like so:
‘Defines the Variable
dim objProduct as cbProduct
‘Creates the Object Instance
objProduct = New cbProduct()
Now, the objProduct variable has been created and is ready to be used.
Objects also provide a set of properties and methods that are used to work with the data. Properties represent elements of data that describe the object. Methods are functions that usually execute some action that relates to the object.
Continuing our example above, we want to use our product object to access Product ID #1. To do this, we need to use the “Load” method. This method will connect to the database and get all of the data related to the product from the database. Note that the code below uses the “objToken” variable, as discussed in the Store Overview chapter.
‘Loads Product ID 1
objProduct.Load(objToken, 1)
Assuming the load procedure was successful, the product object would be loaded for the desired record. Now we can access the data specific to the product. One of the properties provided by the object is called “UnitPrice”, which contains the unit price of the product. Continuing the example, we are going to add 1.00 to the current “UnitPrice”:
‘Writes the Current Price
Response.Write(“Current Price: “ & objProduct.UnitPrice & “<BR>”)
‘Add 1.00 to Current Price
objProduct.UnitPrice = objProduct.UnitPrice + 1.00
‘Write New Price
Response.Write(“New Price: “ & objProduct.UnitPrice & “<BR>”)
Now the price has been updated. However, the data is only changed in the object itself. The new price has not been set in the database. To save the changes we have made to the object into the database, we need to use the Save method:
‘Saves the Changes to the Database
objProduct.Save
Now that we have saved the changes to the database, we are done with the object. It is good a programming practice to dereference the object when you are through by setting the variable to nothing:
‘Set the Variable to “Nothing”
objProduct = Nothing
Setting the variable to Nothing tells ASP.NET that we are through with it. This allows ASP.NET to make the best use of memory resources.
Suppose you have entered your products into AbleCommerce and in the detailed description field have HTML that displays a table of technical specifications. You want to show this table on the product1.aspx page, below the standard description. To make this modification, you would find the code that displays the standard description:
<tr>
<th class="ProductDetail" colspan="<%=iif(intImagePos=0,2,3)%>">
Description
</th>
</tr>
<tr>
<td class="ProductDetail" colspan="<%=iif(intImagePos=0,2,3)%>">
<%=objProduct.Description2%>
</td>
</tr>
Below this, you could add in the following code to display the data from the detailed description field:
<tr>
<th class="ProductDetail" colspan="<%=iif(intImagePos=0,2,3)%>">
Technical Specifications
</th>
</tr>
<tr>
<td class="ProductDetail" colspan="<%=iif(intImagePos=0,2,3)%>">
<%=objProduct.Description3%>
</td>
</tr>