Then new CMS features of AbleCommerce let you manage your static web content even easier than ever before. You can add web pages and links directly to the categories defined for your store. The display of these content objects can be intermixed with your products.
Throughout this chapter you will see reference made to “content objects”. This general term represents items in your store that provide some kind of content to the user. For instance, a category object provides a user with a navigation system that they can browse to look through your store. A product provides content about something that can be purchased. A webpage provides static content for the purpose of distributing information to the user.
Whenever you see a content objects mentioned, know that this represents any object that can be managed by the AbleCommerce CMS. Currently the supported objects are categories, products, web pages, and links. The kinds of objects supported by the CMS may be expanded in future releases of AbleCommerce.
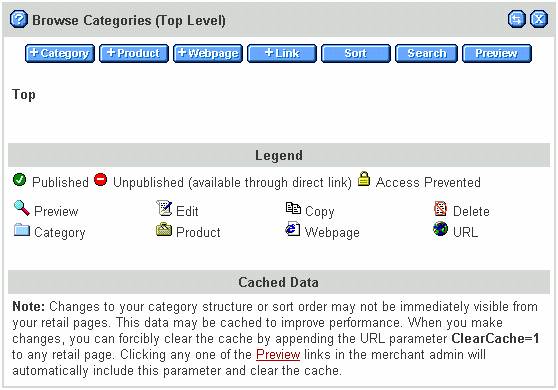
The CMS features are all accessed through the category management screen. Click on the “Categories” menu item to display a screen similar to the one below.
The screen shown represents a store with no categories or content. At the top of the page are buttons that provide access to the CMS and product management features. Below that is a listing of the contents of the current folder (as indicated on the title bar). Then there is a legend that helps you to identify the icons used on this menu. Finally there is a note about data caching.
You may already have objects listed on the page if you have imported data into your store or have created categories. For the purposes of this chapter, we will assume that no categories already exist. Either way you can still follow the examples, as they will work with or without pre-existing data.
Usually the first step in managing your content is to create a new category. Categories are used to organize the products and web content within your store. You can create any number of categories necessary so that customers can navigate your store with ease.
Click the “+Category” button to create a new category. This will open the Add Category screen as depicted below. We will add a category called “Sample Category”. If you need detailed information on this form, you can click the help link at the top left. For the purposes of this example, the category name is all that is required.
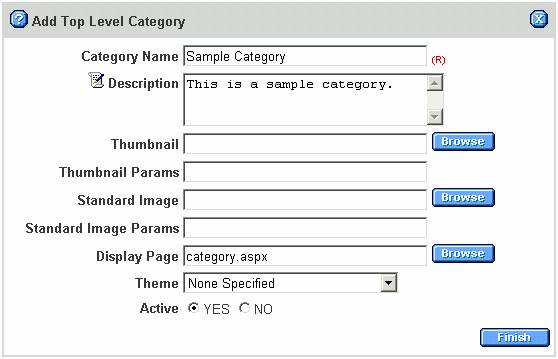
When you have finished filling out the form, click Finish. This will take you back to the category management screen, where you will see a listing for the new category.
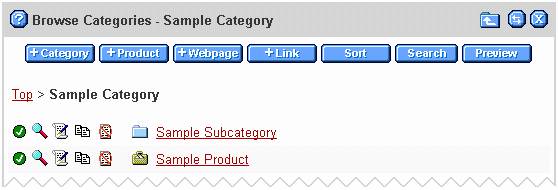
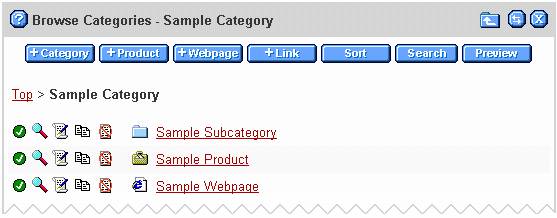
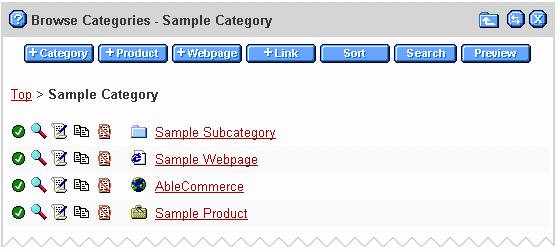
When you view a category, any content objects that have been created will display in the list. After we create the Sample Category above, we can see this in the list. The list provides information and access to the content objects.
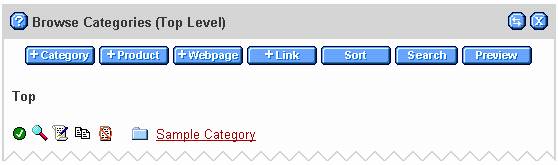
On the left hand side of each line are five action icons. They are Status, Preview, Edit, Copy, and Delete.
The Status icon on the far left will change as it depends on whether the object is published, hidden, or inactive. The checked green circle indicates that our new category is active and publicly viewable. More details on object state is provided later in this chapter.
The Preview icon will let you view the category from the retail perspective. This is how the item would be shown to a customer browsing your store.
The Edit icon lets you modify the object. For our new listing, this would take us to the “Edit Category” page.
The Copy icon will create a duplicate of the listed item and place it at the end of the object list for this category.
The Delete icon will remove the object from the database. When you delete a category, you also delete any subcategories it contains.
The object icon is displayed to the right of the action icons. This icon will change depending on the type of content object. In this case, it is a category. Finally the object name is displayed.
For categories only, clicking on the object icon or linked name will open the category. This lets you view and manage its contents. For all other object types, the icon and name serve the same purpose as the Edit icon.
Unless you plan a very small web site, it is likely that you will need to use subcategories to further organize your content. You create subcategories in the same manner as categories.
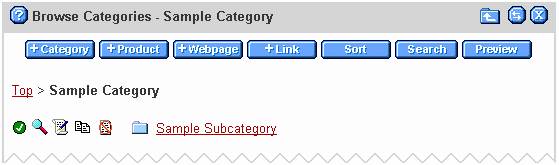
Let’s create a subcategory of the Sample Category we created earlier. First, click on either the category icon or the linked “Sample Category” name. This will open the category menu for the Sample Category, as shown below.
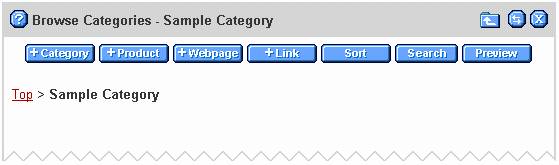
There are a few things to notice on this screen. First look at the title bar. It shows that we are viewing the contents of the Sample Category. To the right of that there is a new icon, a folder with an up arrow. Clicking this icon will take you to the one level up (in this case, the top level). Last, you can see that the category trail now reflects our current position: Top > Sample Category.
Now, click the “+Category” button. This will open the Add Category screen.
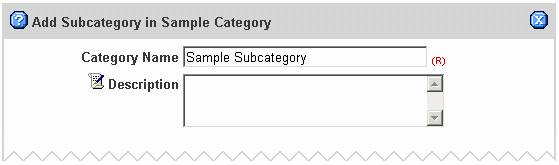
This page also has a minor difference from the Add Category screen we saw earlier. The title bar tells us that we are creating a Subcategory within the Sample Category. Other than that, the form is exactly the same.
Fill in the name of our new subcategory. Again, the additional fields are not required for this example. Click finish to save and return to the object listing.
You can now see the new subcategory in the object list. You could continue this process by making subcategories of your new subcategory, and so on. Your category tree can be as many levels deep as you wish. Just be sure to use common sense in designing your categories. Customers don’t usually like to click through to a sub-sub-sub-sub-subcategory in order to view products, unless it is a particular case where this is warranted.
Adding a product will be demonstrated here only for the purposes of explaining how it interacts with the CMS. There is far too many details of Product Management to fit in this chapter. For complete information you should consult the Merchant Administration manual, where a full explanation is given.
From the category menu, we can create a product by clicking on the “+Product” button. This opens the Add Product screen.
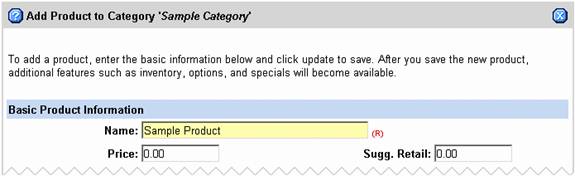
Note that the title bar identifies the category we are adding the product to. For the purposes of this example, you only need to enter in the product name. Then click the Update button. You will remain at the edit product page, with a message stating the product was saved. Click the X at the upper right to return to the category listing, where the new product will now appear. Notice that the action buttons are the same for the product listing, but the product icon is used instead of the category icon.
Every store needs to display static content, such as company contact information, privacy or return policies, etc. This is a perfect example of where web pages can be used.
Adding your static pages to the content management system provides many benefits. The pages are automatically added to your site navigation so that they can be accessed. Also, the need to mess with a bunch of HTML files is eliminated. All of the editing can be done right from the web browser as easily as you manage any other part of AbleCommerce.
From the category menu, we can create a webpage by clicking on the “+Webpage” button. This opens the Add Webpage screen.
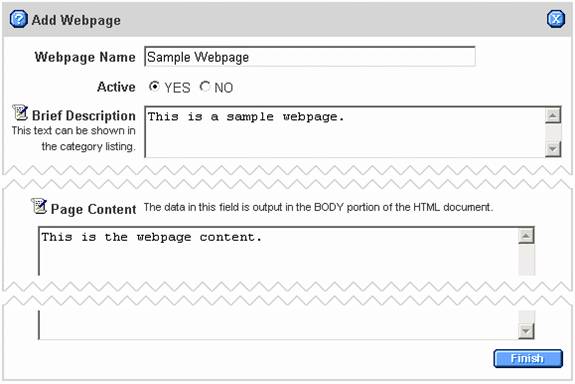
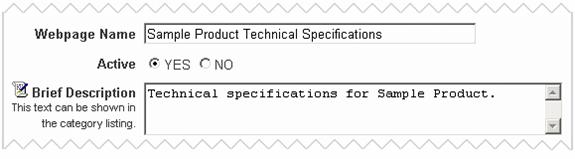
For the purpose of this example, the only required elements are shown in the image. You need to enter a name for the new page, along with a description and some sample content. The name and description you provide for the webpage will be shown in the category listing for the retail side, so be sure to use text that is appropriate for the customer to view.
The page content can be any valid HTML or text. Whatever you place in the content area will be displayed to the customer when the web page is viewed. To easily add HTML, click the edit icon to the left of Page Content. This will let you edit the content using the online WSYIWYG editor.
The remainder of the fields of the form can be left with the default data for this example. When you finish filling out the form, click Finish to return to the category listing where the new webpage will be shown.
Sometimes you may wish to display a link in your site. This could be a link to a product manufacturer, an affiliate, or any other online resource you can imagine. You can use the link content object to add links wherever you desire within your store.
From the category menu, we can create a link by clicking on the “+Link” button. This opens the Add Link screen.
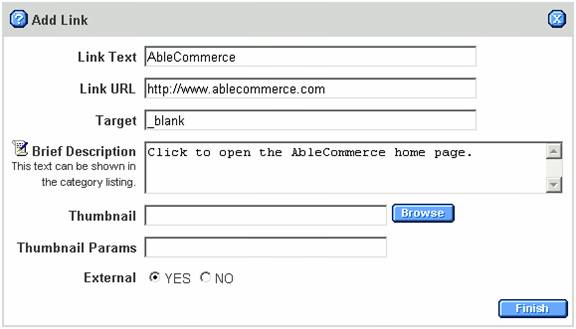
Fill in the form to create the new link. In the sample image, we have defined a link to the AbleCommerce home page. You can enter any link text and URL. Notice that for the Target we have specified “_blank”. This will tell the link to open in a new blank window. You can use this field to specify where the link should open.
Also note the Brief Description field. This is the text that will be displayed in the category listing on the retail page. When a customer views the category that contains this link, this text will be displayed next to it. This is not required if you want to display the link without any descriptive text.
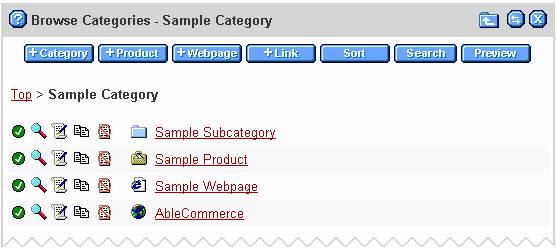
When you have finished entering the new link, click Finish to return to the category listing. You will see the new link at the end of the list.
So far, every object we have added to the category has appeared at the bottom of the list. Usually, items are not entered in the order they should be displayed. We can use the sorting feature to put the items into the desired order. Click the Sort button to open the screen below.
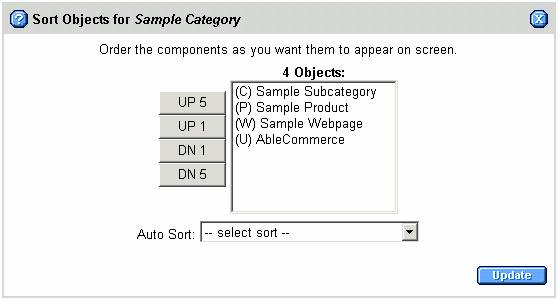
The title bar tells us that we are sorting objects for the Sample Category. In the center of the screen is a list of objects in the category. Each object has a symbol that identifies its type, such as (C) for category. To the left of the list are buttons that can be used to adjust the position of each item. Below the list is an Auto Sort option that can be used to quickly sort using one of the pre-defined orders.
To sort the items one by one, simply select the item you want to move and then click one of the up (UP) or down (DN) buttons. For example, suppose we wanted our Sample Product to display at the bottom of the list. To do this, click the Sample Product and then the DN 5 button. This will move the item down 5 lines, which in our example is enough to move to the end of the list.
You can reorder the items using the buttons or the various auto sort options until you have them arranged just right. If you change your mind at any time and do not wish to change the order, you can click the X button at the top right to cancel.
When you are finished sorting the items, click the “Update” button to save. You will get a message confirming that the sort order has been updated. Then click the X button to return to the category listing. You will see the new order of your objects reflected here. The sort order will also be used on the retail display.
If your store contains a large number of content objects, browsing through your category tree may not be the fastest way to find what you are looking for. The content management system also provides a search feature so that you can look for objects by keyword and type. Simply click the “Search” button to open the Search Objects form. Then fill in the criteria for the object you want to access and click Search. Your results will look similar to the following screen.
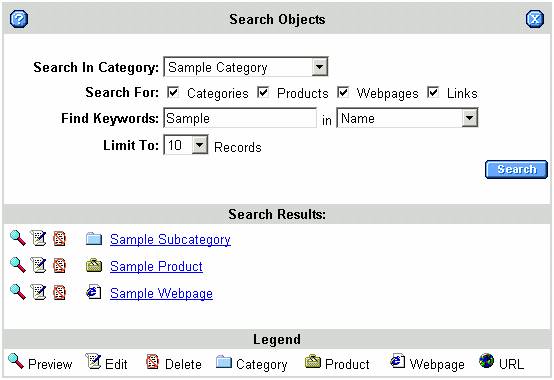
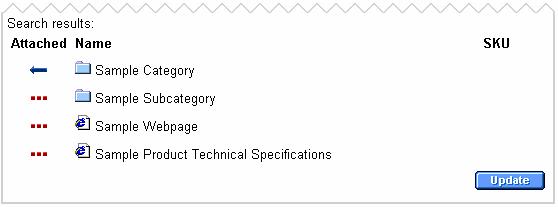
We searched in the Sample Category (including subdirectories) for all types of content objects that had the keyword Sample in the name. The results show three objects that match our criteria.
Notice that the search results are very similar to the category listing. However, the Status and Copy action icons are not shown. This is because they perform functions that are specific to the category being viewed. Search results are not specific to any category.
You can preview, edit, or delete items that appear in your search results by clicking the appropriate icon. When you are finished, click the X in the upper right corner of the search form to return to the category listing.
Often it is helpful to get a quick look at the current category from the retail perspective. This can help you adjust sort orders and view the content objects in context. Click on the “Preview” button from the category listing to show the retail view of the category. The retail view of our Sample Category is shown below.
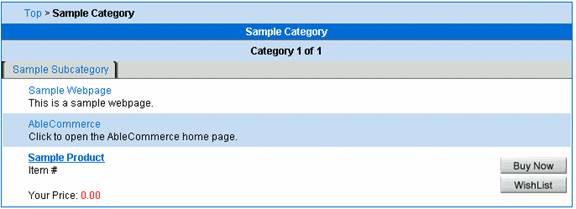
Notice that the order of the content objects mirrors what we had set on the retail side. Also notice how the descriptions for links and web pages are shown.
 Using the AbleCommerce CMS, you
have the ability to specify which of your objects can be seen from your retail
web site. Objects in your store can be
Published, Unpublished, or Access Prevented.
The icon on the far left of the category listing indicates the current
status of the item. An icon key is shown
in the figure to the right. You can
click the icon to change the status.
Using the AbleCommerce CMS, you
have the ability to specify which of your objects can be seen from your retail
web site. Objects in your store can be
Published, Unpublished, or Access Prevented.
The icon on the far left of the category listing indicates the current
status of the item. An icon key is shown
in the figure to the right. You can
click the icon to change the status.
Published items are displayed in your category navigation and can be viewed by your customers. This is indicated by a checked green circle icon in the category listing. Clicking the icon will switch the status of the icon to Unpublished.
Unpublished items are essentially hidden from your category navigation. They will not show up when a customer browses
the category. Unpublished items can
still be accessed via a direct link. For
example, you might have a webpage that contains the manufacturer spec for a
product, but is unpublished in the category.
You can add a cross-link from the product to this webpage. When the category is viewed, the webpage will
not show. However, when the product is
viewed a link to directly access the webpage will be displayed. More details on cross-linking are in the next
section of this chapter.
Unpublished items are identified by a red circle with a horizontal white line through the center. Clicking on the icon will switch the status of the item to Access Prevented.
Access Prevented items are hidden from the category listing and cannot be accessed directly. If a customer attempts to access the object they will be redirected to the home page. These items are identified by a lock icon. Clicking the icon will switch the status back to Published.
Some content objects in your store can be linked other objects. Categories are a prime example of this. When you view the objects in a category, you are seeing objects that the category is linked to.
However, the ability to link is not exclusive to categories. You can also link products to another content object. The linked objects are then displayed on the product details page when viewed by a customer.
For example, suppose you want to attach a technical specifications page to one of your products. Using the cross linking feature, this is easy to accomplish.
First, create a webpage content object that will contain the technical specifications. Step by step instructions for creating a webpage object are given above, so they will not be repeated here. For our example store, we have created a new webpage named “Sample Product Technical Specifications” filled with sample content.
Next, edit the product that you want to link to the webpage. In our example store, we access the “Sample Category” on our category listing, then click the Edit icon for “Sample Product”. This will open the Edit Product screen.
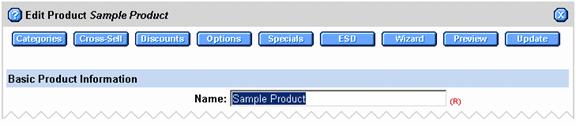
At the top of the Edit Product screen is a button bar that provides access to various product-related features. Click the “Cross-Sell” button to open the cross linking interface. This will open the Object Links interface as shown below.
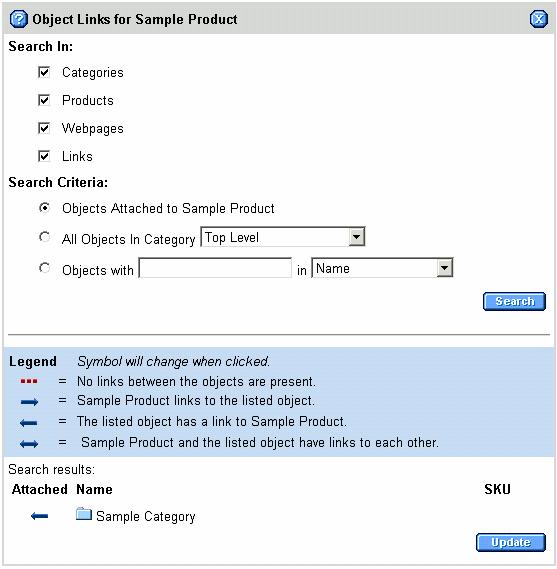
The title bar of this form identifies the product that we are managing the links for, in this case “Sample Product”. Below this is a form to search for content objects defined for your store. You can specify which types of objects to include, as well as filter criteria.
Below the search form is a legend that explains the symbols used in the search results. Finally, the search results are displayed along with an update button.
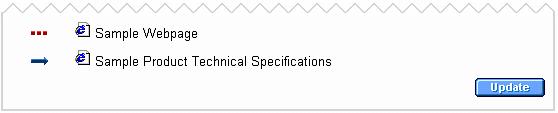
When this page first opens, it automatically searches for objects already linked with the product. In the image above, it shows that the “Sample Category” contains a link to “Sample Product”. That category contains (links to) this product.
In the search results portion, you can adjust the link between objects by clicking the symbol. For instance, if we clicked the left arrow next to Sample Category in the image above it would change to a two-way arrow. Clicking again would change it to a red dotted line. Once more and it would become a right arrow. Each symbol shows a different type of relationship between the two objects, as indicated by the legend. Note that any changes made to the link symbols are not automatically saved and will not take effect unless the “Update” button is clicked.
In our example, we want to link the Sample Product to our new technical specifications page. To do this, we set the search form to look for objects with the keyword “Sample” in the name.

Clicking the “Search” button will find objects that match our criteria and display them in the results section.
![]()