Manage > Orders > View Order # > Shipments
In this Topic Show
Shipping Items
Any shippable product that is purchased will be part of a shipment for the order. A new order can have multiple shipments when either of the following conditions apply:
-
The customer has chosen to ship to multiple destinations. (A new shipment will be created for each destination)
-
The products purchased are from different warehouses. (A new shipment will be created for each warehouse)
NOTE: Each product has a Shippable setting. The options are Yes (item is shippable), No (digital file or no shipping involved), or Separately (calculates rates separately, but does not create a new shipment).
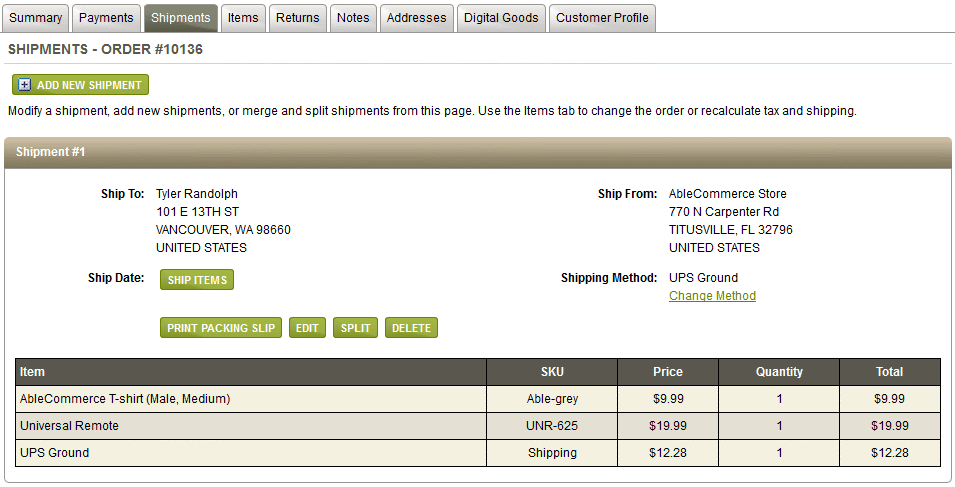
When an order has a shipment, you will be able to perform a number of changes like ship all or part of an order, add tracking numbers, print packing lists, or modify a shipment. This document covers the basic shipping feature.
You will also have the ability to generate a shipment through UPS, retrieve tracking numbers automatically, and print a shipping label. [NEW in Gold R11]
Ship an Order
REQUIREMENTS: The ship button will only appear for shipments that have not been shipped.
-
From the Shipments page, click the SHIP ITEMS button located next to Ship Date.
-
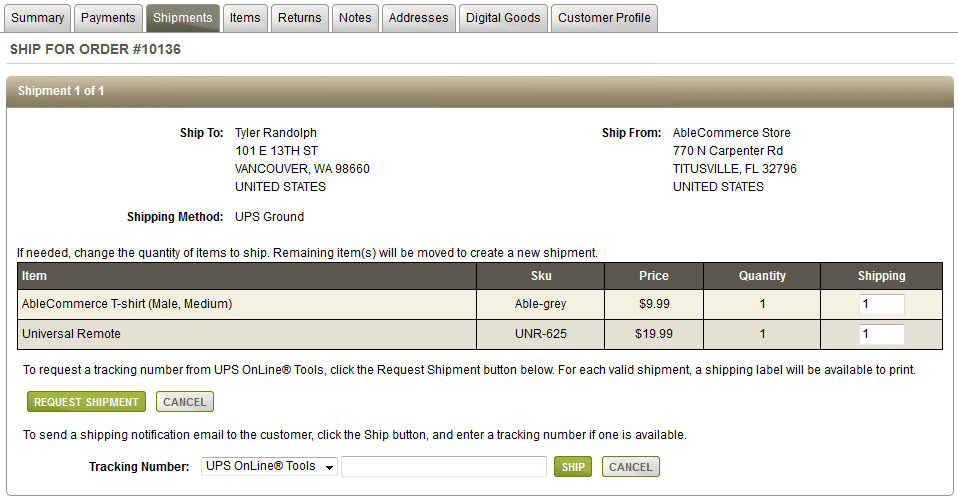
You will see the Ship Order page as shown in the example.
-
If you are using the Enable Labels feature activated through your UPS configuration, then you'll see a REQUEST SHIPMENT button as shown in the example above. This option will not be shown unless this feature is enabled. It is only available in AbleCommerce Gold R11 or later. Click the REQUEST SHIPMENT button to automatically retrieve a tracking number from UPS.
-
If you will not be requesting a tracking number from UPS, then you may manually enter a Tracking Number into the field shown, and click the SHIP button. The shipping provider will be shown as a default selection. You can change this if needed. The selection and tracking number will be used to generate a link to online tracking services in the shipment notification email.
-
If you wish to only ship part of the shipment, then change the Quantity to the number being shipped. Remaining items will be placed into another shipment when you click the SHIP button.
-
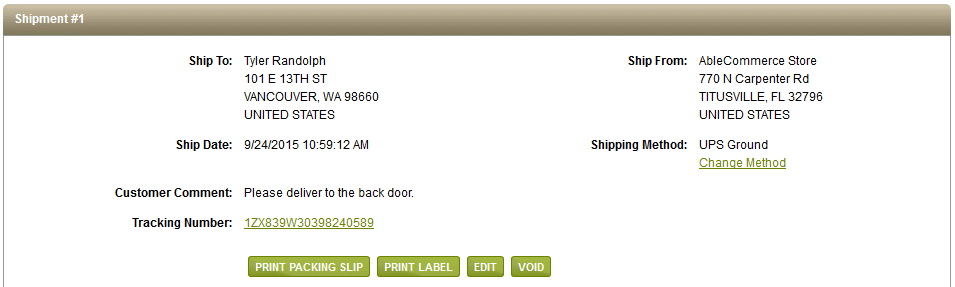
When you are returned to the Shipments page, you will notice that the Ship Date is recorded for this shipment.
-
If a tracking number was provided, or requested through UPS, you will see it linked adjacent to the Tracking Number.
-
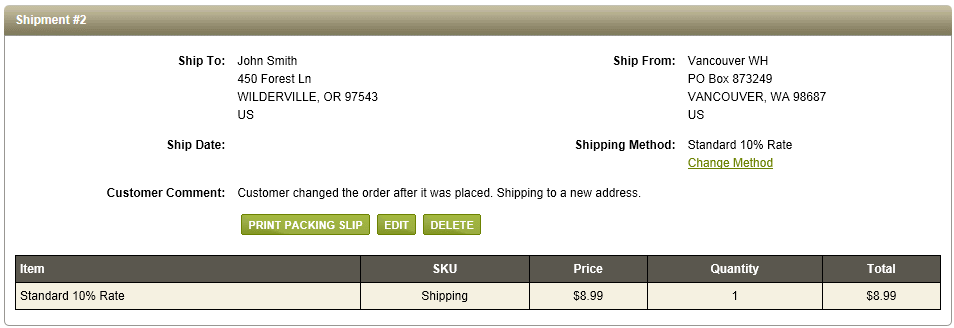
Special delivery instructions may be shown next to Customer Comment. This feature can be enabled through the configure Checkout Settings page.
-
You can use the available PRINT PACKING SLIP button which would be printed and placed in the package before shipping.
-
If the feature is enabled, you can use the PRINT LABEL button to print a UPS shipping label which would be attached to the package before shipping.
-
If for some reason you need to edit the address or tracking number, you can click the EDIT button.
-
If the feature is enabled, you can use the VOID button to cancel an existing shipment created through UPS.
Edit a Shipment
REQUIREMENTS: The edit button will appear for any shipment.
-
From the Shipments page, click the EDIT button located below a shipment.
-
This will take you to the Edit Shipment page
 .
. -
The Edit Shipment page gives you the ability to change the name, address or tracking number for this shipment. Be sure to SAVE if you make any changes.
-
If you want to remove an item from this shipment, click Delete icon.
-
If you want to change the number of items being shipped, click the Edit icon and then enter a new Quantity.
-
If you want to change the Price of any item, enter it in the Price column.
-
You can use the buttons to ADD PRODUCT or ADD OTHER ITEM, such as a discount, credit, or charge. This is the same functionality as on the Edit Order Items tab.
-
When finished, click the SAVE icon.
NOTE: If you change the Quantity of items shipped from the Edit Shipment page, it will not create a new shipment. If you modify the items in a shipment, you may need to manually adjust any taxes, shipping charges, or payments already made.
Add a Shipment
If you need to add a new shipping destination, then you should create a new shipment. The merge and split shipment features can create new shipments as well.
-
From the Shipments page, click the ADD NEW SHIPMENT button.
-
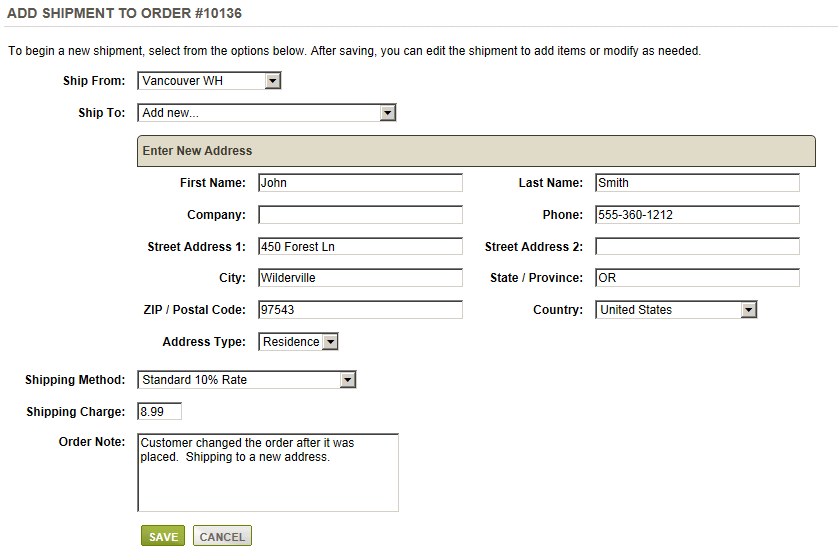
This will take you to the Add Shipment page.
-
If the store has multiple warehouses, then select one from the Ship From list.
-
Select an existing address if the user has multiple address book entries, or add a new one as shown in the example above. This is the Ship To address.
-
Select a Shipping Method from the available options.
-
Enter a Shipping Charge for the new shipment. You can change it later by editing the shipment.
-
You may enter a Order Note which will be recorded with the order history and notes page.
-
When finished, click the SAVE button.
-
The Shipments page will be updated. The new shipment will be added to the order.
-
Once this is done, you can use the ITEMS tab to add products to the shipment that was created.
TIP: To add items to the new shipment, you can use the MERGE feature or the SPLIT feature. If you need to change the order and add an item, then you would want to go to Edit Order Items page instead.
Related Topics
Manage > Orders > Shipping (Split and Merge Shipments)
Re-arrange items within multiple shipments.
Manage > Orders > Shipping (Return Items)
Restock inventory with a product return.
Configure > Shipping > Warehouses
Add warehouses to manage shipping methods.