Marketing > Email Lists > Manage Email Lists
In this Topic Show
Manage Email Lists
The Email List manager allows you to view all the lists you create for your store. To access this page, go to Manage > Email Lists from the top-menu.
From this page, you can view, create, and manage all your email lists.

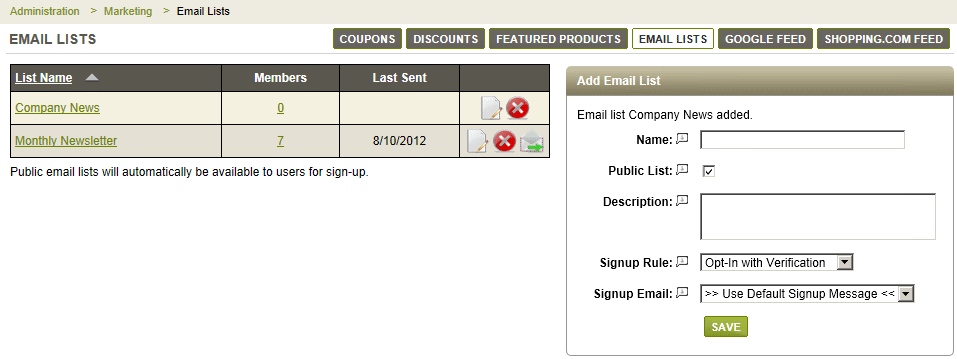
In the right section, you can Add an Email list. In the left section, you can manage your email lists. In the example below, you can see two email lists that have been created.

Looking left to right, the information shown is as follows:
-
-
List - the name of the email list as it will appear to your users.
-
Members - the number of members that have joined the mailing list.
-
Last Sent - the date the email list was last sent.
-
In the far right column, you can edit or delete any email list by selecting the applicable action icon.
Edit List Details
-
From the Email Lists page, or from the top-menu, go to Marketing > Email Lists.
-
In the left section of the page, you will see any Email Lists that you have created.

-
Either click on the linked list name or the EDIT icon in the right column to see the details of your mailing list.

-
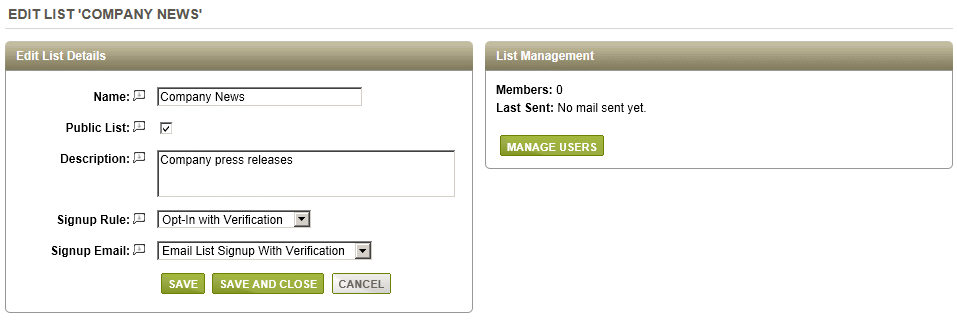
You can Edit List Details in the left section of the page. If necessary, make any changes to your mailing list.
-
After you have created a mailing list and added users, you will see additional options in the right section of this page.

-
This is another location where you can MANAGE USERS of this list. These options will appear once you have members assigned to the mailing list.
See the next sections for more information and adding users, sending email, and export functions. -
Click the SAVE button when finished, or CLOSE to return to the Manage Lists page without saving.
Manage Users
-
In the left section of the Email Lists page, you will see any lists that you have created.
-
You can add or remove members by editing the email list or clicking on the linked number in the Members column.

-
You should now be viewing the Manage Users page for the list you have selected.

-
Enter in a search term or using the Quick Search functions to find a user(s). Wildcard characters like * and ? are accepted.
-
Click the SEARCH button to display your results.
-
For each user that you wish to add, check the box in the In List column, and it will automatically be added to the list and be displayed within the top section of the page.

-
To remove a user, simply uncheck the box in the In List column they will be automatically removed.

-
When finished, click the link Return to Email Lists at the bottom of the page.

-
You can see the number of Members has been updated. Also note that a new icon has appeared in the right-column.
-
To send an email to your mailing list members, see the next section for more information.
Sending Email to your Members
After you create a new mailing list and added members, you can now send email to the list.
-
In the left section of the Email Lists page, you will see any lists that you have created.
-
If the list has members associated, then you will also icons in the far right-column.

-
Click the MAIL icon.
-
You must have completed the setup of your email server before sending messages. If you have not completed this step, then go to Configure > Email > Settings or click the CONFIGURE EMAIL button from this page.
-
For this example, we will select the "Blank Message" option. You could also select from the list of Email Templates available to the store. Click NEXT to continue.
-
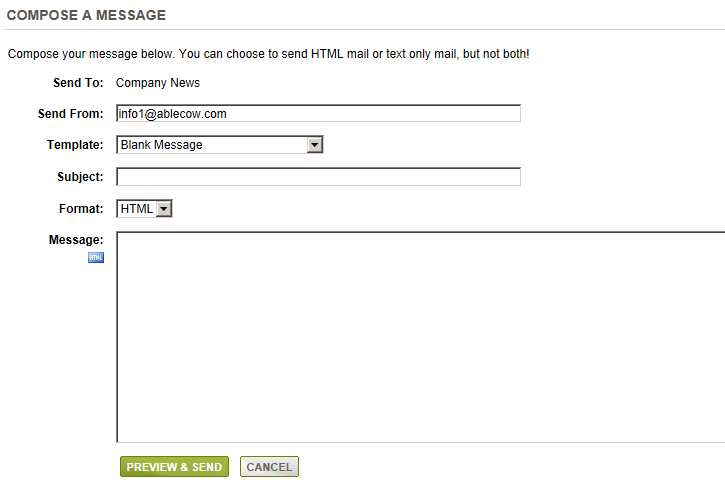
Now you will need to compose your email message. Any changes made here, either to the blank message or to an existing template, will not be saved. If you want to save your email message, you should make changes to the template instead. This can be done from the Configure > Email > Templates menu.

-
Enter the From Address. Your email will be addressed from this address.
-
Enter a Subject for this email.
-
Enter a Message. You can use HTML form, but make sure to check the "Send HTML" option when doing so.
-
Click the PREVIEW button to see how your message will look.
-
If it looks acceptable, then click the SEND button to complete the process. Otherwise, click BACK to make changes.
-
After sending, you will see a confirmation page and have the option to SEND ANOTHER or return BACK TO LIST.
Exporting Lists
-
Once you have an email list with member(s) assigned, then you will have some additional export features.

-
If you click the EXPORT USERS button, it will give you the option to save your list members as a CSV (comma separated values) file which can be opened in a program such as Microsoft Excel.
-
The CSV file will include all basic user information available, such as Email, First Name, Last Name, Company, Address fields, City, State, Postal, Country, Phone, and Fax.
-
If you click the EXPORT EMAIL button, you will be able to save a CSV file that includes minimal information, such as Email, First Name, and Last Name only. [New in R9]
Go to Site Map