Add Currency
Adding multiple currencies to your store will give your customers an option to view locale specific prices. The multi-currency feature is for display purposes only. When a payment is performed, the actual amount of the transaction is calculated in the default currency.
When you add a new currency, you will have the option to automatically update the exchange rate. This of course is the recommended practice because it will be updated daily with no human intervention. You should select the automatic exchange rate before adding a new currency.
AbleCommerce supports the following two banks for exchange rates:
-
Federal Reserve Bank of New York  - Working within the Federal Reserve System, the New York Fed implements monetary policy, supervises and regulates financial institutions and helps maintain the nation's payment systems. - Working within the Federal Reserve System, the New York Fed implements monetary policy, supervises and regulates financial institutions and helps maintain the nation's payment systems.
-
European Central Bank  - The central bank for Europe's single currency, the euro. - The central bank for Europe's single currency, the euro.
Select the Automatic Exchange Rate
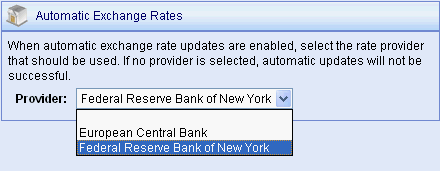
When automatic exchange rate updates are enabled, select the rate provider that should be used. If no provider is selected, automatic updates will not be successful. Supported currencies vary for the exchange rate providers.
-
From the Manage Currency page or from the top-menu, go to Configure > Currencies.
-
Find the section named Automatic Exchange Rates.

-
Select one of the two available providers, European Central Bank or Federal Reserve Bank of New York.
You may need to determine if the exchange rate provider supports the currencies you are using.
Add a Currency
This is where you will add new currencies so that your customers can select prices specific to their location.
-
From the Manage Currency page or from the top-menu, go to Configure > Currencies.
-
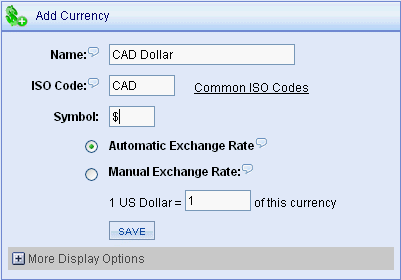
Find the section named Add Currency.

-
Enter a Name for this currency. This will be shown to the customer when they select their preferred currency.
-
Enter the three letter ISO (4127) Code. Make sure it is correct for the currency or the automatic exchange rate feature will not work.

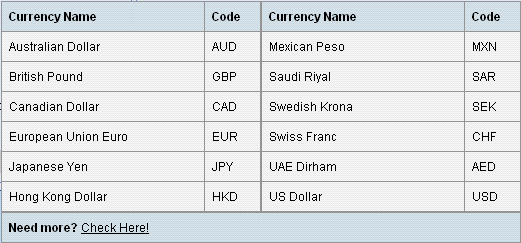
AbleCommerce provides a link to the most Common ISO Codes.
If you need to view the complete list, or need additional information about ISO codes, please go to Wikipedia's ISO 4217  page. page.
-
Enter a Symbol which will be displayed next to any price.
-
Select how the rates will be updated:
-
Automatic Exchange Rate - when automatic rates are enabled, updates will be attempted once per day using the configured rate provider. You must make sure to provide the correct ISO code for automatic rates to be effective. Supported currencies vary for the exchange rate providers.
-
Manual Exchange Rate - when manual exchange rates are enabled, you control the exchange rate and it only changes when you update it.
-
If using a manual exchange rate, then enter the rate equivalent to the default currency. Otherwise, the rate will be calculated automatically when the currency is created.
-
Click the SAVE button when finished.
Add More Currency Display Options
You can change additional display options when you add or edit a currency.
-
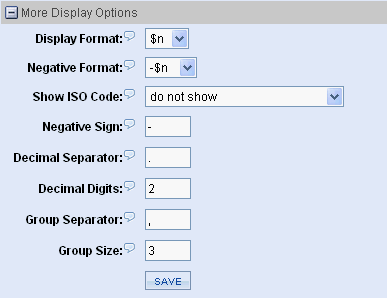
In the Add/Edit Currency section, click the plus (+) sign next to More Display Options. This will open up a new section as shown.

-
Select an option for Display Format. (e.g. "$n")
Determines the format of positive amounts; "$" represents the currency symbol, "n" represents the amount.
-
Select an option for Negative Format. (e.g. "-$n")
Determines the format of negative amounts; "$" represents the currency symbol, "-" represents the negative sign, "n" represents the amount.
-
Choose whether to show the ISO Code. (e.g. "show after formatted currency")
Indicate whether the ISO code should be included as part of the formatted currency.
-
Enter a value for the Negative Sign. (e.g. "-")
The symbol used to represent a negative amount.
-
Enter a value for the Decimal Separator. (e.g. ".")
The string that separates the whole and fractional part of an amount.
-
Enter the number of Decimal Digits. (e.g. "2")
The number of digits shown to the right of the decimal place.
-
Enter a Group Separator. (e.g. ",")
The string that separates groups of integers to the left of the decimal separator.
-
Enter the Group Size. (e.g. "3")
An integer that indicates the number of digits in a group to the left of the decimal; use "0" to indicate no grouping.
-
Click the SAVE button when finished.
|


