![]()
Zaps™ Connect the Apps You Use Every Day
Table of Contents Show
Zapier is a tool that allows you to connect to more than 1,400+ apps, automate tasks and build custom automated workflows to help your business save time.
One of the most powerful features of Zapier is how it can be used to create Zaps that will update any application with outgoing or incoming data and requests.
Consider the following use case examples:
Make inventory updates in AbleCommerce using Google Sheets.
As new orders come in, automatically create invoices in popular accounting packages.
Create a support ticket when customer adds a note to their order.
Notify users of their Abandoned Baskets using Mailchimp or other email app.
Announce new products or services to your Facebook feed.
AbleCommerce provides a free built-in integration with Zapier. The integration is available to all customers using version 9.0.2, or higher, of AbleCommerce. You will need to create a Zapier account and choose from one of the plans they offer. Zapier offers a "free forever" plan which includes up to 5 single-step Zaps. Combine this with the AbleCommerce "free forever" 1-admin user license, and you'll be well on your way to growing your eCommerce business with minimal investment!
More information about plans and pricing available at Zapier's website.
More information about AbleCommerce plans and pricing.
A Zap is simply an automated workflow that runs in the background; it is automatically watching for new or updated items in apps (like AbleCommerce) then using that data to find, create, and/or update items in other connected apps (such as Quickbooks). It can be as complex as a customized bi-directional exchange of data from one system to another, or as simple as adding a new user to Mailchimp. The basic idea behind zaps is automation. Zaps are available to help improve the efficiency of your online business, but they can also be used for marketing, analysis, reporting, data exchange, etc. There are many ways to Zap the data that your AbleCommerce store is collecting.
Each Zap start with a trigger, a Zapier step that watches for new data coming from an app (e.g. new orders in AbleCommerce) When new data is found, the next action that occurs is an important one, so consider the possibilities to improve and automate business workflows, tasks, marketing efforts, customer relations, social media, and more. The public AbleCommerce integration with Zapier will provide some of the most common Zap Templates for an ecommerce app, but we would also love to hear your requests for more Zaps.
There are two ways you can create a Zap. The quickest method is to start with a pre-built Zap template. You can create a Zap from scratch as well, but it is most common to find one of the existing Zaps to copy from. You can also find pre-built Zaps from the Zapier Dashboard, the Zapier Explore page, and on the Zapier blogs.
Setup a Trigger: Determines which event needs to take place for the Zap to run automatically. (e.g. New Order Placed)
Setup the Action: When the Zap is triggered, determine what should happen. (e.g. Add new Order to Quickbooks)
Test and Activate: Before you activate a Zap, be sure to test both Trigger and Action.
Each Zap can be further customized with filters, search steps, time delays, and much more. Later in this document, we'll provide some real working examples with sample Zap templates and instructions. Keep in mind that the free Zapier plan limits your Zap customization to a single trigger and action.
Zap templates are ready-made integrations or Zaps with the apps and core fields pre-selected for publicly available Zapier integrations. In a few clicks, they help people discover a use case, connect apps, and turn on the Zap. Zap templates are the fastest way for you to automate your workflows.
With version 9.0.5, there is an embedded list of popular pre-made Zap templates that can help you get started quickly. After logging in to your AbleCommerce Merchant Administration, visit Data Transfer > Zapier > Settings page. If needed, expand the bottom section named "Zap Templates" and choose any from the list available. See screenshot below as a reference. Just click the blue Use this Zap button to be redirected to the Zapier website and begin.

Please contact us directly if you are participating as part of a special invitation. Read your email for more information on reporting issues or getting help.
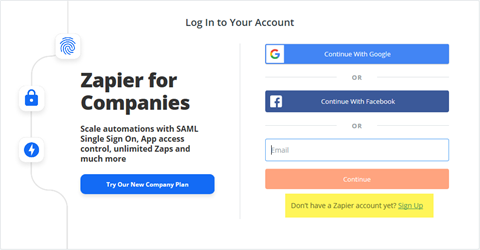
If you have received a private invitation to participate in using Zapier with AbleCommerce, please follow the steps below to register.
After accepting the invitation, you will need to create a new Zapier account, if you don't have one already.
From Zapier's Log In screen, click the blue "Sign
Up" link.
If you like, choose some of the apps that you use most often.
(AbleCommerce will be listed here soon!)
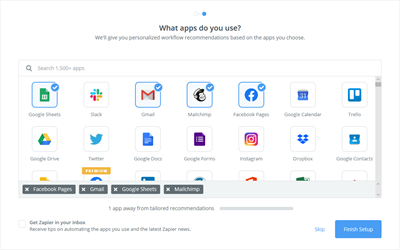
Click the blue Finish Setup button view your Zapier Dashboard.
Click the My Zaps tab.
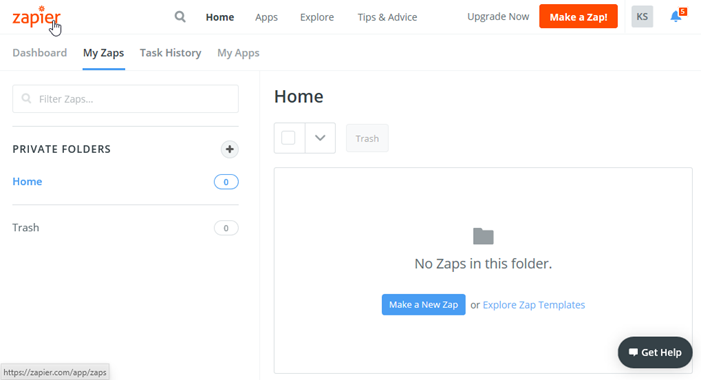
Keep this page open for later.
We will return to the Zapier Dashboard shortly, but first let's get Zapier installed for AbleCommerce.
AbleCommerce version 9.0.2 and later include a free plug-in for Zapier. The chart below will track identification and changes made for the AbleCommerce - Zapier integration version.
AbleCommerce version |
Zapier app identification |
Change Log |
9.0.2.6218 |
AbleCommerce 1.0.1 |
By private invitation only |
9.0.3.6432 |
AbleCommerce 1.0.1 |
By private invitation only |
9.0.4.6750 |
AbleCommerce 1.1.0 |
Beta release approved. |
9.0.5.6938 |
AbleCommerce 1.1.0 |
Zap templates built-in to AbleCommerce Merchant Admin |
We make our Zapier integration available to all AbleCommerce installations. Before you begin, we recommend that your AbleCommerce installation has at least a 2-admin user license. Our Zapier integration will work with the AbleCommerce "free forever" 1-admin user license, but be aware that our Zapier integration should use its own admin account from AbleCommerce.
The second requirement is that your AbleCommerce installation must be using a live license and be located at a public website that can be accessed by the Zapier. AbleCommerce stores in local development (e.g. localhost) will not work because they cannot be accessed by Zapier.
Login to your AbleCommerce installation.
Using the menu, go to the Plugins page.
Use the Filter Plugins
option and select the type "Automation".
Note:
Zapier will only be shown if you are using AbleCommerce 9.0.2 (or
later).
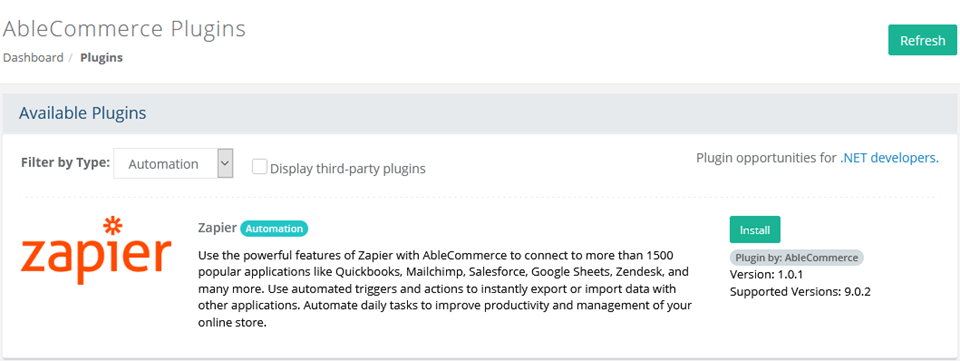
Click the green Install button in the far right column.
When the confirmation popup appears, click the green Yes, install it button.
Upon completion, click the orange Configure
button.
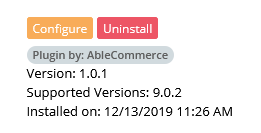
NOTE: Version shown may be different.
Reference the section above, "Zapier Versioning for AbleCommerce
app" for details.
After the Zapier plugin is installed, you can access the configuration page to make changes, set a new API key, or change the admin user account.
From the AbleCommerce Admin menu, go to Data Transfer > Settings page.
The Zapier configuration page is shown.
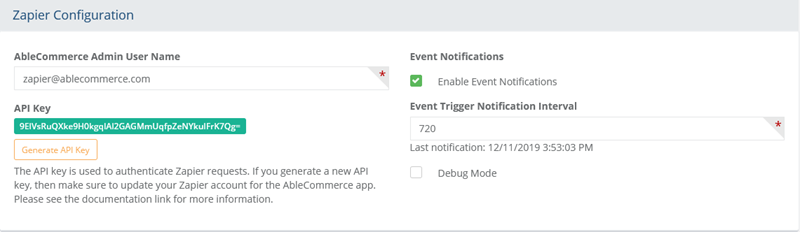
In the first field, enter the AbleCommerce
Admin User Name for an AbleCommerce admin user account.
- This should be a separate admin account that is used exclusively
for Zapier requests.
- All Zapier API calls will be executed on behalf of this admin user
account.
The API Key is generated when the Zapier plugin is installed. To create a new one, click the Generate API Key button.
A confirmation popup screen will appear.
Note: If you generate a new API key, then make sure to login to your
Zapier account and update the AbleCommerce app.
Event notifications can be disabled if desired.
The Event Trigger Notification Interval is pre-populated with a default value of 10 minutes.
The Debug Mode option should only be used to assist in troubleshooting issues with the Zapier - AbleCommerce integration. This will only record errors that happen within the AbleCommerce application. If checked, the log file will be written to the \website\app_data\logs\ folder.
Now that AbleCommerce is configured for Zapier, proceed to connecting Zapier to AbleCommerce app.
For this next step, you will need to have two pieces of information ready:
API Key: generated and displayed on the Zapier configuration page
Store URL: this should match your licensed domain name and include a subdirectory if applicable.
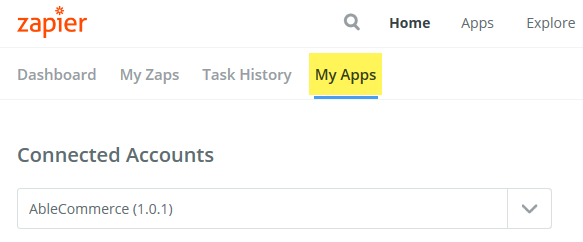
Return to the Zapier Dashboard.
Click the My Apps tab to view the Connected Accounts page.
In the search form, enter "ablecommerce"
Then select AbleCommerce (1.x.x)
app
The selection will launch a new window. The next step establishes
a secure connection between AbleCommerce and Zapier.

NOTE: Version shown may be different.
Reference the section above, "Zapier Versioning for AbleCommerce
app" for details.
Enter the Store URL in
the first field. This should be the fully-qualified URL to your AbleCommerce
installation.
e.g. https://www.zaphappy.com/
- Make sure to include the trailing forward slash in the URL.
- A secure https connection is always recommended, but not required
for testing purposes.
Note: If you have AbleCommerce running in a sub-directory of a domain,
make sure to enter the path to that location.
Enter the API Key in the second field. This information is obtained from the Zapier configuration page within AbleCommerce.
Click the red Yes, Continue
button.
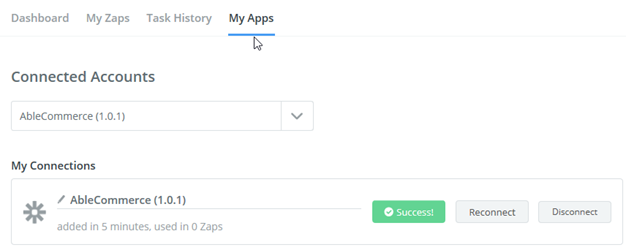
If the connection is successful, then AbleCommerce will appear on the
Connected Accounts page.
You can use the Test
button to (re)confirm a connection to the app.
If the connection is not successful, then you may receive an
error similar to the one shown below.
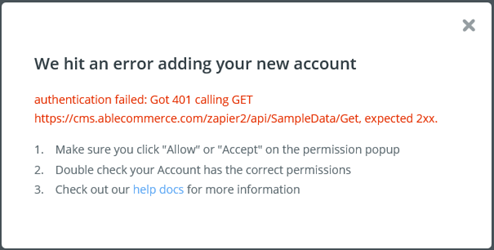
If this should happen, confirm that the API
key matches the one you have generated within AbleCommerce.
Then confirm that you can access the store URL entered for the app
connection. This should be tested from an outside source if the website
is behind a firewall or within an internal network.
If you are still unable to connect, contact AbleCommerce for help.
In the next section, we walk you through the process to create each of these Zaps.
Subscribe new AbleCommerce customers to a MailChimp list -- this is a good starting point for your first Zap
Update prices and inventory of products in AbleCommerce -- a Zap to help make price and inventory changes quick and easy
Create receipt in Quickbooks from new orders in AbleCommerce -- a more complex Zap with line-item support
You're not limited to these three, in fact, you can create any type of Zap you like, so please contact us for help if you have a special request or need assistance.
A Zap initiates a process that begins with choosing an app, picking an event, and then doing some action which involves a second app. The first app selection decides where the data will be taken from. The second app selection will be the target of the data import or update. The event is triggered by some action that is decided by the first app selection.
Each Zap requires that you pick 2 apps to connect.
The first app (e.g. AbleCommerce) will be used as the source of the new or updated data. (e.g. New Order trigger)
The second app (e.g. Quickbooks) will be the destination, which will use a create and/or update action. (e.g. Create Invoice)
Or maybe you want to connect the other way.
The first app (e.g. Google Sheets) will be used as the source of the new or updated data. (e.g. New Spreadsheet Row)
The second app (e.g. AbleCommerce) will be used to add or update new data. (e.g. Create Product)
Once you've picked your apps, then you need to match the field assignments between the two. Depending on the complexity of the data, this can take a little time to set up. In the examples that follow, we'll walk you through the process of creating Zaps.
Zap #1: Subscribe new AbleCommerce customers to a MailChimp list
Zap #2: Update prices and inventory of products in AbleCommerce
Zap #3: Create receipt in Quickbooks from new orders in AbleCommerce
For the initial integration, we are able to offer 6 triggers, 5 actions, and 2 searches. Please see app details below for a complete list with descriptions.
The purpose of this Zap is to subscribe new AbleCommerce customers to a MailChimp list. You will need a MailChimp account and a list created before beginning.
App #1 - AbleCommerce: A new registered user account (contact) created by the AbleCommerce checkout system or an admin creating a user record.
Note: For merchants using the AbleCommerce "Guest Checkout" feature, keep in mind that these users will not be added as new contacts.
Triggered by: A new record created by the "New Contact" trigger.
App #2 - MailChimp: Add the customer's email address to an existing MailChimp list if it doesn't already exist.
Login to the Zapier Dashboard > My
Zaps page.

Click either button to "Make a New Zap!"
From the next screen, view the Choose
App & Event section to locate and select the AbleCommerce
(1.x.x) app.
NOTE: Version shown may be different.
Reference the section above, "Zapier Versioning for AbleCommerce
app" for details.
For the next step, Choose Trigger Event to view the list available.
Select the "New Contact" trigger.
The App and Event selections are complete when the blue Continue button appears.
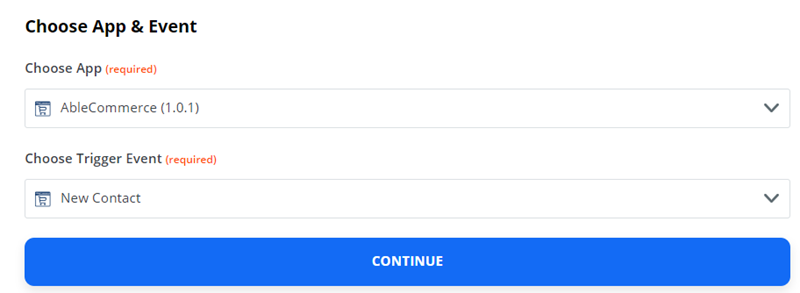
Click the blue Continue button.
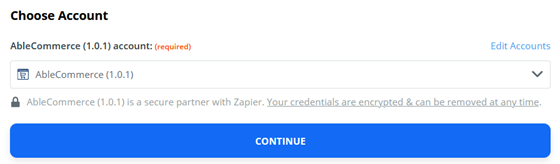
Choose the AbleCommerce (1.x.x) app. which will display the
available AbleCommerce stores configured for Zapier.
NOTE: Version shown may be different.
Reference the section above, "Zapier Versioning for AbleCommerce
app" for details.
Zaps can be hooked up to any Zapier account that is registered with
the AbleCommerce app.
Make sure that Zapier has been installed and configured within AbleCommerce.
Pick your store connection and click the blue Continue button.
For the next step, Zapier provides a few options that can be
used to test your Zap connection and data for the selected event.
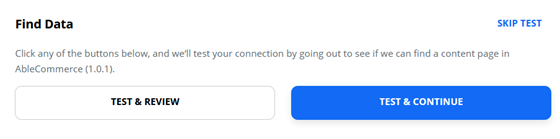
We recommend using the Test
& Continue feature.
- The Test & Review option will connect Zapier to your AbleCommerce
store and pull a sample of live data.
- If you SKIP TEST, then values from the AbleCommerce provided sample
data will be used.
This completes the first step in creating a new Zap.
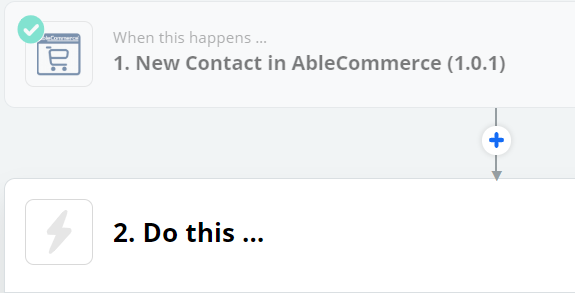
Now you get to decide what happens to your data when the event is triggered.
Choose the app that you would like to connect to for the transfer
of data. Use the search form
to find all apps available.
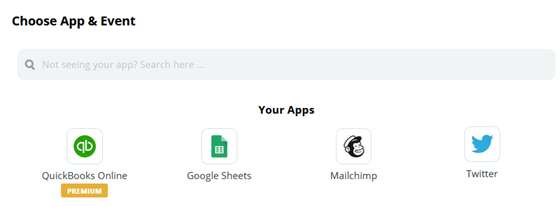
For this example, we will choose the "Mailchimp" app.
Once the app is selected, its available events will be listed in the Choose Action Event drop-down selection.
Choose the "Add/Update Subscriber" action event.
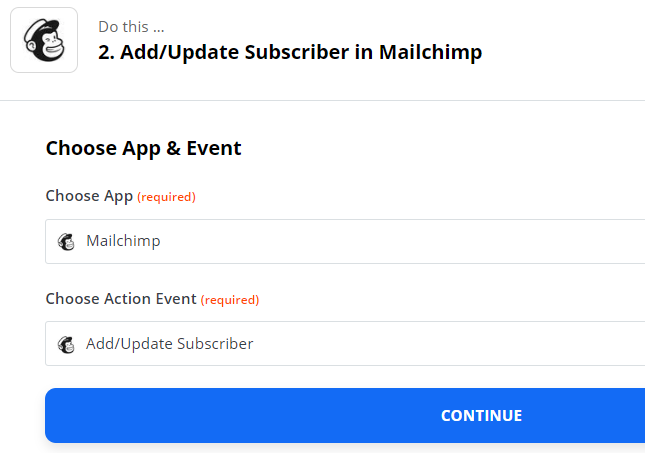
Click the blue Continue button.
The next step may vary depending on which app is selected. This is how the app and Zapier will establish a secure connection.
If you selected the Mailchimp app, then you will be presented with a "Sign in to Mailchimp" button.
In the provided fields, enter the login credentials that are requested by the app.
Click the Authorize App
button.
A confirmation page will be presented. When complete, Zapier will have
access to the account.
Click the Continue button once again.
Now, it's time to match up the fields from AbleCommerce to your
destination app.
Note: Field matching is an important
(but tedious) step when setting up a new Zap. However, once our integration
is approved, we will be able to begin providing Zap templates which
will have each Zap already created for your convenience. These can
be shared to your Zapier account.
First, locate any required fields for the selected app. These
may or may not have any relation to AbleCommerce data, so you'll need
to read the descriptions to discover the use of each field. Let's
take a look at MailChimp again (before field assignment).
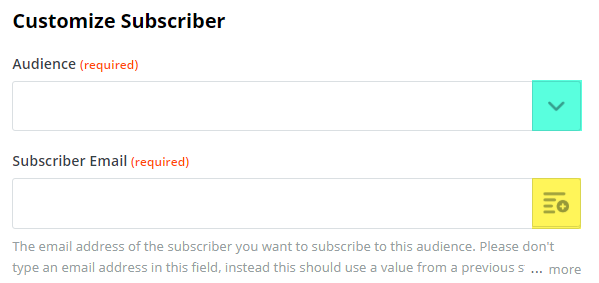
The first field for "Audience" is required by MailChimp. Select an Audience by clicking the downward symbol (shown in blue highlight).
The second field is for "Subscriber Email" and is
also required by MailChimp. This field is a match
field (shown in yellow highlight), and will be used to send
data from AbleCommerce to MailChimp. What information is sent is determined
by the match fields available. This is the most simplistic example,
but there are Zaps that can get very complex. Luckily most Zaps are
super easy to setup.
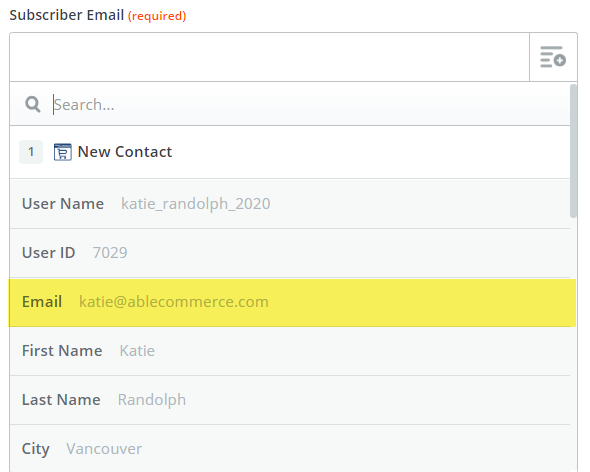
To match a field, expand the selection. You should see a list
of all the available fields from the New Contact Trigger selected
in Step One above. The trigger will offer as many practical fields
as possible, but you only need to worry about the ones on the receiving
side.
There will be a sample of data for each field and a user friendly label,
so you can easily identify which data fields in AbleCommerce match
up to the applicable field in the connecting app.
Select Email as the match field
to Subscriber Email.
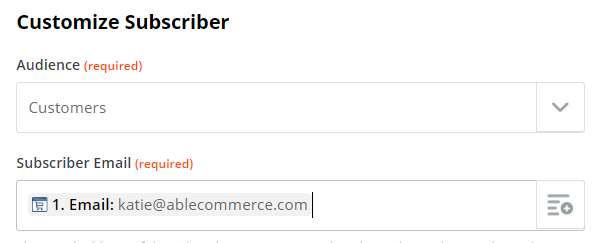
The screenshot below shows the selected Audience
("Customers" created in MailChimp) and the Email
field of AbleCommerce being matched to the Subscriber Email field
in MailChimp.
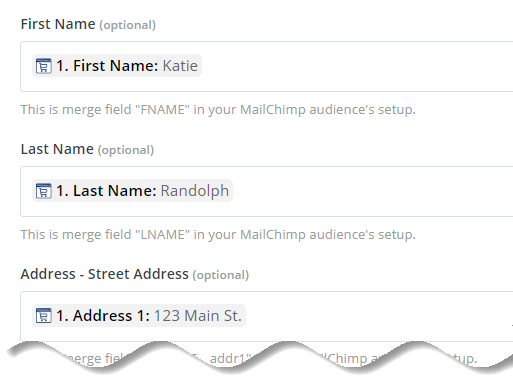
Often times, the input forms have several fields and some will be required and others optional. It is up to you how many of the optional fields you wish to use for the application selected. There will usually be other non-related selections available in the app's input form, so you just need to decide what options you wish to use or not use.
Since the New Contact trigger offers additional information,
you may want to match up the remaining fields available in MailChimp.
When finished with field assignments and selections, click the blue Continue button.
Testing options will become available. The testing options are the same as in the previous section.
Click the Test & Review button. If the test was successful, a confirmation will appear.
Click Done Editing if everything looks good.
A new record record will be added to the destination app.
Your new Zap is ready to be turned on.
Click the Turn Zap On
button. This takes a moment to finish, but once the Zap is on, you
can try it out by doing something in your AbleCommerce store to activate
the selected trigger. In this case, just create a new order or customer
account and the New Contact trigger will activate.
Note: When any customer places an
order in AbleCommerce, their email is instantly checked against the
existing records in your MailChimp account and if it is not found,
then the customer's email will be added to your list.
Before leaving, in the upper-left corner of the page, enter
a descriptive name for your
new Zap.

When any customer places an order in AbleCommerce, their email
is instantly checked against the existing records in your MailChimp
account and if it is not found, then the customer's email will be
added to your list.
Note: Timing is usually instant,
but it can be adjusted as needed within AbleCommerce. Your Zapier
account may have its own timing or Zap limitations depending on the
plan chosen.
The purpose of this Zap is to quickly make product price and inventory updates to the existing items in your catalog by using a spreadsheet.
App #1 - Google Sheets: Create a Google sheet with records for each of your products. If a product uses variants, then you will need one spreadsheet row per each unique variant.
To export from AbleCommerce, go to Data Transfer > Export > Products. Use the built-in utility to create a downloadable .zip file with your complete product and variant catalog in CSV format.
Triggered by: Any change in the spreadsheet or to a specific column of your choosing.
App #2 - AbleCommerce: Updates prices and/or inventory stock levels for products and/or variants.
Using the "Variant Match Field", you can define which field will be used to match updates for a product's variants. Select Variant ID, Variant SKU, or Variant Name.
When updating a product, you can use the product SKU as the match field by entering null or 0 for the Product ID. If using this method, make sure each product SKU is unique. Otherwise, the default match field for products (without variants) is the Product ID.
Note: The product or variant names cannot be updated using the "Update Prices and Inventory" action. However, there are other actions available that allow the product name to be changed outside of AbleCommerce. For these, special code is in place to automatically update the product URL when a name is changed.
Login to Zapier.
Create a new Zap.
Choose App: Google Sheets
Choose Trigger Event: New or Updated Spreadsheet Row
Continue to select your Google Sheets account.
Continue to the "Customize Spreadsheet Row" section.
Select a Spreadsheet name.
Select
a Worksheet name. You must
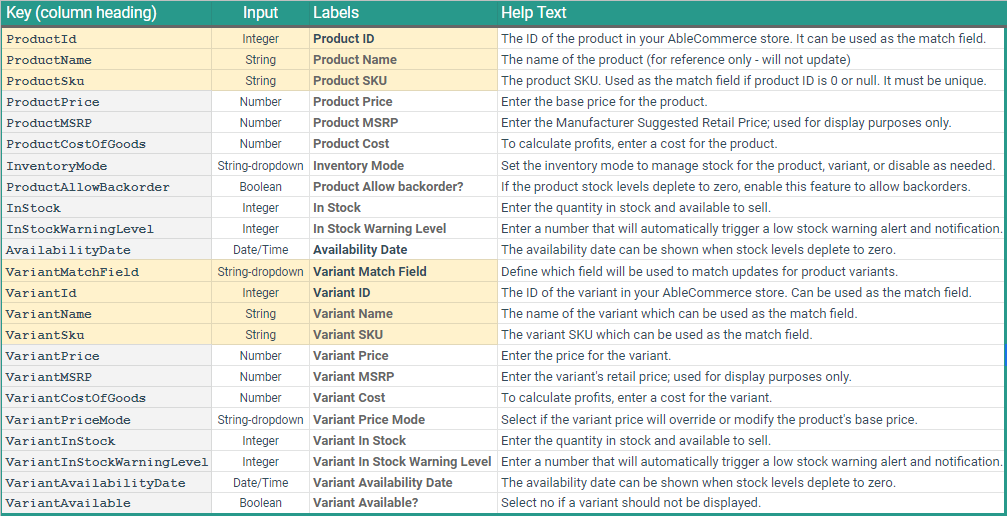
have column headers setup as follows:
Using the Key in the first
column below, enter this as the header text for each column in your
sheet. (e.g. ProductId)
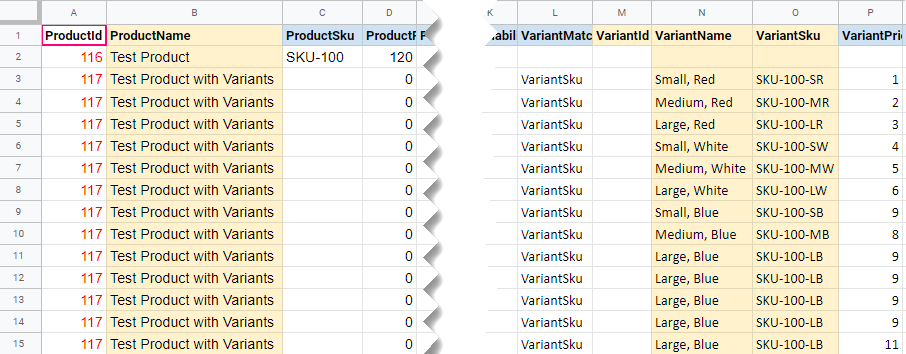
Google Sheet Example (partial)
A Trigger Column is optional, but it can be used as the trigger for an update, or it can be left blank to make changes immediately.
If needed, use the Refresh Fields button.
Continue to the "Find Data" section.
A sample of data from the Google Sheet will be shown. Review the data that will be output before continuing.
If the sampling of data looks good, then click the Done Editing link.
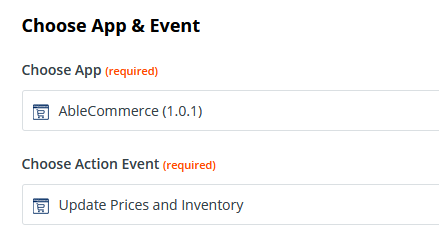
Open the "2. Do this ..." section, search for the AbleCommerce app and select it.
For
the Choose Action Event, select
"Update Prices and Inventory".
Continue to the "Choose Account" section for app authentication.
Select your Zapier account registered with the AbleCommerce app.
Continue
to the "Customize Product"
section as shown in the screenshot below.
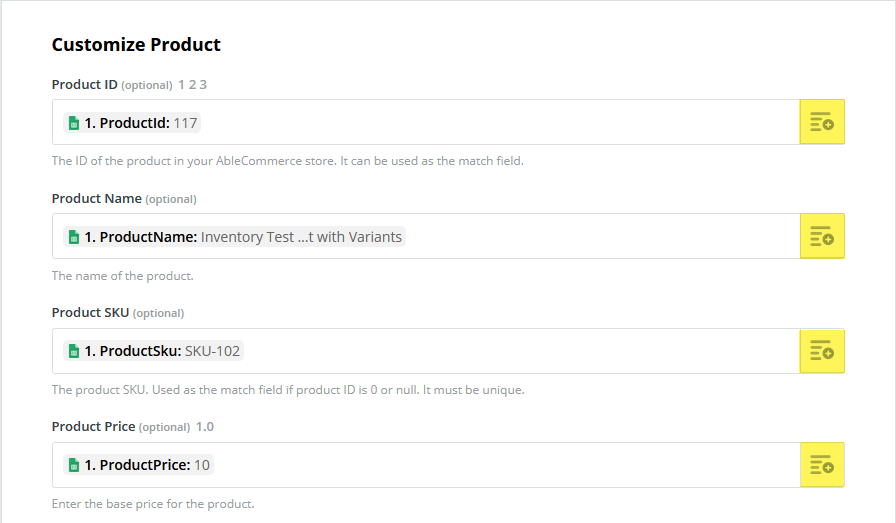
For each label shown, match each field (by clicking area shown in yellow highlight) to the column heading in your sheet.
For
fields that require a specific value to be set, such as True or False,
Zapier offers the ability to assign the key (column heading) as the
match field instead of using just one of the options/values offered.

Use the down-arrow (shown in yellow highlight) to open the selection drop-down.
Select the option "Use a Custom Value (advanced)".
Then a new field will appear below it. Match this field to the applicable column heading in your sheet.
When finished making all field assignments, continue to the "Send Data" section.
Use one of the Testing options to review the data.
If the sampling of data looks good, then click the Continue button or Done Editing link.
Turn on the Zap!
Give the new Zap a good descriptive
name.

Return to the Zap dashboard.
The purpose of this Zap is to create a sales receipt in QuickBooks. This is a multi-step Zap because there is an intermediate step that will search to see if the customer exists. If not, then the customer account must be created first. Once the middle step has completed, then a sales receipt will be created using the AbleCommerce order information.
App #1 - AbleCommerce: New orders placed within the AbleCommerce retail checkout system or by an admin user.
Triggered by: A new order event of your choice.
App #2 - QuickBooks:
Creates a new customer account if needed. Creates a new sales receipt
attached to the correct customer account.
Note: QuickBooks supports line-items
for the order data, but has a single shipment address per order. AbleCommerce
has support for multiple shipping addresses per order. In QuickBooks,
if there are additional shipping addresses generated in the order, then
each address will be shown separated by commas.
Login to Zapier.
Create a new Zap.
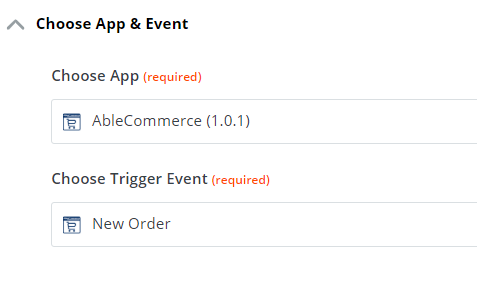
Choose App: AbleCommerce
Choose
Trigger Event: New Order
Continue
to Choose Account section
and select your AbleCommerce Store.

Continue
to Customize Order section.
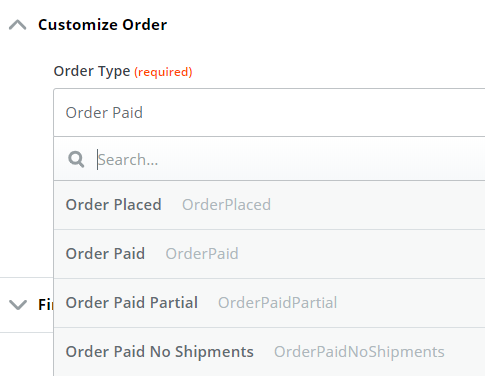
Select the type of order that will be used to create a new sales receipt from.
Order Placed (includes every new order, paid or unpaid)
Order Paid (includes fully paid new orders only)
Order Paid Partial (includes new orders that have a partial payment)
Order Paid No Shipments
(includes new orders without shipments)
Note: The most common type
of order to create a sales receipt from will be Order
Paid, however, you can select the Order Type filter of your
choice.
Continue to the Find
Data and testing section.
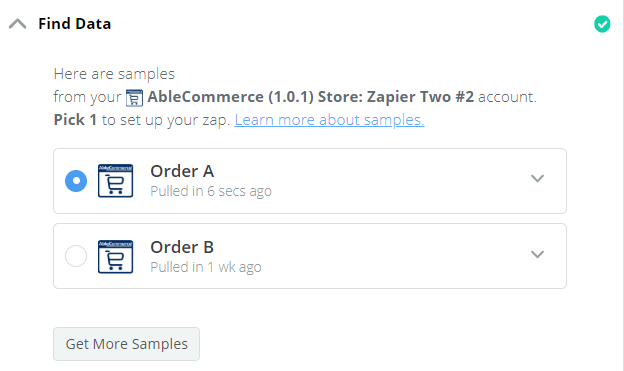
Open and review an existing sample order. If none exist, or you need a new one, use the Get More Samples button.
If the sampling of data looks good, then click the Test & Continue button or Done Editing link.
Proceed to the next part of the Zap. (Do this ...)
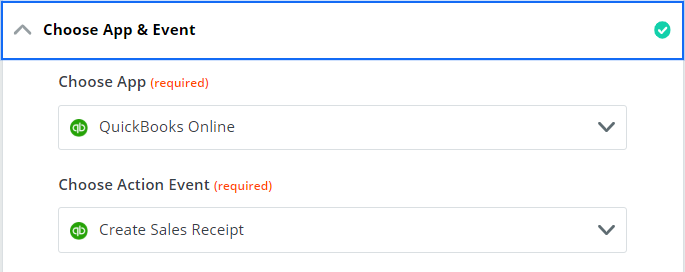
Choose App & Event
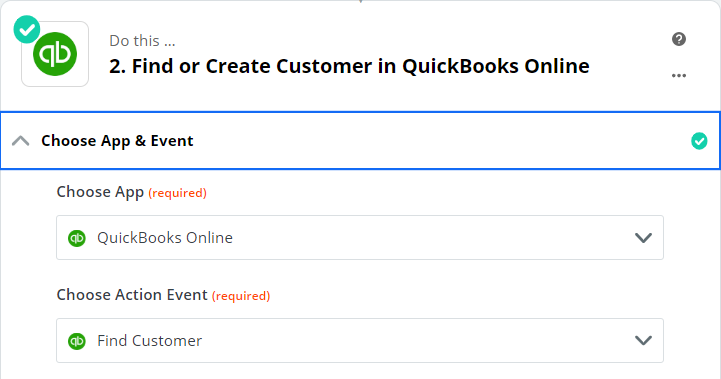
Select "QuickBooks Online" for Choose App
Select "Find Customer" for the Choose Action Event.
Continue to the Choose
Account section for app authentication.
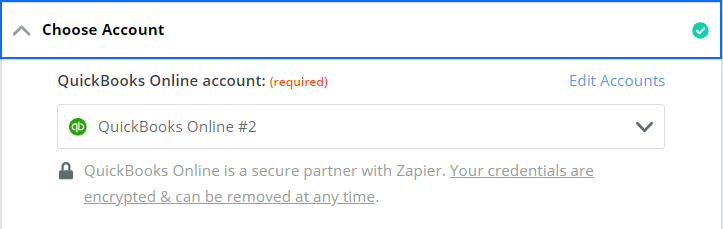
Select your Zapier account registered with the QuickBooks app.
Continue
to the "Customize Customer"
section as shown in the screenshot below.
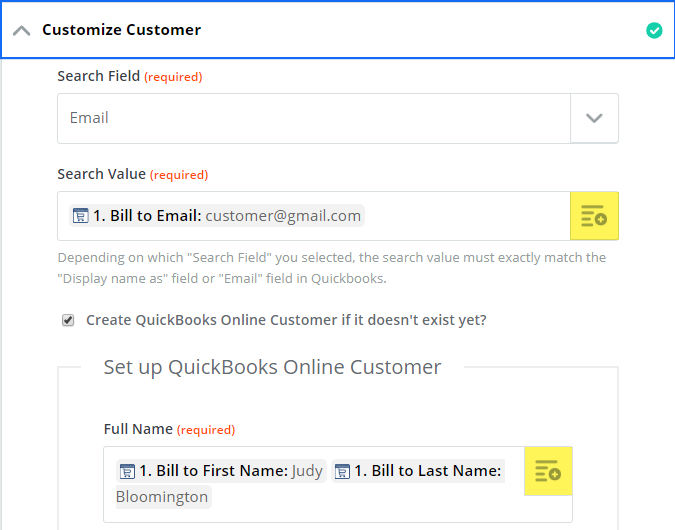
Select "Email" for the Search Field.
Select a match field for the Search Value. Use the down-arrow (shown in yellow highlight) to open the selection drop-down and select "Bill to Email" as the match field.
Check the box to "Create QuickBooks Online Customer if it doesn't exist yet?"
In the
form fields that follow, map each of the following AbleCommerce fields
used to create the customer in QuickBooks.
QuickBooks |
AbleCommerce |
| Full Name | Bill to First Name, Bill to Last Name |
| Display Name | Bill to Company or leave blank |
| First Name | Bill to First Name |
| Last Name | Bill to Last Name |
| Company | Bill to Company |
| Bill to Email | |
| Phone | Bill to Phone |
| Address Line 1 | Bill to Address 1 |
| Address Line 2 | Bill to Address 2 |
| Address City | Bill to City |
| Address State Code | Bill to State/Province |
| Address Zip Code | Bill to Postal/Zip Code |
| Address Country | Bill to Country Code |
Continue to the "Find Data" section.
A sample of customer data from the QuickBooks will be shown. Review the data that will be output before continuing.
If the sampling of data looks good, then click the Test & Continue button or Done Editing link.
Open the "2. Do this ..." section, search for the QuickBooks Online app and select it.
For
the Choose Action Event, select
"Create Sales Receipt".
Continue
to the Choose Account section
for app authentication.
Continue
to the Customize Sales Receipt
section. First we need to lookup the customer by email.

Skip the first row to use the Find Customer by Name/Email field instead. Assign the AbleCommerce field Bill to Email.
For the Email field, assign the same AbleCommerce field Bill to Email.
The
next section of field assignment takes place in the Line
Items section.
Note: Both QuickBooks and AbleCommerce
have line-item support. This means that any comma-separated lists
of data will be filtered and arranged to create an itemized list with
each item on its own line.
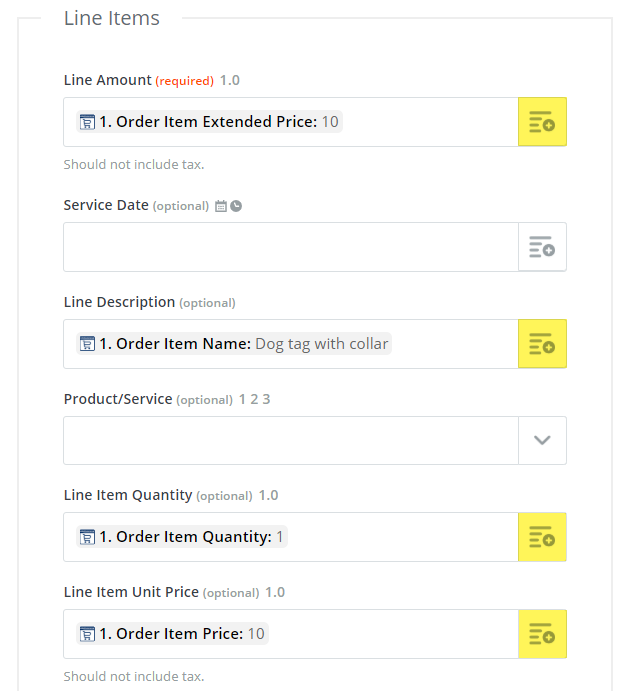
Reference
the table below to complete field assignment for the Sales Receipt.
QuickBooks |
AbleCommerce |
| Line Amount | Order Item Extended Price |
| Line Description | Order Item Name |
| Line Item Quantity | Order Item Quantity |
| Line Item Unit Price | Order Item Price |
| Transaction Date | Order Date |
| Sales Receipt Number | Order No. |
| Address Line 1 | Bill to Address 1 |
| Address Line 2 | Bill to Address 2 |
| Address City | Bill to City |
| Address State Code | Bill to State/Province |
| Address Zip Code | Bill to Postal/Zip Code |
| Address Country | Bill to Country Code |
| Shipping Address Line 1 | Order Shipment Address 1 |
| Shipping Address Line 2 | Order Shipment Address 2 |
| Shipping Address City | Order Shipment City |
| Shipping Address State Code | Order Shipment State/Province |
| Shipping Address Zip Code | Order Shipment Postal/Zip Code |
| Shipping Address Country | Order Shipment Country Code |
| Tax Calculation | Tax is Excluded from Price* |
Make
sure to match up the correct AbleCommerce fields within the Line Item
section. QuickBooks expects the math calculations to be correct on
the receipt.
Note: QuickBooks provides additional
fields for discounts, shipping, and tax. In AbleCommerce, these are
treated as line-items within the order, so it isn't necessary to match
these optional fields.
* Make sure to choose the Tax Calculation option "Tax is Excluded
from Price".
When finished, click the blue Continue button.
Proceed to the Send Data section. To test QuickBooks, a new sales receipt will be created.
If the test data looks good, then click the Test & Continue button.
When finished, click the Done Editing link.
Turn on the Zap!
Give the new Zap a good descriptive
name.

Return to the Zap dashboard.
New
Order (with line-item support) - Triggers when a new order
is placed.
This trigger includes additional Order
Type selections for:
Order Placed - includes all new orders
Order Paid - includes only fully paid orders
Order Paid Partial - includes new orders with a partial payment
Order Paid No Shipments - includes new paid orders without a shipment
New Product - Triggers when a new product is created.
New User - Triggers when a new account is created.
New Order Note - Triggers when a customer adds a note to their order.
New Abandoned Basket - Triggers when a customer does not complete the checkout process.
Create Product Simple - Creates a product with the minimum fields needed for a complete listing and purchase.
Create Product Advanced - Creates a product with the minimum fields needed for a complete listing and purchase. This action includes additional fields for shipping, inventory, and catalog display features.
Create User - Creates a registered user account with contact information.
Create Order Note - Creates a new order note in the store.
Update Product for Google - Update a product's data specifications used in Google feeds, advertising and shopping campaigns, and search engine optimization.
Update Prices and Inventory - Updates prices and inventory stock levels for products and/or variants. Match by SKU, Name, or ID.
Find or Create User - Search for a user by email address. Use * for a wildcard search.
Find or Create Product - Search for a product by its name or SKU. Use * for a wildcard search.