PayPal PayFlow Pro
Table of Contents Show
PayPal PayFlow Pro Processing Features
The PayPal PayFlow Pro payment gateway is very simple to setup. There are no additional software requirements besides having AbleCommerce installed. To enable PayPal PayFlow Pro, you need to have a username and password for your account.
AbleCommerce supports all the standard features of the payment
gateway. In addition, there are additional services such
as recurring billing and fraud protection which can be added to
your account. For more information on the services and features
available, visit PayPal PayFlow Pro 
Authorize - where the cardholder's funds are verified as available and set aside for the pending transaction.
Authorize Capture - where the cardholder's funds are verified and immediately transferred to the merchant.
Capture - a full or partial transfer of funds from the cardholder's pending authorization to the merchant.
Void Authorization - when the pending authorization of funds is canceled. This does not refund a payment.
Refund - when funds have been transferred to the merchant, and a full or partial refund is returned to the cardholder.
Partial Refund - where multiple refunds to the customer are possible.
Recurring Billing - where the recurring billing feature within your gateway is initiated by AbleCommerce. PayFlo Pro maintains the billing and notifications after the initial order is placed.
At this time, multi-currency is not a supported feature of AbleCommerce's PayFlow Pro integration. All amounts will be in USD.
Post-order Processing
All AbleCommerce payment gateway integrations offer full support for post-order processing. This means that after an order is placed, you can authorize, capture, refund, and void transactions from the AbleCommerce order administration area.
Some post-order processing features, such as refunds, may require that you enable credit card storage from the Configure > Security > System Settings page.
Installing the PayPal Payflow Pro Gateway
Login to your AbleCommerce installation.
Using the menu, go to the Plugins page.
Use the Filter Plugins option and select the type "Payment".
NOTE: Payflow Pro plugin will be available in the list as shown in the screenshot below.
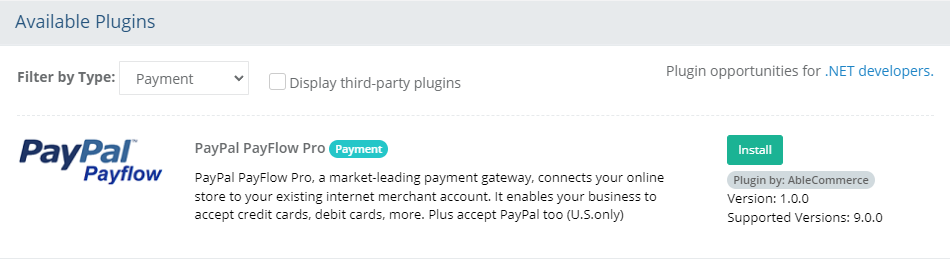
Click the green Install button in the far right column.
When the confirmation popup appears, click the green Yes, install it button.
Upon completion, click the orange Configure button.
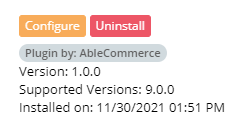
NOTE: Version shown may be different depending on the release of AbleCommerce you are using.
Configure PayFlow Pro Payment Gateway
Before you begin, make sure that you have your PayFlow Pro account information supplied by PayPal. All values are case-sensitive.
From Configure > Payment > Gateways page, all of the installed payment gateways will be shown.
NOTE: Visit the Plugins page to install a new payment gateway. There is no limit to the number of gateways that can be install and/or in use.To configure a new gateway, click the blue plus (+) button to continue. If the gateway is already configured, click the Edit button to make changes.
You will now be on the Add PayFlow Pro configuration page as shown below:
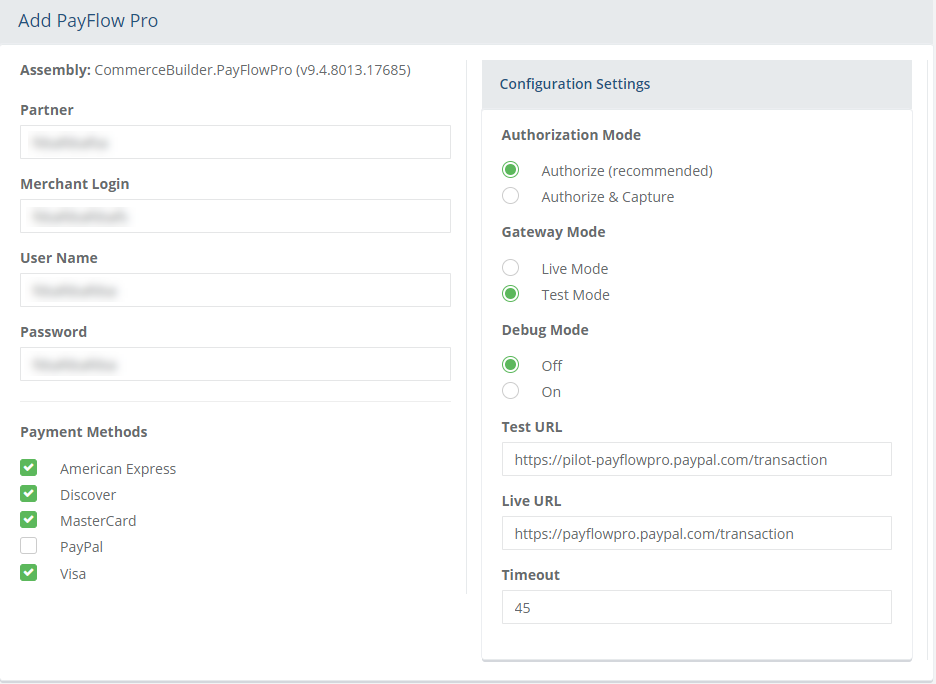
In the field named Partner, enter your partner identification. (e.g. Verisign)
Enter your User Name in the next field. This is the same user name used to login to the PayPal manager.
Enter your transaction Password in the next field.
For added security, this password should be different than your PayPal Manager password. For instructions on changing your password, see the next section "Changing Your Password".Choose the type of Authorization Mode.
Authorize: to request authorization without capturing funds at the time of purchase. You can capture authorized transactions through the order admin interface.
Authorize & Capture: to capture funds immediately at the time of purchase. You should not use this feature unless you are able to ship goods the same day of the sale.
Choose the Gateway Mode.
Live Mode - used for processing live transactions with a production merchant account.
Test Mode - used for processing transactions with a test merchant account.
The Test URL field has the address for testing. Do not change this unless the gateway requires it.
The Live URL field has the address for live transactions. Do not change this unless the gateway requires it.
If desired, you can adjust the Timeout. This is how long AbleCommerce will wait for the gateway to respond. 45 seconds is the default and recommended value.
Debug Mode: When debug mode is enabled, all messages sent to and received from Payflow Pro are logged. This should only be enabled at the direction of qualified support personnel.
Default Log File Location: ..\App_Data\Logs\[gatewayname].log.In the bottom section of the page, find the section called Payment Methods.
Click the box next to all credit card payment methods that will use the PayPal Payflow Pro gateway.
At the bottom of the page, click the Save and Close button to finish.
Activating your Payflow Pro Account
When you are ready to activate your Payflow Pro account to begin submitting live transactions, follow these steps:
Log in to PayPal Manager at https://manager.paypal.com
Click the Click Here to Activate button and follow the on-screen instructions.
When finished, return to the PayFlow Pro gateway configuration page in AbleCommerce, change the Gateway Mode to Live.
Changing Your Password
You have a single password to log in to PayPal Manager, and to perform PayFlow Pro transactions. Here you can either change your single password, or create a separate password for PayPal Manager.
To change your password, login to your PayPal manager and follow the next steps:
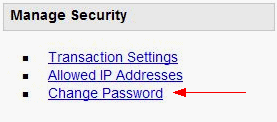
Click on the "Account Administration" menu item.
In the Manage Security section, click on the "Change Password" link.
From the next page, click on the link "Change your password", or the link will be "Change PayFlow Pro Transaction password" if you have changed it before.

Enter your new password and click the Update button.
Enter this password into the Password field of the Payflo Pro configuration page in AbleCommerce.
Testing with PayFlow Pro
Edit the PayFlow Pro gateway configuration page in AbleCommerce.
Change the Gateway Mode to Test.
At the bottom of the page, click the SAVE button.
Be sure to change the Gateway Mode to Live before processing real credit card transactions.
When testing PayFlow Pro, keep in mind there are some potential issues:
Using a test Visa credit card number of "4111111111111111" will result in a failed Authorization. Try using "4012888888881881" instead.
If you have Fraud Protection Services, you must use delayed capture processing for all sale transactions. (Authorize mode)
NOTE: There may be additional features within your PayFlow Pro account that have not been tested with AbleCommerce. If you enable unsupported features, you are doing so at your own risk.