BluePay
Table of Contents Show
BluePay Processing Features
BluePay is a leading provider of technology-enabled payment processing for merchants and suppliers of any size in the United States and Canada. Through physical POS, online, and mobile interfaces, as well as CRM and ERP software integrations, BluePay processes business-to-consumer and business-to-business payments while providing real-time settlement, reporting, and reconciliation, along with robust security features such as point-to-point encryption. BluePay is headquartered in Naperville, Illinois, with offices in Chicago, Maryland, New York and Toronto.

AbleCommerce supports all the standard features of the BluePay payment gateway.
Authorize
Authorize Capture (Sale)
Capture
Void
Refund
Partial Refund
BluePay is a Canadian and American provider. Amounts will be in CAD or USD as configured within your merchant account.
Post-order Processing
All AbleCommerce payment gateway integrations offer full support for post-order processing. This means that after an order is placed, you can authorize, capture, refund, and void transactions from the AbleCommerce order administration area.
Some post-order processing features, such as refunds, may require that you enable credit card storage from the Configure > Security > System Settings page.
Installing the BluePay Gateway
Login to your AbleCommerce installation.
Using the menu, go to the Plugins page.
Use the Filter Plugins option and select the type "Payment".
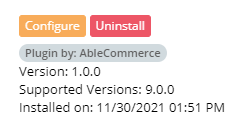
NOTE: BluePay plugin will be available in the list as shown in the screenshot below.

Click the green Install button in the far right column.
When the confirmation popup appears, click the green Yes, install it button.
Upon completion, click the orange Configure button.

NOTE: Version shown may be different depending on the release of AbleCommerce you are using.
Configure BluePay Payment Gateway
Before you begin, make sure that you have the following information which will be provided by BluePay:
Merchant Login ID = Your BluePay Account ID
Merchant Password = Your BluePay Secret Key
If you have trouble finding this information, skip to the next section on this page for help.
From Configure > Payment > Gateways page, all of the installed payment gateways will be shown.
NOTE: Visit the Plugins page to install a new payment gateway. There is no limit to the number of gateways that can be install and/or in use.To configure a new gateway, click the blue plus (+) button to continue. If the gateway is already configured, click the Edit button to make changes.
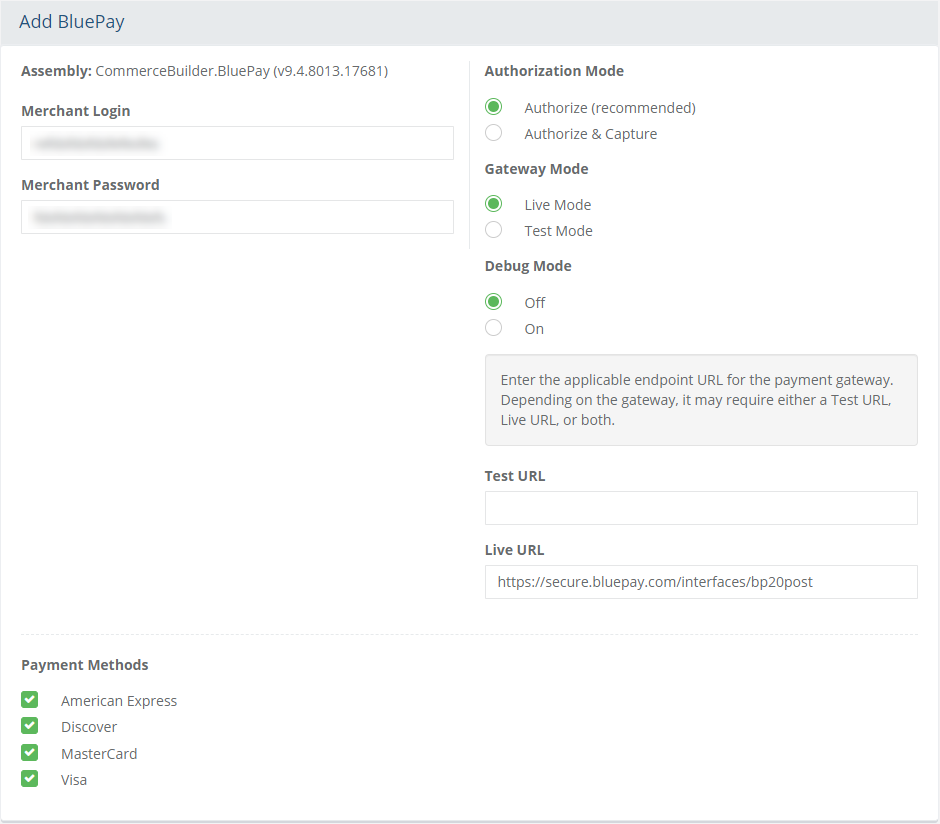
You will now be on the Add BluePay configuration page as shown below:

In the field named Merchant Login, enter the number known as the Account ID.
In the field named Merchant Password, enter your Secret Key.
Choose the type of Authorization Mode.
Authorize: to request authorization without capturing funds at the time of purchase. You can capture authorized transactions through the order admin interface.
Authorize & Capture: to capture funds immediately at the time of purchase. You should not use this feature unless you are able to ship goods the same day of the sale.
Choose the Gateway Mode.
Live Mode - used for processing live transactions with a production merchant account.
Test Mode - used for testing transactions with a development merchant account.
Debug Mode: When debug mode is enabled, all messages sent to and received from BluePay are logged. This should only be enabled at the direction of qualified support personnel.
Default Log File Location: ..\App_Data\Logs\[gatewayname].logThe Test URL and Live URL fields are used to store the connection link to the gateway. This information is pre-populated when you configure the gateway and should not be changed unless directed by BluePay or AbleCommerce personnel.
In the bottom section of the page, find the section called Payment Methods.
Click the box next to all credit card payment methods that will use the BluePay gateway.
At the bottom of the page, click the Save and Close button to finish.
Configuration Settings in your BluePay account
This section provides information on configuring your BluePay account to work with the AbleCommerce integrated gateway.
Go to BluePay's website and login to your merchant account.
From the left navigation bar, expand the ADMIN menu.
Then expand the Accounts menu. Now click on the List link.
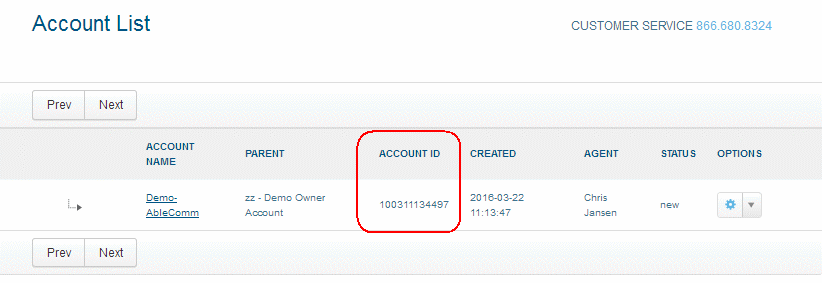
Next you will see the "Account List" page as shown in the example below:

The Account ID is shown. This is the first piece of information you will need for AbleCommerce. It should be entered in the Merchant Login field of the AbleCommerce BluePay configuration page.
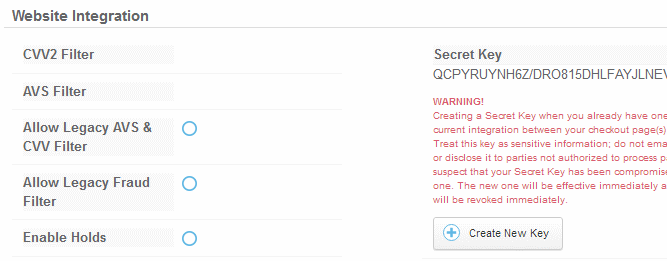
Click on the linked ACCOUNT NAME to view the "Account Admin" page. Find the "Website Integration" section as shown in the example below.

If this is a new account, then click the "Create New Key" button to generate your Secret Key. This should be entered in the Merchant Password field of the AbleCommerce BluePay configuration page.
If you ever create a new Secret Key, the old one will be disabled immediately.
Testing with BluePay
Setup a BluePay sandbox account through https://www.bluepay.com/developers/
Edit the BluePay gateway configuration page in AbleCommerce.
Change the Gateway Mode to Test Mode.
At the bottom of the page, click the SAVE button.
Using the credit card numbers listed below, you can test an approval or decline.
- If the dollars portion of the amount is odd, then an approval is returned.
- If the dollars portion of the amount is even, then a decline is returned.Be sure to change the Gateway Mode to Live before processing real credit card transactions.
BluePay Test Credit Card numbers
Visa 4111111111111111
MasterCard 5500000000000004
American Express 378282246310005
Discover 6011111111111117
NOTE: There may be additional features within your BluePay account that have not been tested with AbleCommerce. If you enable unsupported features, you are doing so at your own risk.