Managing Theme Files
If you plan to customize the style sheets and images for your store, we recommend that you make a copy of one of the default themes available. You can use the built-in Themes File Manager, as documented here, or you can make a copy of the desired theme folder found under the \App_Themes\ directory.
Themes
The files that make up a theme are located in the corresponding sub-folders of the \App_Themes\ directory. After selecting the theme you wish to use for your store, you may want to make a copy of the theme before making changes. You can do this by using the Themes File Manager.
A theme is composed of Cascading Style Sheets (.css) and Asp.Net Skin (.skin) files which allow you to customize the look and feel of your store. It is not the purpose of this document to explain skinning or style sheets in detail. So, if you are not familiar with .CSS files or .SKIN files, you may want to search on Google for some more information.
A theme also includes the buttons and icons used throughout your store. This includes the logo, add to cart buttons, and much more. You can view the \images\ folder for your selected theme to see which images are available. Replace these images with your own for a custom store appearance.
Add or Copy a Theme
-
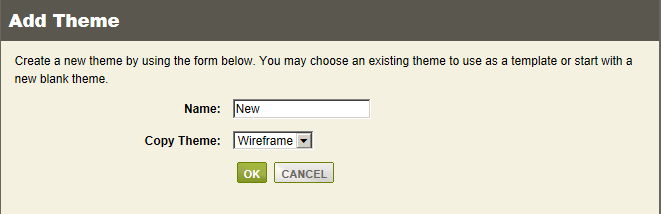
From the Themes page, or from the top-menu, go to Website > Themes.

-
Find the ADD THEME button and click it to view a pop-up form.
-
You may select a theme to copy from, or you can leave the Copy Theme option empty to create your own new blank theme.
-
In the Name field, enter a name for your new theme. The theme name cannot include any special characters or spaces.
-
Click the OK button, and wait a moment for the theme files to be copied to their new location. The new theme will be created the \App_Themes\ folder.
Editing a Theme
IMPORTANT: You can edit a theme by using the built-in Theme Designer or by editing the style.css file directly. If you edit the file directly, then do NOT use the Theme Designer without the prior understanding that it will reformat the original style.css file so it can work with the designer features.
-
You can edit a theme by clicking the icon in the far right column. We do not recommend editing the installed themes unless you make a backup first.

-
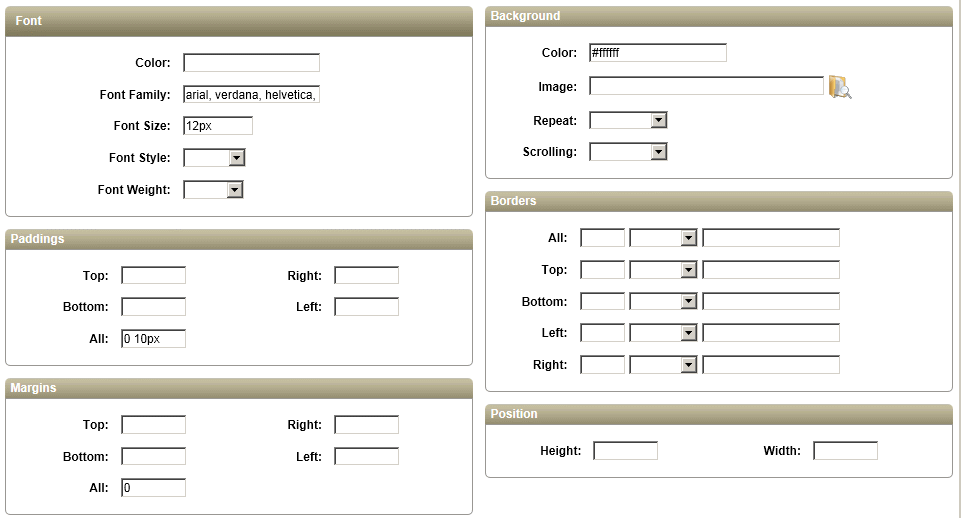
From the next Edit Theme page, you will see a variety of fields and a selection tool in the upper part of the page.

-
The Choose Style options are a list of all the available styles that have been mapped to the Theme designer. When you make a selection here, the mapped style and a short description are indicated in the Style Selector section.
-
After making a selection, the bottom of the page will be updated to show the available style elements for the selected style.
-
Enter values or changes as needed and click the SAVE button when finished.
-
If you need to remove a theme, simply click the red DELETE icon from the list of themes.
Importing a Theme
-
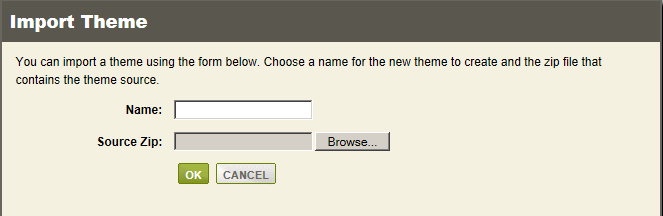
From the Themes page, or from the top-menu, go to Website > Themes.
-
Find the IMPORT THEME button and click it to view a pop-up form.
-
In the Name field, enter a name for your new theme. The theme name cannot include any special characters or spaces.
-
Then select the zip file that contains the theme source. This zip file needs to contain all the necessary files and folders for a theme. Reference any of the built-in themes in the \App_Themes\ folder to see the required files and structure.
-
Click the OK button, and wait a moment for the theme files to be copied to their new location. The new theme will be created the \App_Themes\ folder.
Download a Theme
Backup your themes at any time.
-
From the Themes page, click on the Download icon for any theme listed.

-
Save the file to a location on your computer.
![]()
Go to Site Map