Data Exchange > ShipStation > Publish Orders
Export to ShipStation
AbleCommerce is integrated with ShipStation to automate the process of creating your shipments and recording tracking numbers. Before using this feature, you should have already created a ShipStation account and configured it for use with AbleCommerce. [New in R10]
After exporting your orders to ShipStation, you will be able to generate accurate shipping costs, print labels, and then re-sync the data back to AbleCommerce.
Filter and Export Products for ShipStation
-
From the Data > ShipStation > Publish Orders page, use the form to setup your search criteria for the products that will be exported for use in ShipStation.
-
Use the fields to find orders to export. Only orders with valid shipments will be available for export.

-
Select your orders using a date range by using the Date Range fields from and to. Click in the field to add your custom date range.
-
You can also select an order range. Enter a single order number, or your order numbers separated by a comma, or enter a range using a hyphen. (e.g. 1-10)
-
Use the Order Status selection if you want to find only orders with the status selected here.
-
You can also select orders by Shipment Status (All, Shipped, or Unshipped) or select a Payment Status (All, Paid, or Unpaid)
-
The checkbox to Include Orders Already Exported is unchecked by default. You can check this box to include orders that have been previously imported into ShipStation. This may be useful if you need to re-import orders for some reason. If that happens, you should cancel the orders within ShipStation before re-importing them.
NOTE: Re-exporting orders will create NEW shipments. Do not use this option unless you have already canceled the shipment within ShipStation for the orders that are being imported again. If you are trying to export an order that has an existing (processed) shipment and a new (unprocessed) shipment, then use the search filters to export, but do not use the option to "Include Orders Already Exported". -
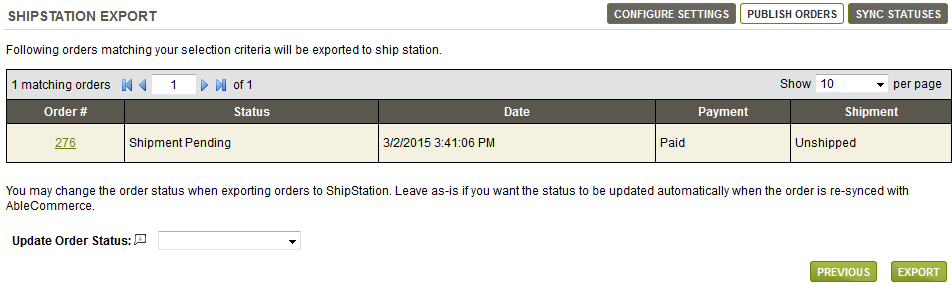
After making your field selections, click the NEXT button and view your results. The following example has a single order shown, but you will likely have several orders to import during the actual production process. If you are testing the integration, then we recommend importing a single order to understand how the process works.
-
Optionally, you may change the order status upon exporting. If you do not want to update the order status at this time, then leave the selection unchanged. In the next section, we will show you how the statuses can be changed automatically.
-
Click the EXPORT button to continue.
-
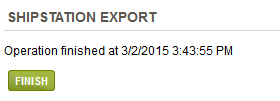
Wait until the export process completes and you are viewing the operation finished message as shown below.
-
Click the FINISH button.
Continue to Importing ShipStation data...
Go to Site Map