![]()
Table of Contents Show
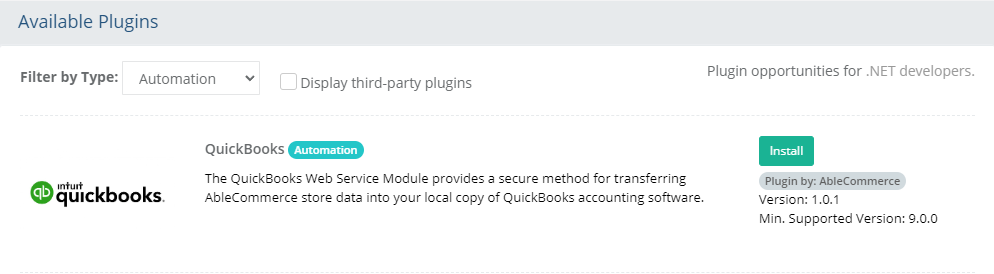
The QuickBooks® Web Service Module provides a secure method for transferring AbleCommerce 9 store data into your local copy of QuickBooks accounting software. The technology used to accomplish this is known as .Net Web Services using the SOAP HTTP protocol. Combined with the Intuit Web Connector, your AbleCommerce storefront will soon have a powerful and simple means to communicate financial data into your QuickBooks company file via any internet connection.
Intuit developed a clever method of allowing other applications to send and receive data from their QuickBooks program known as the Intuit SDK. Intuit then extended this SDK to work over the internet using their QuickBooks Web Connector (QWC) program.
This module combines both technologies to create a secure two-way communications channel between AbleCommerce and QuickBooks. Since the QWC must be installed on the same computer as QuickBooks, you remain in control and authorize all transaction exchanges. All communication between the QWC and your web site is encrypted using website SSL certificate already installed in your online store.
There are two separate information-transfer processes that must occur. Each
is initiated the exact same way. The difference is controlled
with the flip of a radio button on the Configuration page.
The first transfer is done very infrequently and is known as a “Pull”. This
“Pull” tells your QuickBooks to send AbleCommerce a complete list of existing
General Ledger accounts, Vendors, Customers etc. This is required
so the module can later determine if new records must be created when
transactions are being transferred from AbleCommerce to QuickBooks.
The second transfer is the regular transfer of completed orders, also known as a “Push”. This can be done as often or as infrequently as you want – you have complete control. In fact, you can even schedule the QWC to automatically pull data at any interval. Yes, this means the entire process of automatically transferring your web store financial information to your local QuickBooks is not only possible but reality!
Note: By default, the web service module will only transfer orders marked as both Paid and Shipped. All other orders are ignored until they are marked as such.
AbleCommerce 9.0.9 – This version of the QB Module requires AbleCommerce 9.0.9 or later. It may be installed on older versions of AbleCommerce 9 but it has not been tested.
QuickBooks – Pro, Premier, Enterprise QuickBooks 2003 and above. Simple Start Edition 2006 and above. QuickBooks Basic is not supported. International versions are supported however they are untested. Note some installs of QuickBooks 2003 Enterprise have proven not to be compatible despite assurances from Intuit. We strongly suggest you upgrade your QuickBooks to the latest release before using this module.
Web Site – Valid SSL certificate with your AbleCommerce store enabled for SSL. All communication occurs through HTTPS and thus is encrypted 100% of the time.
Good Performance PC – QuickBooks itself is no small program. It requires a decent PC with at least 1Gb RAM to function well. Adding this Web Connector functionality will put even more demand on your computer.
Clean Company File – Some company files become large and “bloated”. This can cause the web connector to have significant delays during processing and could result in complete failure to transmit data. Please be sure your company file has only the necessary history data required.
Overall, you need a solid workstation setup to consistently transfer data between the online store and your local PC.
Before beginning, make sure that QuickBooks is running on a local computer. Refer to the system requirements for supported versions. The AbleCommerce QuickBooks plugin does not support QuickBooks Online.
Open the company file.
Download and install the latest version of QuickBooks Web Connector software on the same PC running QuickBooks. There are no options or settings to configure.
Review the procedures for downloading and installing.
Download the latest version.
Extract the 3 files into a temp folder.
Right-click on QBWebConnectorInstaller.exe and select "Run as Admin" to install.
Complete the next step before launching the connector.
Login to your AbleCommerce installation.
Using the menu, go to the Plugins page.
Use the Filter Plugins
option and select the type "Automation".
Note:
QuickBooks will only be shown if you are using AbleCommerce 9.0.9
(or later), or if you've installed the plugin separately.
Click the green Install button in the far right column.
When the confirmation popup appears, click the green Yes, install it button.
Upon completion, click the orange Configure
button.

NOTE: Version shown may be different
for your installation.
Configuration within AbleCommerce is performed in two steps. The first step tests the web service module and populates all the configuration page options. Here’s how to perform the first configuration step.
From the AbleCommerce Admin menu, go to Data
Transfer > QuickBooks > Settings page, or access this
page by clicking Configure from the Plugins page. Direct URL: /Admin/QuickBooks/Config
Let’s review the configuration page as it’s very important to understand
how the QuickBooks web service functions. You’ll
quickly notice how all the settings are grouped into logical sections
on the page. But all the drop-down lists are empty – this
page isn’t going to work well without some choices available for your
to select.
The QuickBooks Connection
Details section is shown in the upper-left section of the page.
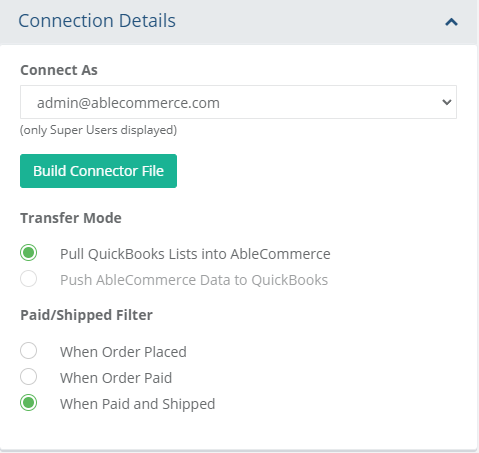
In the “Connect As” drop-down list, select one of the listed Super Users. This top-level admin user will also be the user that QuickBooks will use for authentication. It is recommended to create a separate admin user as logins cannot be shared with real users.
Click the Save button in the admin footer.
Now you must click the Build
Connector File button. This step will create the AC_QB.qwc
file.
A green confirmation will display indicating where the connector file
was created. The file is located in the /wwwroot/App_Data/
folder on your website, but you can also download the file from the
configuration page as seen below.
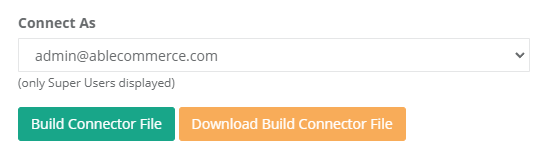
Download this file to your local computer where QuickBooks is installed.
Every time you do a transfer session, you must have QuickBooks loaded before you begin. Before transferring to a live QuickBooks company file, make sure to do a practice test with a company file used for testing.
Confirm QuickBooks is running and that there is a company file loaded.
Find the AC_QB.qwc file created in the steps above.
Double-click the file. It will automatically launch
the QuickBooks Web Connector.
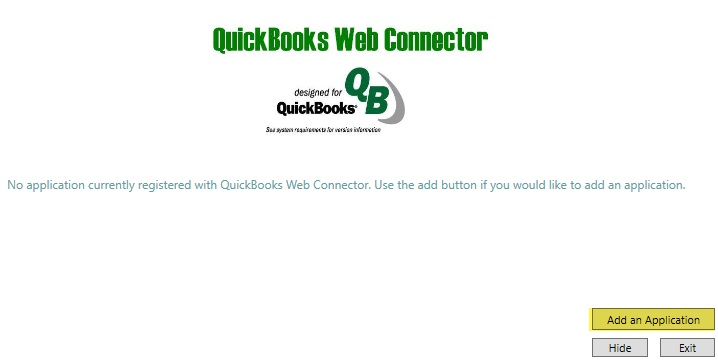
Click the Add
an Application. This will trigger a popup dialog in QuickBooks
asking permission to authorize a new web service.
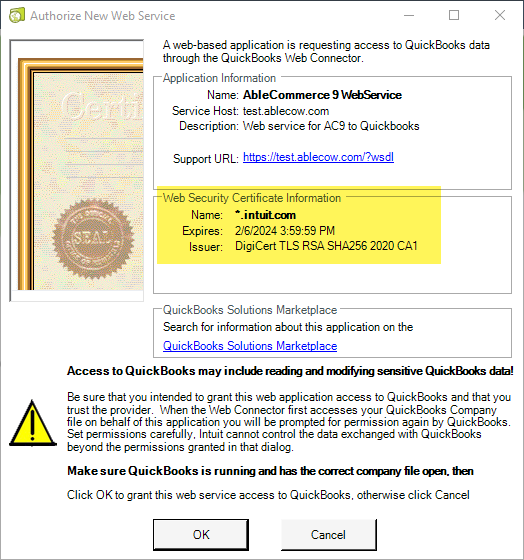
Make sure the Web Security Certificate Information is valid. If it
says "unavailable", then you need to stop and make sure
that AbleCommerce admin has secure SSL enabled.
Confirm by clicking the OK button.
In the next step, QuickBooks will ask you to confirm
the requested access to the AbleCommerce 9 WebService.
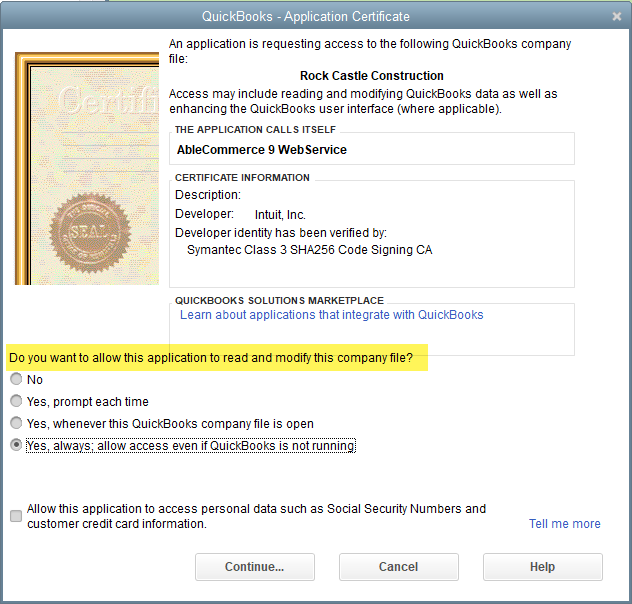
There will be options to allow this application to ready and modify the company file.
You may choose whichever options suits you, but we recommend selecting "Yes, always; allow access even if QuickBooks is not running".
Click Continue...
A final confirmation dialog will appear. If everything looks good, click Done. This step only needs to be completed once.
Upon confirmation, the QuickBooks Web Connector launches.
Click the checkbox in the first column. It will prompt
you to enter a password for the admin user configured in AbleCommerce.
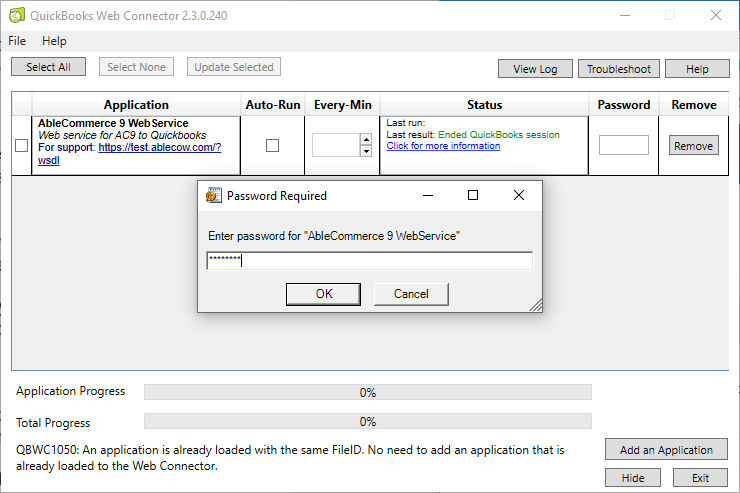
Click OK to save the password.
Now that we have everything set to make a connection, let’s initiate the session. This is exactly how you’ll do it with your regular transfer sessions and it’s super-simple.
Just pull up the QWC and click the Select All button at the top. Now the Update Selected button is no longer greyed-out. Click the Update Selected button and the session is started. You’ll see a few messages flash by and the Application Progress bar will jump to 100%. You’re done – QuickBooks and AC7 just had a conversion
View the QuickBooks connector. If the Update Selected button is disabled, then click the Select All button.
Next, click the Update Selected button. Wait for the
Application Progress to complete.
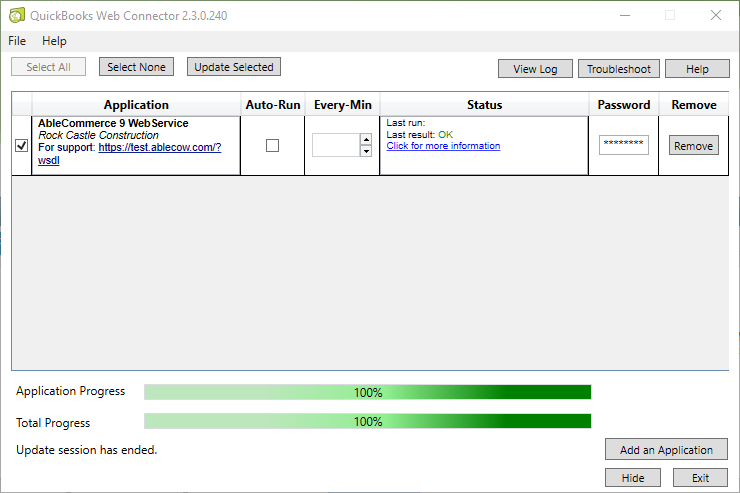
- QuickBooks and AbleCommerce just had a successful communication.
- This completes the first transfer of data from QuickBooks to the
AbleCommerce store.
In AbleCommerce, return to the configuration page for QuickBooks. Notice how most of the lists are now populated with data from your company store.
In the Connection Details section, change the Transfer
Mode to "Push AbleCommerce Data to QuickBooks". Previously,
this option was disabled.
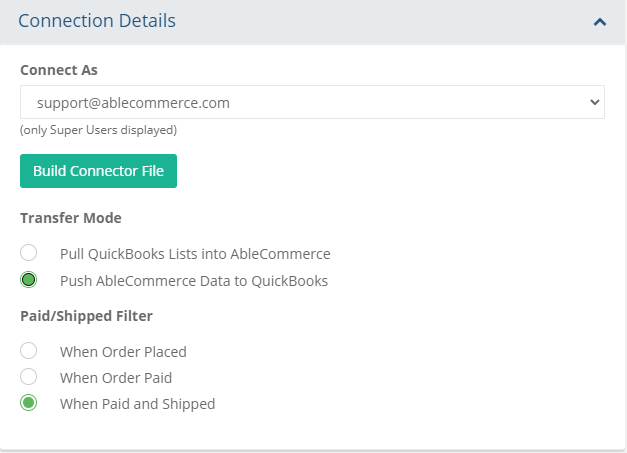
Click the Save button.
These configuration settings are updated each time a transfer occurs. If you ever change the GL account assignments, update bank accounts or make any other relevant change, you should return to this screen. All the choices and dropdowns will reflect the values available from QuickBooks the last time any transfer (Push or Pull) occurred.
To force an immediate update, set the data mode back to “Pull QuickBooks Lists into AbleCommerce”. Then initiate another QuickBook Connector session. That will make QuickBooks refresh your AbleCommerce store with the current Quickbooks lists of customers, GL accounts etc.
Every business manages their financial records differently. This document cannot serve as a guide on how to configure the accounting requirements for your particular business. If you have any questions regarding what settings to use, consult your accountant before making changes.
The AbleCommerce QuickBooks configuration page is divided into logical sections.
Each section includes on-screen help text to help with each setting. Carefully read through each section and make any setting changes.
When your changes are complete, click the “Save” button at the bottom of the page.
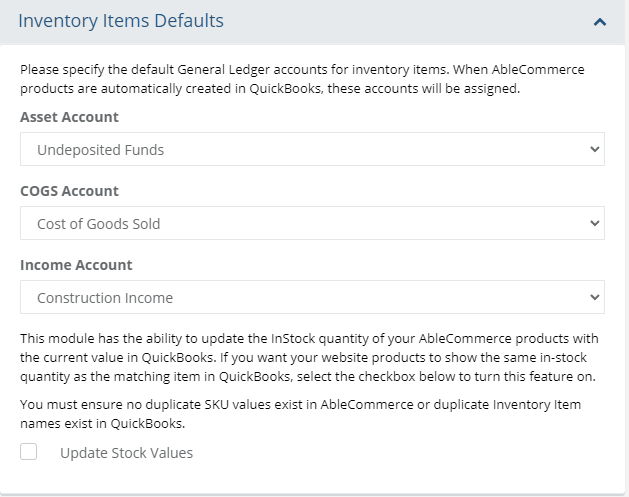
These fields will dictate how inventory items are created in QuickBooks. Every inventory item must have valid Asset, Cost of Goods Sold and Income GL accounts assigned to them. When the module transfers an AbleCommerce product to QuickBooks, it will automatically create the item if it does not already exist. The product SKU value in AbleCommerce is the determining factor when identifying existing products in QuickBooks.
The module has the ability to update AbleCommerce inventory stock values from Quickbooks. If you want your Quickbooks stock values to be reflected in your online store, check the Update Stock Values checkbox. Again, remember that inventory items are matched up by SKU, so only items in Quickbooks that have a matching SKU in AbleCommerce will be updated.
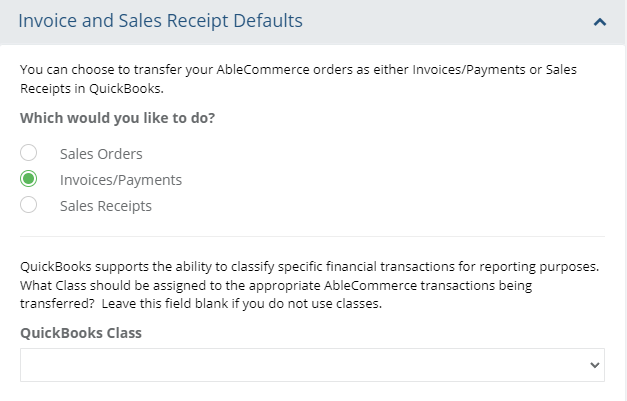
Sales Order/Invoice/Sales Receipt: You have the ability to decide how AbleCommerce orders will appear in QuickBooks. You can choose to create sales orders, use the invoice with payments model or have each order transfer as a single Sales Receipt transaction. The data and dollar amounts transferred are the same, so the difference is purely a business preference.
Note that Sales Orders do not have a “payment” per-se. When Sales Orders is selected, a checkbox is available to choose if the customer record in Quickbooks is updated with the credit card information used to pay for the order in AbleCommerce. This gives you the ability to use Quickbooks for your payment processing. If multiple payments are used to pay for the order, only the first charge card payment will be posted to the Customer record in Quickbooks.
Note: Credit Card Number Storage must be enabled in your AbleCommerce store for this feature to work.
Class: If you have implemented classes in your QuickBooks company file, you can use the Class dropdown to assign a class to the orders from the website. This allows you to separate out the website orders on certain reports within QuickBooks. That’s especially helpful if you also accept orders through other means like a brick-and-mortor, walk-ins, telephone etc.

A/R Account: When invoices are posted to Quickbooks, they must be assigned an Accounts Receivable GL accounts. Use this dropdown to choose which A/R account to use in your company file.
Discounts Account: Any discounts given in AbleCommerce must also be assigned a Discounts GL account.
Payments A/R Account: Payments posted to Quickbooks require an A/R account to assign to them.
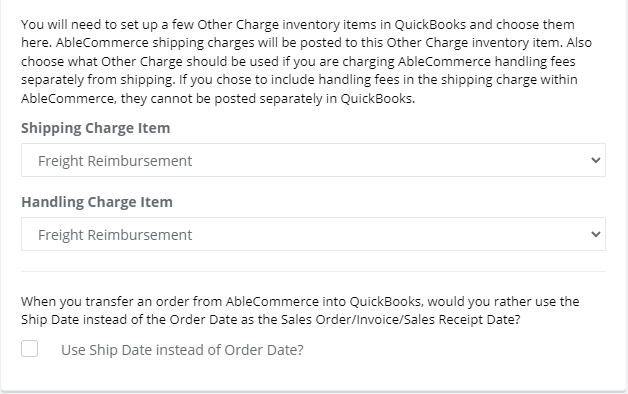
Shipping/Handling Charge: These two items that MUST be created first in QuickBooks before a transfer can occur. AbleCommerce stores shipping and handling fees as separate line items. The web connector must know how these charges should be assigned in QuickBooks before they can be transferred. Be sure to create each item in QuickBooks as an “Other Charge” type item. Otherwise the item will not appear in the dropdown list as a choice.
Use Ship Date Instead of Order Date: Normally a transfer to set the Sales Order/Invoice/Sales Receipt transaction date to the order date of the AbleCommerce order. Selecting this option checkbox will set the QuickBooks transaction date to be the ship date from the first order shipment of the order. If no shipments are found for the order and this option is selected, the AbleCommerce order date is used.
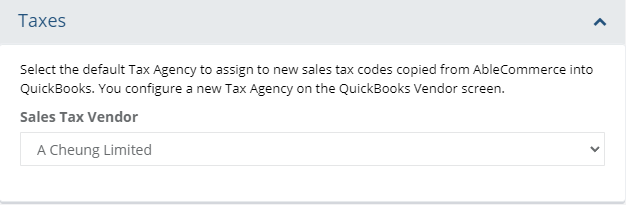
You must create at least one vendor that will be assigned as the sales tax vendor. Without it, the web connector will be unable to transfer orders into QuickBooks. This applies even if you do not charge sales tax in your storefront. Even non-taxable sales will be assigned a tax code in AbleCommerce. You will see tax codes in AbleCommerce show up in QuickBooks as “000” or “001”. This represents the AbleCommerce tax code id value from the ac_TaxCodes table and is unique for each tax code.
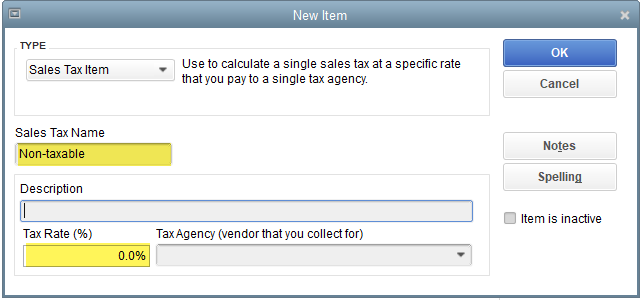
Make sure you have sales tax correctly configured in your Quickbooks company file. You do not want Quickbooks to calculate sales tax on orders transferred from AbleCommerce. Why? Because AbleCommerce has already calculated tax for you. So go into your company preferences in Quickbooks, select Sales Tax and set the default sales tax type as “Non-taxable”. This will prevent Quickbooks from automatically double-taxing your orders transferred from AbleCommerce.
In QuickBooks, go to File - Preferences - Sales Tax.
From "Setup Sales tax Item" section, add new sales
tax item and name it Non-taxable
with tax rate as 0.00%
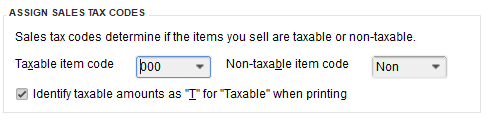
From "Assign Sales Tax Codes" section, select
Taxable Item code as Misc Code with code 000
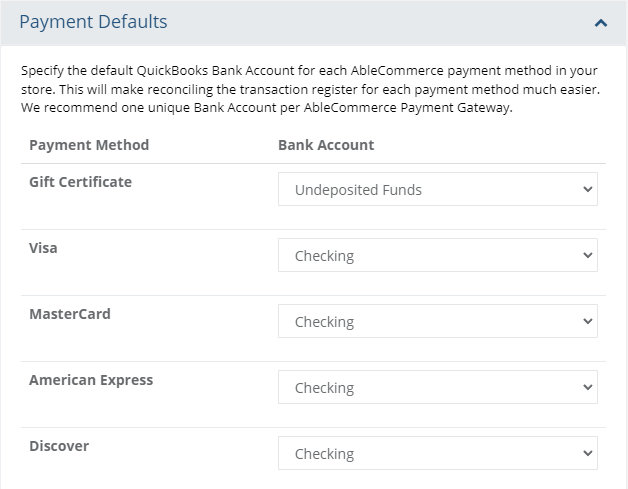
Every payment method configured in your AbleCommerce store must be assigned
to a QuickBooks Bank account. For each payment method listed,
choose the Quickbooks Bank Account to which payments should be posted. Most
companies will use the same bank account for all payment methods, but
you have flexibility here if you need it.
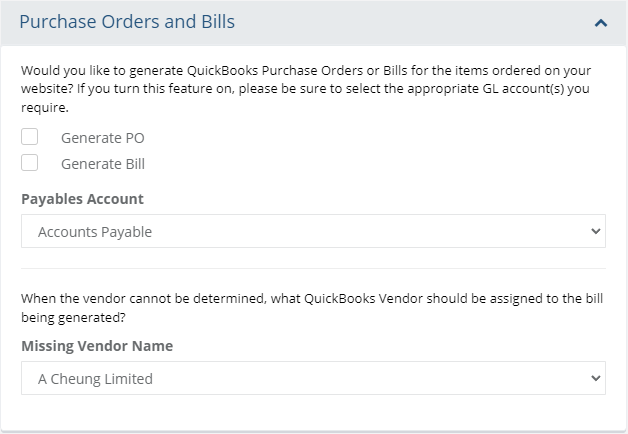
The web connector has the ability to generate a QuickBooks Purchase Order or QuickBooks Bill. This is usually necessary when your AbleCommerce store products are drop-shipped from a distributor or fulfillment center. By enabling the checkboxes, you can automatically generate the PO and/or bill in Quickbooks based on the AbleCommerce order data. Leave these unchecked to disable this functionality.
Be sure to specify an Accounts Payable GL account so the transactions can be posted to the proper location in QuickBooks.
Also, specify a missing vendor name in the case where a product is sold but that products vendor has been deleted from your storefront.
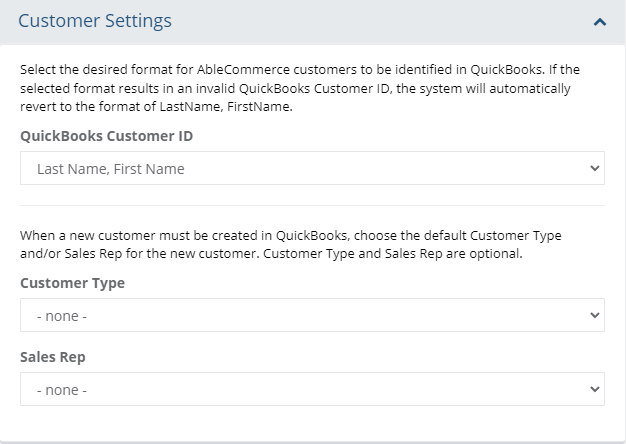
Customer ID: When a new customer is created in QuickBooks, it must be given a unique identifier name. Use this dropdown to decide how that unique name should be created. You can choose from various formats like FirstName Comma LastName or even use the Bill to Email address. If your store is close to exceeding the maximum allowable names or you do not wish to maintain unique customers in your company file, simply choose Single Customer “Web Store” and the same customer will be used for all AbleCommerce orders in QuickBooks.
Customer Type: When the module transfers an order into Quickbooks, it must create a Quickbooks customer if that customer does not already exist. When that new customer is created in Quickbooks, you can automatically assign a Quickbooks Customer Type if you desire. Use this dropdown to choose which Customer Type to assign to new Quickbooks customers created by the module. Leave the choice set to - none - to disable this option.
Sales Rep: Same situation as Customer Type. Use the dropdown to make a selection or leave - none- selected to disable it.
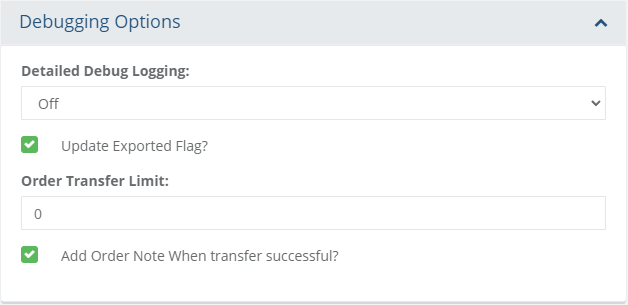
Debug Logging: Communications between QuickBooks and the web module on the AbleCommerce website are extensive and complex. Should the need arise, enable this option so that all the communication is recorded to the ~/App_Data/Logs/Quickbooks.log file. Often this will be the first thing requested when you submit a tech support request. If you are experiencing transfer errors, simply enable this option and run a transfer.
Update Exported Flag: Every order has an exported flag that is set once the order is transferred into QuickBooks. There may be times where you want to test the transfer on a different company file. By unchecking this option, the same orders will be transferred every time a transfer is initiated. During normal operations, this option should always remained checked or you will duplicate your data in QuickBooks.
Order Transfer Limit: This choice serves two purposes. First, larger storefronts may want to limit the amount of data transferred in each session. This could be because of time constraints or resource demands on the internet connection during business hours. Second, it’s a lot easier to troubleshoot 10 orders than it is to troubleshoot 500. By setting this number to a low value, you can more quickly and easily test and troubleshoot your web connector install.
Add Order note When Transfer Successful: Enabling this choice will make the module automatically add a note to the order Notes/History of the order once it has been successfully transferred.
Once you’ve populated all the configuration settings, you’re ready to begin transferring actual store data.
Note: You must enable sales tax in your QuickBooks company file preferences before transferring orders. Refer back to Sales Tax Preferences in QuickBooks before initiating the first transfer.
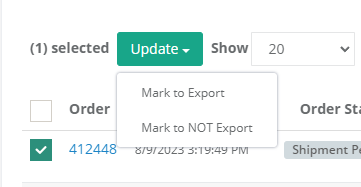
As new orders come into AbleCommerce, you'll need to establish your own process for initiating the export. To view which orders will be exported, go to the Mark Orders as Exported page by clicking the button "Select Orders to Export" from the AbleCommerce Quickbooks configuration page, or via the admin menu under Data Transfer. (Versions 9.0.9 and higher)
By default, all orders will appear in the results. Any order
that hasn't been exported will be marked "Yes" in the Export to QuickBooks column.
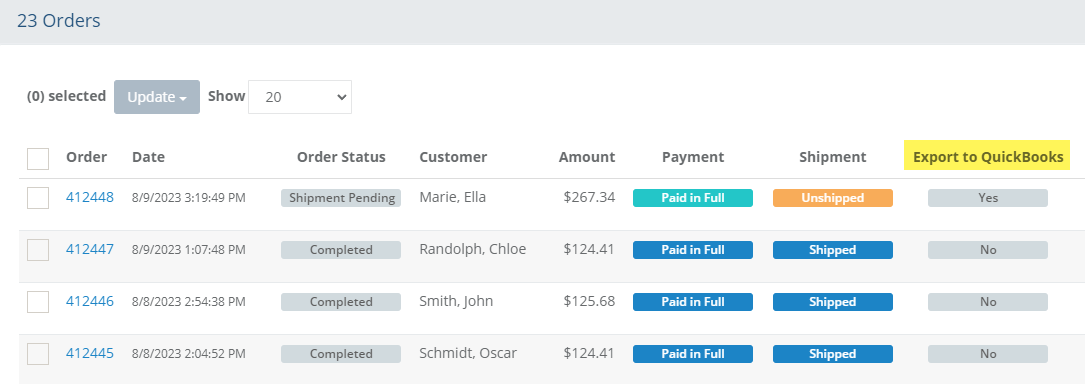
Note:
Even if an order is marked "Yes" for export, it will not
be exported unless it meets the criteria for the Paid/Shipped
filter setting under the configuration section for Connection Details.
Three options are available: Order Placed, Order Paid, or Order Paid
and Shipped. The payment and shipment columns are updated according
to the order status.
Generally, you won't need to change the orders to be exported.
It will be automated, or changed to No
once the order has been exported. If you do need to change the Export
flag, select the order(s) by checking the box in the first column.
After a selection is made, the Update button will activate and you
can then select one of the options to flag the order for export or
to remove it from the list to export.
Open the QuickBooks Web Connector by double-clicking the "AC_QB.qwc"
file that was saved to your local computer.
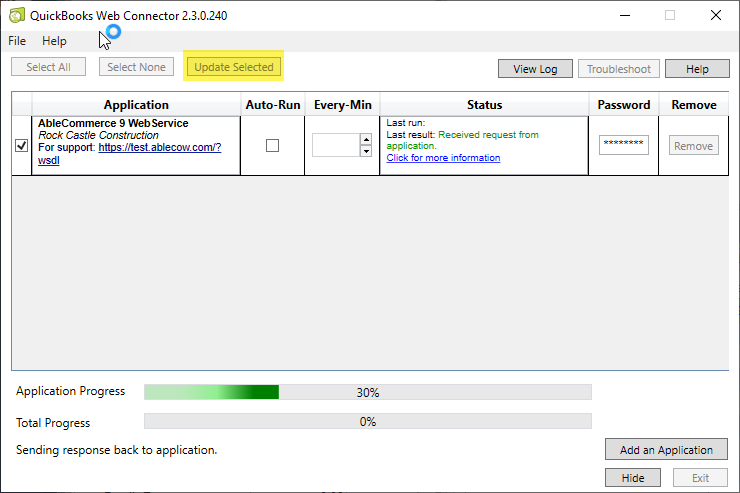
Make sure the AbleCommerce 9 Web Service application is checked in the first column.
Then click the "Update Selected" button.
The Application Progress bar will start processing. This can take some time depending on how many orders are being transferred.
When completed, go to QuickBooks and check for new orders. Depending on the settings under Invoice and Sales Receipt Defaults, the new order may be a Sales Order, Invoice, or Sales Receipt.
Once the export is completed, additional settings under Debugging options will change the order flag to No under the Export orders page, and a new order note will be added indicating "Order exported to QuickBooks". These options are on by default, but can be disabled.
In the event you cannot transfer or are receiving errors during your transfer, here are some tips to help troubleshoot the most common problems encountered.
Transfer never begins
Either your SSL certificate is not correct, not installed or not working
properly. This will usually result in a message mentioning
a non-XML response.
Pull works but nothing on the configuration
page
Your QuickBooks company file must have some data before a pull can work. Specifically
you need one vendor, one non-stock inventory item, one bank account and
the necessary GL accounts already created.
Pull works but push does not put anything
into QuickBooks
Most likely you have a problem with your store data. Often stores
will do a series of test orders before the store goes live. Those
test orders are still there and they’ll be the first ones transferred
by the web connector. Purge out these old test orders or set
the Exported flag to TRUE on these old orders so they will be skipped.
Partial data transfers but not everything
shows up
This one is the toughest. It all depends on where the failure
occurred, but in all cases the problem is with the store data or web connector
configuration. First, check the AbleCommerce Error Log. Most
errors are recorded there. If you see some errors, export the
log and open a support ticket with the log file so we can review it for
you. We’ll be able to guide you as to what is causing the failures
so you can take the necessary steps to correct the problem.
Sales Tax error
You must enable sales tax in the QuickBooks company file preferences before
you can transfer data. AbleCommerce assigns a tax code to every
order regardless of whether the order actually has a tax charge.
Timeout error
In certain situations where the QuickBooks company file has a large number
of customer records, the transfer could timeout before it begins to push
data. There is a 2-minute timeout hardcoded into the Intuit
Web Connector program – if QuickBooks doesn’t respond with the customer
list within that time then the connection will error out. This
is always the result of trying to run QuickBooks and the web connector
on an underpowered PC. Upgrade the PC and give it at least
1Gb (more is better) of RAM or run the transfer on a different PC with
more horsepower and memory.
Size Limit for HTTP requests
Another possible problem is a limit to the size of HTTP requests in .Net websites. The default is too small for larger QuickBook company files. You may need to modify web.config to increase the maximum size of HTTP requests with this tag <httpRuntime maxRequestLength="53600" />
Order Fails to Export
Another common issue is that transfer may fail on certain orders, but not others. Almost always this is because of a malformed address. Special ASCII characters or a really long address line could fail without with an error.