Page Tracking
Table of Contents Show
Configure Page Tracking
The Page Tracking feature can record all activity by any user accessing your AbleCommerce store or Merchant Administration. The records are initially stored in the database and then can be archived to disk when regular maintenance is performed by AbleCommerce. When you enable tracking, you can see statistics about what categories and products are being viewed, pages that are referring to you, and some technical data like the user's IP, browser, and operating system. When the log files are archived, they are written to disk in extended log file format. This means the log files are compatible with most statistical reporting software programs that convert the raw data into something meaningful.
Using the Page Tracking feature will benefit your customer as well. If enabled, you and your customers can see their recently viewed items and other features.
The logs for user activity are stored in the database and can be archived in extended log file format.
Go to Configure > Store > Page Tracking using the menu.
In the top section, you will see the Page Tracking options.
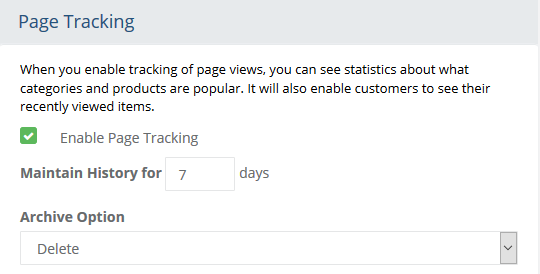
To record all user activity, check the box next to Enable Page Tracking.
For Maintain History, enter the number of days to store records in the database before they are archived or deleted.
Choose an Archive Option.
Delete - This option deletes any records older than the number of days entered for history length. There will be no backup of the data that is removed.
Save to File - This option will write out any user activity data, longer than the history length, to a file, and then delete it from the database.
Click the SAVE SETTINGS button when finished.
NOTE: The log is written to the App_Data/Logs/ folder in extended log file format. You must have write permissions to this location, and you are responsible for maintaining and/or removing the log files.
View or Clear the Activity Log
You can view the page tracking log for the entire store here, or you can view a single user's activity from the Edit User page under People > Users
Go to Configure > Store > Page Tracking using the menu.
Find the section named Page Tracking and within it, there will be a sub-section for activity logs.
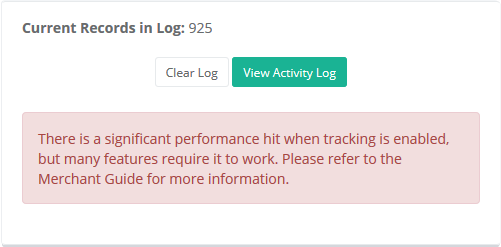
The number of records in the current log will be shown. You will see buttons to Clear or View the activity log.
The Current Log shows the number of records stored in the database at that time.
IMPORTANT NOTE: A high traffic site should have adequate server and database resources when this feature is enabled. If this is not possible, or performance needs to be improved, we recommend that merchants disable this feature. See the section below to understand the impacts of enabling/disabling the Page Tracking feature.Click the View Activity Log button to view the log as shown in the example below.
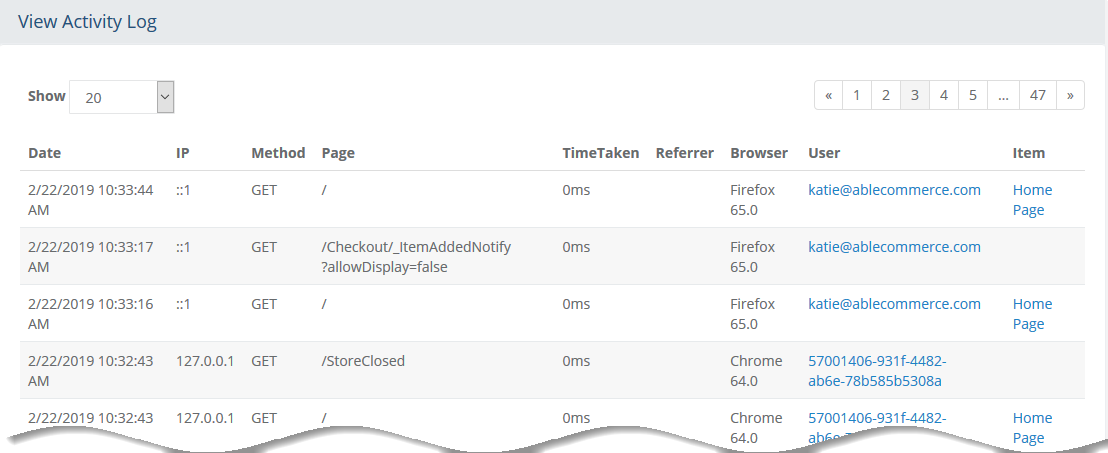
This page displays all store activity from newest to oldest. You can see the following information:
IP - The user's originating IP.
Method - click on URL (GET) or post to form (POST).
Page - a partial URL to the page that was accessed.
Time - the length of time on each page (in milliseconds)
Referrer - If available, the page that referred to this one.
Browser - the browser type and version, with computer's operating system.
User - the anonymous or registered user will be shown here with a link to the Edit User page.
Item - This is the name of the product or category that the user looked at.
If you want to reset all page tracking statistics and clear all records from the log. Click the Clear Log button.
Impacts of Page Tracking
The following features make use of the Page Tracking feature. All features, but one, are available only to merchants. If you not using the Recently Viewed control, then we recommend that you disable the Page Tracking feature to improve performance.
Admin -> Dashboard -> Activity by Hour (Admin/Dashboard/ActivityByHour.ascx)
Admin -> Dashboard -> Popular Categories (Admin/Dashboard/PopularCategories.ascx)
Admin -> Dashboard -> Popular Products (Admin/Dashboard/PopularProducts.ascx)
Admin > People > Users > Edit User > Search history (Admin/People/Users/SearchHistoryDialog.ascx)
Admin > People > Users > Edit User > Page View History (Admin/People/Users/ViewHistoryDialog.ascx)
Admin > Reports > Customers > Page Views Over Time (Admin/Reports/CustomerHistory.aspx)
Admin > Reports > Customers > Popular Browsers (Admin/Reports/PopularBrowsers.aspx)
Admin > Reports > Products > Category Popularity (Admin/Reports/PopularCategories.aspx)
Admin > Reports > Products > Product Popularity (Admin/Reports/PopularProducts.aspx)
Admin > Configure > Store > Page Tracking > View Log (Admin/Store/PageTracking/ViewLog.aspx)
Configure Google Tag Manager
Google Tag Manager (GTM) helps make website tag management simple with tools and solutions that allow small businesses to deploy and edit tags all in one place. It is a free tool that enables you to install, store, and manage marketing tags without modifying website code. The purpose of this documentation is to explain the process of configuring GTM within AbleCommerce. If you wish to learn how to use Google Tag Manager, there are many resources that you can use to do that.
Helpful Guide for Beginners: https://www.analyticsmania.com/wp-content/uploads/2023/09/Ebook-Google-Tag-Manager-for-Beginners-with-GA4.pdf
Think of Google Tag Manager as a place to manage many tracking codes. You can generally do this without the intervention of a developer. Also, keep in mind that Google Analytics 4 (GA4) is a separate feature in AbleCommerce that includes additional features such as ecommerce tracking (see below). To keep, or use your ecommerce tracking features, you should configure GA4 in AbleCommerce with that option enabled.
To begin, login to tagmanager.google.com using an existing Google account.
Use the option to create a new workspace.

Give the workspace a name, domain, and description. Click Save.
Make sure you are viewing the workspace you have just created, if you have multiple.
In the top bar, find the GTM tracking number. It will begin with GTM-xxxxxxxx, followed by 8 characters.

Next, login to the AbleCommerce admin and go to the Configure > Store > Page Tracking page.
Find the Google Tag Manager section as shown below:
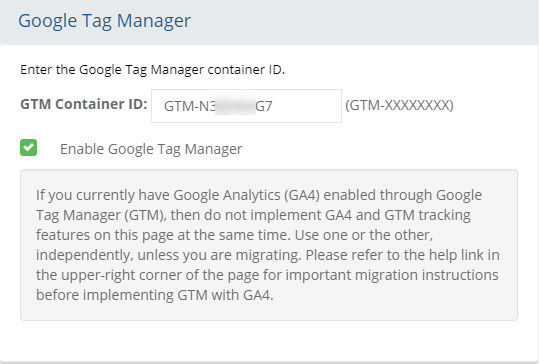
NOTE: Google Analytics (GA4) configuration tag is now the Google tag. GA4 configuration tags in a web container will be automatically migrated starting in September 2024. At the time of this writing, (April 2024), GA4 with ecommerce tracking should be enabled separately within AbleCommerce.Copy the GTM tracking number and paste this into the GTM Container ID field as shown below.
Check the box "Enable Google Tag Manager" to turn on the tracking code feature.
Click the Save Settings button in the admin footer.
NOTE: Upon save, the GTM tracking code will be added to the base.layout file in the \website\views\shared\ folder.Return to tagmanager.google.com to add your first tag if you haven't done so already.
Tag Manager supports more than 50 tags with more available in the Community Template Gallery.
A few examples: Google Ads, Floodlight, Conversion Linker, Google Analytics, AdRoll, LinkedIn, Pinterest, Twitter, and many more!
Configure Google Analytics 4
Google Analytics 4 (GA4) is the next generation of tracking and measurement of your website traffic. Google Analytics 4 allows you to collect and analyze your user traffic from both websites and apps.
GA4 is designed for the future of measurement:
Collects both website and app data to better understand the customer journey
Uses event-based data instead of session-based
Includes privacy controls such as cookieless measurement, and behavioral and conversion modeling
Predictive capabilities offer guidance without complex models
Use Google Analytics to learn which online marketing initiatives are cost effective and see how visitors actually interact with your site. Make informed site design improvements, drive targeted traffic, and increase your conversions and profits.
How to get started with Google Analytics 4
Option 1: Set up Analytics data collection for the first time
Do this if you’re new to Analytics and ready to collect data for your website and/or app.
Option 2: Add Google Analytics 4 to a site with Universal Analytics (Analytics “classic”)
The GA4 Setup Assistant will add a Google Analytics 4 property alongside your existing Universal Analytics property. Your Universal Analytics property will continue to collect data. You can access both using the property selector in the Admin area.
You need to use your GA4 Measurement ID. AbleCommerce automatically inserts the tracking code into your pages.
Go to Configure > Store > Page Tracking using the menu.
Find the section named Google Analytics 4 as shown in the example below.
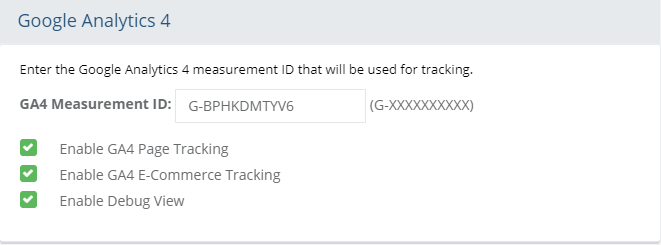
Enter your GA4 Measurement ID. (e.g. G-ABCDEFGH1)
If you do not know how to get this ID, then skip to the next section.Check the box next to Enable GA4 Page Tracking. This option will collect data about user's and where they've been.
Check the box next to Enable GA4 E-Commerce Tracking. This option will track additional sales data that can be used by Google Analytics or Google Adwords. These Google tools allow you to setup Online Campaigns to track advertising dollars spent, costs per clicks, and conversion rates.
The Enable Debug View is an option which will allow you to monitor events in realtime, as they are triggered. To use the Debug View report, go to Configure > Debug View within Google Analytics.
Click the SAVE SETTINGS button when finished.
Finding your GA4 Measurement ID
You will need to access your Google Analytics account.
Sign in to Google Analytics: https://analytics.google.com/
Follow the instructions to setup a web stream.
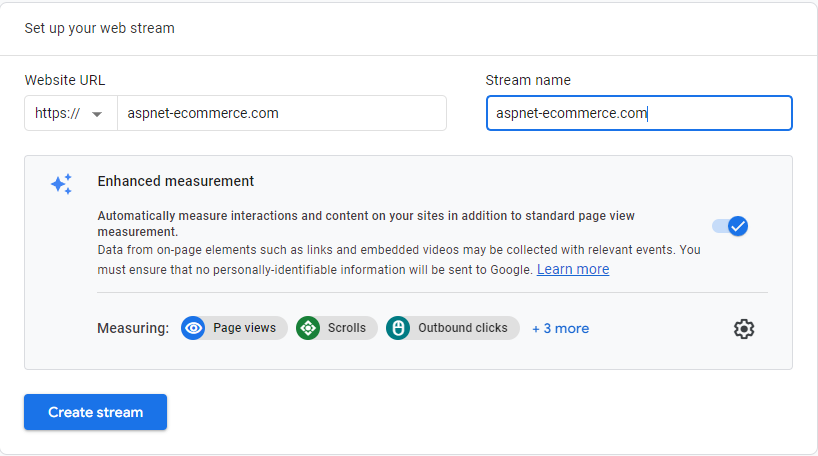
In the Stream details section, there should will be a Measurement ID.

Copy the Measurement ID to the AbleCommerce Google Analytics 4 configuration page.
Click the SAVE SETTINGS button when finished.
The tracking code will be inserted into the AbleCommerce pages right away, but it can take up to 24 hours for the data to appear in the Google Analytics reporting area.
Configure Google Universal Analytics
On July 1, 2023, standard Universal Analytics properties were deprecated and this feature is no longer available.

User Activity
To improve performance, there is a User Activity setting which can be used to limit the number of records created by a user who is browsing the retail storefront.
Go to Configure > Store > Page Tracking using the menu.
Find the section named User Activity.
Enter the time between recorded activity in the field for Update User's Last Activity field. The default value is 60 seconds.