Configure Store
Table of Contents Show
Store Settings
The store settings section is where you can change the name of your store and restrict access to certain membership groups.
Using the menu, go to Configure > Store > General.
Find the Store Settings section as shown in the example below.
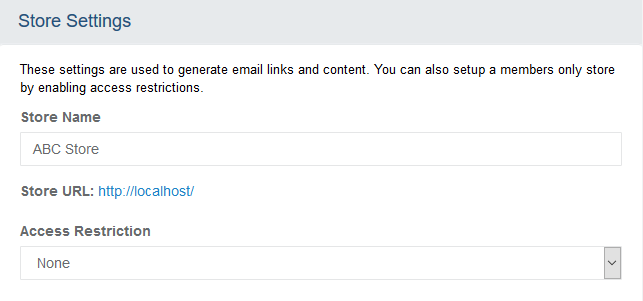
In the Store Name field, enter a name for your store. This information will appear in your email and invoices. It will not change the domain or URL for your store.
If you wish to change the Store URL, press the link provided. This will bring you to a separate page where you may change the Store URL and enter a new web address for your store. This information will not change your installation parameters, instead, it will appear anywhere a link to your store is generated.
The Access Restriction feature allows you to create a members only store.
You will have the following 3 options:
None - This is the default value. When selected, any user (anonymous or registered) can view the retail storefront.
Registered Users only - By selecting this option, you will not allow an anonymous user to view the storefront. A user is anonymous when he/she is not a registered user. A registered user must have an account created in the store with a minimum of a username/email and password. A login form will be presented to anonymous users.
Authorized Groups only - When this option is selected, the user must be registered and be a member of the Authorized group(s) selected in order to view the retail storefront. This feature is intended for membership-only store.

Click the SAVE SETTINGS button to update. Any changes will take effect immediately.
Locale Settings
The locale setting for time-zone determines how your store will display and record dates and times. This can be particularly useful if your server is located in a time-zone that is different than the location of your virtual or physical store.
Locale settings also define the unit of weights and measurements for your products. The settings apply to all product weights and measurements. AbleCommerce will automatically convert all measurements to the applicable unit that is supported by the real-time shipping services such as UPS, FedEx, USPS, etc.
After updating your locale settings for units, it is advisable to never change them unless you have a specific reason for doing so. If you do need to change the unit of weights or measurements, make sure to adjust the data accordingly for your products.
Using the menu, go to Configure > Store > General.
Find the Locale Settings section as shown in the example below.
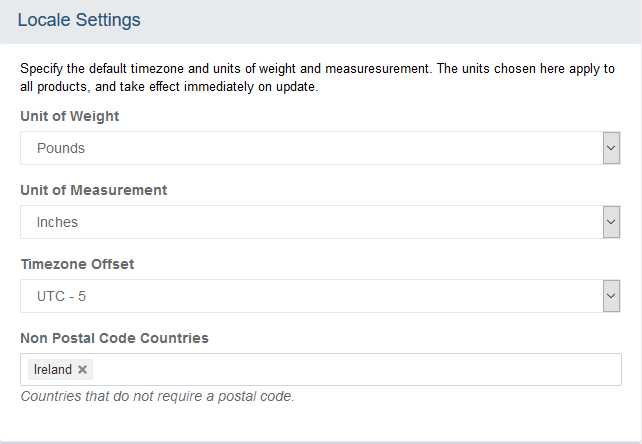
Select the Unit of Weight that you will use to enter product weights. The choices are ounces, grams, kilograms, or pounds.
Select the Unit of Measurement that you will use to enter a product's width x height x length. The choices are inches or centimeters.
Select your Timezone Offset. All times displayed will be converted into the time-zone you select.
Enter the Non Postal Code Countries. Using the 2 letter abbreviation for a country, enter a comma delimited list of countries that do not require a postal code on address entry forms.
By default, Ireland does not require a postal code. Add additional countries as needed.Click the SAVE SETTINGS button when finished.
Order Settings
AbleCommerce gives the merchant an option to modify the starting order number and how order numbers are incremented. The merchant can implement a minimum order amount and a maximum order amount. This feature will prevent a user from completing the checkout unless the order total is within the criteria specified.
The catalog mode feature allows a merchant to turn off all buttons that would allow a customer to purchase. The full catalog of products is still displayed but nothing can be purchased. This feature is often used by merchants that want to allow users to preview the store before it's officially open for business. In some cases, the merchant may want to offer products for display purposes but have the customer contact the store to make a purchase.
Using the menu, go to Configure > Store > General.
Find the Order Settings section as shown in the example below.
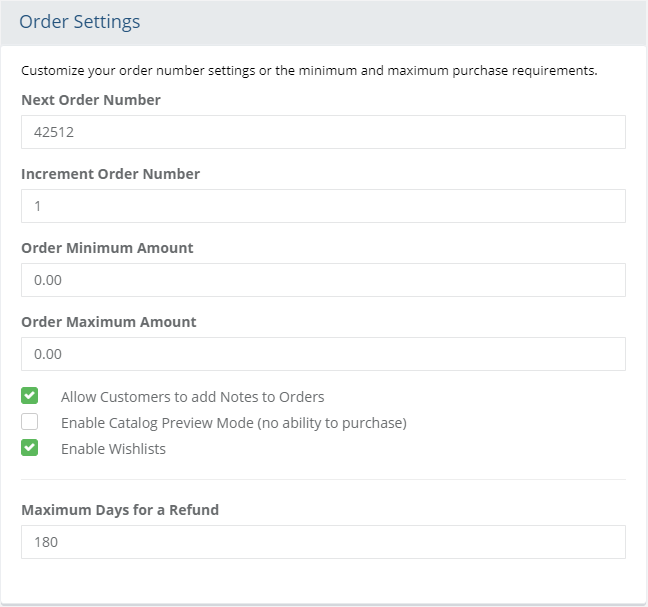
If you want to change the order number for the next order placed in the store, enter a higher value in the Next Order Number field.
If you want to increment your order numbers so they are not sequential, then enter a value in the Increment field. The value will be added to the order number to determine the order number of the next order placed.
If you want to enforce a minimum order amount, enter the value in the Order Minimum Amount field. Customers will not be able to checkout unless the value of their order meets the minimum amount designated here. Leave blank for no minimum.
If you want to enforce a maximum order amount, enter the value in the Order Maximum Amount field. Customers will not be able to checkout unless they reduce the value of their order to be equal to or less than the maximum amount designated here. Leave blank for no maximum.
The Allow Customers to add Notes to Orders option will enable a feature that allows customers to enter a note at the bottom of their order invoice.
Enable Catalog Preview Mode - When this option is checked, all your products will become immediately unavailable for purchase. The items can still be viewed.
By default, the Enable Wishlists feature is active. If you do not want to offer your customers the ability to create wishlists, then uncheck this option. It will be hidden from most places within the retail storefront. You may need to edit the Store Footer and remove the link to My Wishlist.
The Maximum Days for a Refund field can be adjusted depending on how long your payment processor allows a payment to be refunded. The default value is 180 days. This value does not determine if the payment can actually be refunded. It only determines for how long the refund button will be available from the order management page. If you are unsure of the time period allowed for refunds, contact your merchant payment processor.
Click the SAVE SETTINGS button when finished.
Inventory Control
AbleCommerce provides an inventory management feature that can be enabled for your store. This feature allows you to enter the quantity of inventory for each product or it's options. The inventory feature will track the amount of inventory available for sale and notify the merchant when quantities drop below the specified re-order level.
Merchants have the option to allow a customer to purchase only the stock that is available or allow the purchase of an item that is on back order. Additionally, the merchant can customize the inventory messages shown to the customer.
Using the menu, go to Configure > Store > General.
Find the Inventory Control section as shown in the example below.
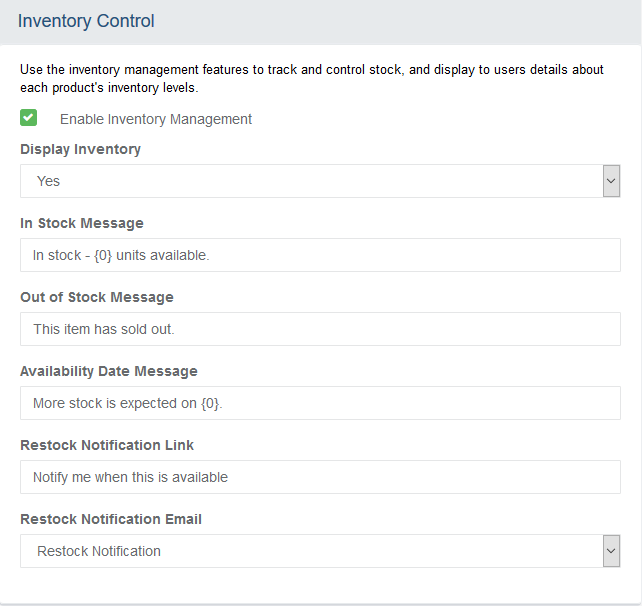
Check the box next to Enable Inventory Management. This will allow you to track inventory at the product level or at the product option level.
Inventory control is not enabled for products until they are updated. From Edit Product page, you will still need to change the Inventory Tracking option to enable inventory management for each product. The example below shows the inventory tracking feature on the Edit Product page.

If you want to display the inventory amounts, select 'Yes' for the Display Inventory option. If you don't want to display the amount of inventory, then select 'No'.
Change the inventory availability message shown to customers by entering your custom message for the In Stock Message field. This message is only shown when you have selected 'Yes' for the Display Inventory option. Note that {0} is a variable that shows the quantity available.
Change the message shown to a customer when they attempt to purchase an item that is not available by entering the Out of stock message in the field provided. This message will only appear if you have not selected the option to 'Allow product to be purchased if out-of-stock' (allow back-orders) for a product and the inventory value for that product is 0 or less.
The Availability Date message can be included as part of the out-of-stock message if you do not want to offer back-orders. Simply enter the date you expect inventory to be available when you are editing the product. It will appear along with the out of stock message.
NOTE: The Out-of-Stock message will only be shown if back-orders are not allowed. The Availability Date is optional.A custom message can be used to generate the Restock Notification text link.
The email template named "Restock Notification" can be used to send an automated email to customers who want to be notified when the product is back in stock. You can select any email template that you wish. For more information on notifying customers, see the Low Inventory page.
Click the SAVE SETTINGS button when finished.
Checkout Settings
AbleCommerce gives the merchant an option to modify the starting order number and how order numbers are increment. The merchant can implement a minimum order amount and a maximum order amount. This feature will prevent a user from completing the checkout unless the order total is within the criteria specified. If special terms or conditions have to be agreed to by the customer, the merchant can enter those and it will automatically appear on the checkout page. The customer can view the terms and then check a box to accept your terms before completing the order.
Using the menu, go to Configure > Store > General.
Find the Checkout Settings section as shown in the example below.
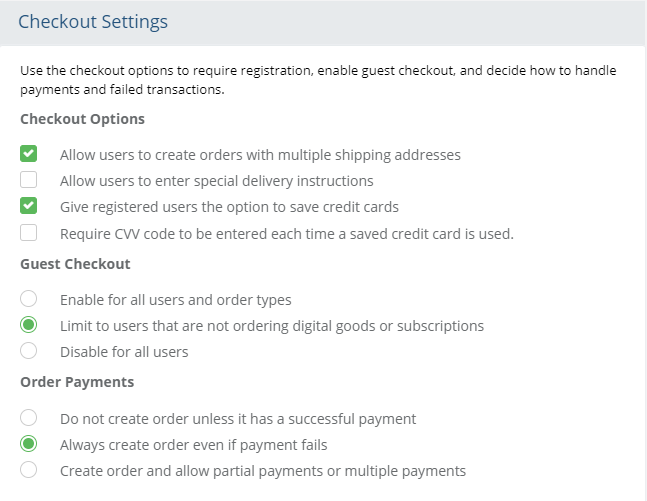
Checkout Options
The checkout options determine what features the user will have available, or what requirements will be made during the final checkout process.
The 'Allow users to create orders with multiple shipping addresses' option allows the merchant to enable and disable the customer's ability to provide more than one shipping address per order.
If you enable 'Allow users to enter special delivery instructions', then a special field will appear within the shipping method selection area of checkout. The merchant can view the information entered here from the order shipments page. However, the message is not sent to any of the shipping gateways you may be using.
The 'Give registered users the option to save credit cards' feature is only available with the Authorize.net CIM payment gateway. It allows the customer to store their credit card profiles so checkout will be faster for them in the future. This feature is only available for registered users.
For customers that have stored a credit card, you can check the 'Require CVV code to be entered each time a save credit card is used' and this will enable the security card field for a future purchases where the customer chooses an existing credit card during the checkout process.
Guest Checkout
If you want to enable or disable the Guest Checkout option, then use one of the three available choices. When enabled, a new option will be available during the checkout process. New customers will be given the option to checkout without creating a user account. An email address is stored with the order, but a valid user account is not created.
The option to 'Enable for all users and order types' will allow any customer with any type of product to checkout without having to register for a new account.
If you are selling digital goods or subscriptions, there is an option for a 'Limit to users that are not ordering digital goods or subscriptions'. When this is option is enabled, the setting will not allow unregistered users from checking out. Registered users with accounts can return to the store and re-access order information or digital downloads. We recommend that you use this as the default setting.
If you use the 'Disable for all users' option, then the Guest Checkout feature will be disabled and all new customers must register for an account by creating a password.
Order Payments
There are three settings to determine how new orders will be created. Each is described below:
The default setting is 'Do not create order unless it has a successful payment'. When this setting is active, the order will not be created until the customer has either entered a valid credit card or input a valid payment method. If the card entered fails the authorization, then a warning message will appear asking the customer to enter valid payment information. This setting is generally ignored if you have payment methods such as purchase order, mail check, or call me.
The 'Always create order even if payment fails' option can be used to allow a customer to create an order even if their payment fails authorization. The merchant will see the failed order and be able to contact the customer for a different payment method. Additionally, the customer will be presented an invoice with a balance due. From there, they can continue attempting to make a successful payment until the number of tries is exceeded.
NOTE: If you allow the customer to make multiple attempts at payment, the order number will increment for each attempt resulting in the appearance of skipped order numbers from the Order Manager page.The final option to 'Create order and allow partial payments or multiple payments' will present the customer with a field where they can enter their own payment amount if different than the order total. This can be a useful feature if the customer needs to use multiple payment methods to pay for the order. When this option is used, an initial successful payment is required to create the order receipt. Once that is done, the customer will have the option to continue making multiple payments until the order is paid.
Click the SAVE SETTINGS button when finished.
Checkout Settings: Product Shipping Fixed Rate
These settings are used when a product is shippable and a special condition shipping option is selected.
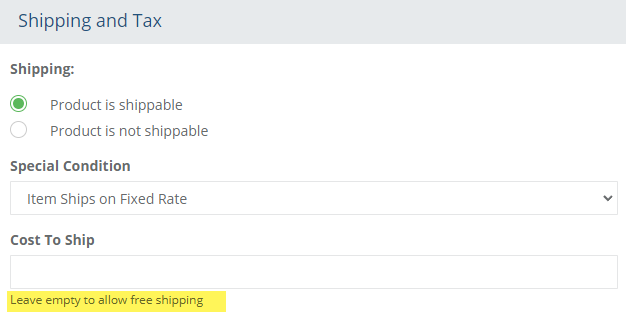
From the product editing page, a product can use the Special Condition option "Item Ships on Fixed Rate" along with either a set value or a null (blank) value in the Cost to Ship field.
When these two conditions are met, one of the two shipping names below will be used during checkout.
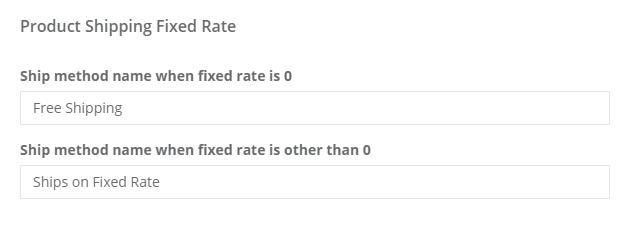
When the Cost to Ship field for a product has a blank value, then the Ship method name when fixed rate is 0 is used. The default value is Free Shipping.
When the Cost to Ship field has any other value entered, then the Ship method name when fixed rate is other than 0 is used. The default value is Ships on Fixed Rate.
By using the fixed shipping option, the product is displayed and treated separately on the shipping page during checkout. The shipping method name from the configuration page is used instead. The value for shipping will come from the product setting.
Other Settings
Merchants have an option to include checkout terms and a site disclaimer. To enable either of these features, you simply need to enter some text into the field provided and it will automatically activate.
Using the menu, go to Configure > Store > General.
Find the Other Settings section as shown in the example below.
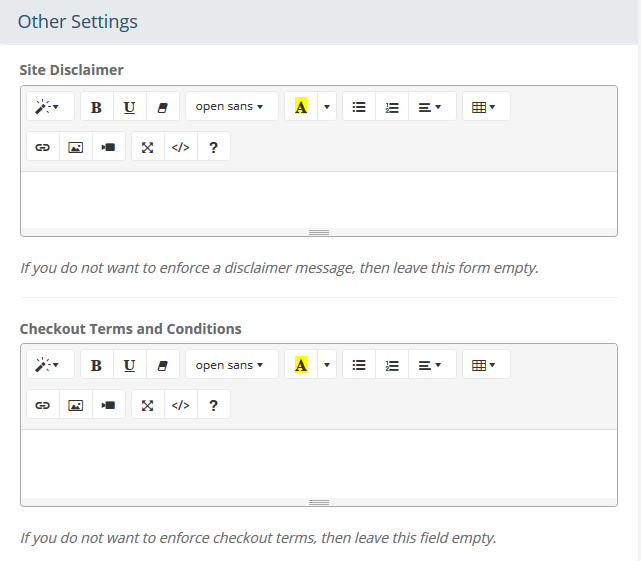
An option to enable the Inline HTML Editor is checked by default. This option determines whether the text fields within the Merchant Administration will be shown as plain html code or include a built-in WYSIWYG html editor. The built-in editor is recommended and includes a source view option </> within it.

The Site Disclaimer message will force a page to appear with the terms entered here. User must accept the terms to enter your site.
A site disclaimer can be used to require users to agree to the terms and conditions you set forth before they may enter your store. This feature can be used if you sell products or services that require an agreement before users can view the products in your store. Additionally, AbleCommerce provides a similar feature where the user must agree to terms and conditions before a purchase can be completed. These features can be used together or alone.In the last field, you may enter your Checkout Terms and Conditions. The information will appear on the final payment page of checkout and must be accepted by the customer completing the order.
Click the SAVE SETTINGS button when finished.
Search Settings
You will have some control over how searches are performed and be able to view the search terms that your customers are using. There are two options for the store's search provider. The choices are standard SQL or Full Text Search (FTS) SQL. In order to use FTS, the SQL server must support it.
There is also the popular search count field. This value indicates the number of times that a search must be repeated by customers before it is added to the auto-complete list. Whenever a customer makes a search on the store, a record is made of it and you can see what searches are overall most frequent by going to Reports > Customers > Search History.
You can see the search history for a particular customer when viewing the customer profile. When a search has been repeated a number of times equal to or greater than the popular search count it will be used to populate the search auto-complete list.
Using the menu, go to Configure > Store > General.
Find the Search Settings section as shown in the example below.
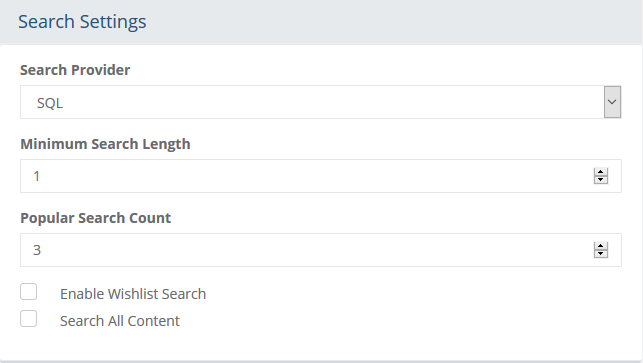
Search Provider - Choose your preferred search provider, SQL or SQL FTS.
NOTE: There will be a difference in your search results depending on which provider is in use. This is due to different behaviors between FTS (Full Text Search) and SQL search abilities. FTS based searches look for exact words in a result set.
Whereas the SQL provider makes use of criteria queries where it uses a LIKE expression to search the results. A Like operator is very loose considering it will list any result having the partial search keyword within it. SQL is able to list orders by using LIKE operator.Minimum Search Length setting determines the minimum number of characters that must be entered into the search form on the retail side.
Popular Search Count - This is the minimum number of times a search word is considered popular. When the popular search is triggered, the customer will be able to see a list of suggested search terms. It may take some time for popular search terms to accumulate and populate the search form.
Enable Wishlist Search will allow users to search for public wishlists by email address.
When the Search All Content box is checked, the search will include additional content derived from categories and webpages. If the box is unchecked, then only product data will be included in the search results.
Click the SAVE SETTINGS button when finished.
Discount Settings
Discounts created in AbleCommerce can be applied to a product, category, or at a global level for the entire store. When you have a global store discount, or assign a discount to a category, AbleCommerce uses the Discount Mode value to determine how discounts are applied when more than one product is eligible for the discount.
Before using the Discount Mode setting, it is helpful to first understand how the priority of discounts are determined when multiple discounts are in use.
Discount Overview
Volume discounts are applied to purchases automatically when all criteria are met. A discount can be based on the number of items purchased or the total price of the line items. As the merchant, you can specify the minimum and maximum quantity or value and have a fixed amount off, or a percentage off, the eligible products. Discounts can even be applied to user groups so you can offer customers different discount rates.
If a product is eligible for more than one discount, AbleCommerce uses the following rules to determine priority:
A discount applied directly to a product will take priority over any other discount.
A discount applied directly to a category will take priority over only a global discount. This type of discount is impacted by the Discount Mode setting.
A discount applied globally to the store will apply to any products that do not already have a discount in effect. This type of discount is impacted by the Discount Mode setting.
Only one discount can ever be applied to any one product. Discounts are not combined.
If a single product has options like color, size, etc. and that product is eligible for a discount, the discount applies to any combination of options. Regardless of the Discount Mode setting, products that have options are always combined. For example, if you purchase 1 red shirt and 1 blue shirt, this will count as 2 shirts when calculating discounts.
Discount Mode
The Discount Mode setting is used to determine if products in the basket are checked individually or if products are combined to determine eligibility for the discount. The Discount Mode setting applies only to discounts that are set for a category or set at the global store level. It does not apply to discounts set at the product level or to products with options.
There are two types of discount modes:
Line Item mode: Each product in the basket is checked individually to see whether it meets the total quantity (or value) required to receive the discount.
Group by Category mode: All eligible products in the basket are combined to determine the discount rate.
These settings impact how discounts are calculated when applied globally or to a category.
From the Configure Store page, or using the menu, go to Configure > Store > General.
Find the Discount Settings section as shown in the example below.
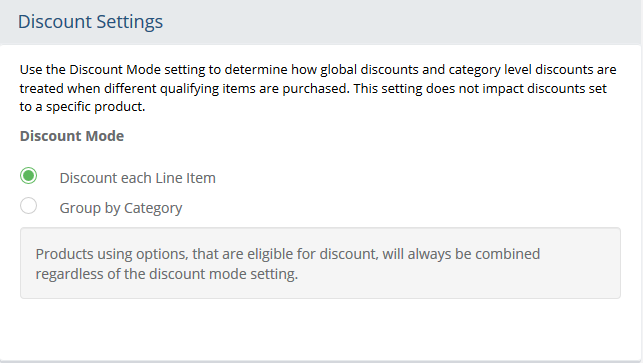
For Discount Mode, select 'Discount each Line Item' or 'Group By Category'.
Discount each Line Item - When this setting is used, the discount will only be applied individually to the items in an order. This includes Kit products where one of the Kit items may or may not have a discount applied. Each item in the Kit will be treated individually, not as a whole. The one exception is products that use options. In this case, the optioned products will be discounted according to the base product. So, for example, if you have options for color or size, then the discount being applied to the product will be used for any combination of size or color.
Group by Category mode - This is an important setting if you want customers to be able to purchase several different items from different categories in order to receive the discount. For example, you might have a category for 'Clothing' and a discount can be applied to this category. When that is done, all items purchased from the 'Clothing' category will be eligible to receive the discount.Click the SAVE SETTINGS button when finished.