PayPal™ with Encryption
Table of Contents Show
Encrypted Website Payments Overview
This document specifically covers the option to use Encrypted Website Payments. It should be used in conjunction with the setup instructions provided for PayPal's gateway. Make certain that you have already completed any configuration and setup before continuing with the steps below.
Why should I be using encrypted PayPal payments? There is a known security vulnerability during the checkout process which allows users to successfully place an order while altering the final amount of the order. Unprotected and non-encrypted buttons that are not saved in your PayPal account are in plain text in the source view of your webpages. The HTML button code for your payment buttons can be viewed by anyone. A malicious third party could copy a page, change button HTML variables such as price, and make fraudulent payments.
Important:
Merchants with significant payment volume are required to take precautions on securing PayPal Payment Standard buttons.
Encrypted Website Payments relies on standard public key encryption for protection. Using Encrypted Website Payments helps secure payment buttons. Encrypted Website Payments protects the HTML button code that contains pricing information by encrypting it. HTML button code that you protect by using Encrypted Website Payments cannot be altered by malicious third parties to create fraudulent payments.
Requirements:
Creating the encryption keys is a very technical process. To enable this feature, you will need have access to the server hosting AbleCommerce, and an understanding of how to generate public and private encryption keys. PayPal offers some instruction at their website. Please review the information here before beginning.
AbleCommerce technical support does not offer free assistance for this public and private key generation process. However, we have written our own documentation in order to provide some assistance.
How to configure Public Key Encryption for Encrypted Website Payments
You will need to create your certificates before using the encrypted website payments option. An overview of this process includes the following steps:
Generate your private key.
Generate your public certificate.
Upload your public certificate to your PayPal account and note down the "Cert ID" for uploaded certificate.
Download the PayPal public certificate from the PayPal website.
Export your public certificate to PKCS#12 format with name "mycert.p12" and remember the password.
PayPal uses only X.509 public certificates, not public keys. A public key can be used for decryption but contains no information identifying who provided the key. A public certificate includes a public key along with information about the key, such as when the key expires and who owns the key. PayPal accepts public certificates in OpenSSL PEM format from any established certificate authority, such as VeriSign.
How to use OpenSSL software on a Windows computer
You can generate your own private key and public certificate using open source software such as OpenSSL (https://www.openssl.org). The steps below are specifically for Windows systems. You may use any software that you choose. This is only one example.
Open a browser, and go to OpenSSL for Windows
In the Download section, click on the "Setup" link to obtain a complete package.
Download the .exe file to your local PC.
Double-click the downloaded OpenSSL.exe file to initiate the installation.
Follow the steps to complete the installation process. You may wish to make a note of the installation path.
Find the "openssl.exe" file that was installed in the \GnuWin32\bin\ folder and double-click the file to open a command prompt.
Enter the command below to create a private certificate.

genrsa -out my-prvkey.pem 1024Hit the Enter key.

You should receive a message, and the file "my-prvkey.pem" is created in the same folder.
The next step requires a little more effort. If you are using the Windows version of OpenSSL, then you may receive an error with a missing configuration file. If this happens, find the "openssl.cnf" in the \GnuWin32\share\ folder and COPY this to C:\usr\local\ssl\ folder. Create the new folders if needed.
Find the "openssl.exe" file again and double-click the file to open a command prompt.
Enter the command below to create a public certificate.

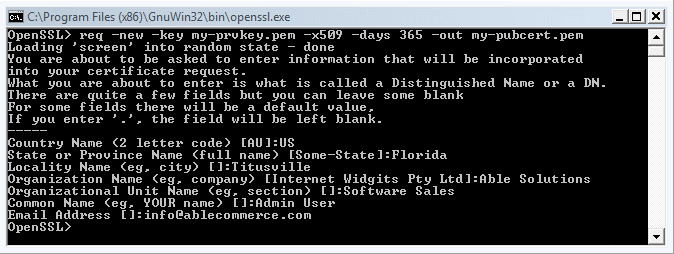
req -new -key my-prvkey.pem -x509 -days 365 -out my-pubcert.pemHit the Enter key.
In the next step, you will be prompted to enter some basic information about your company. After each value, click the enter key.

When finished, you should see the OpenSSL> command prompt.
Check the \GnuWin32\bin\ folder to confirm the "my-pubcert.pem" file was created.
Find the "openssl.exe" file again and double-click the file to open a command prompt.
Enter the command below to generate a public certificate in PKCS#12 format.

pkcs12 -export -in my-pubcert.pem -inkey my-prvkey.pem -out mycert.p12Hit the enter key.
During the process, you will be prompted to enter an Export Password. Carefully type a password. You will not be able to view the characters on the screen, so make sure to write down the password. It will be used later during final the configuration.
After typing in your password, you will be prompted to enter it again. The passwords must match for the export to be successful.

Hit the enter key.
Check the \GnuWin32\bin\ folder to confirm the "mycert.p12" file was created.
Let's take a look at the new files we created using the OpenSSL program. In your \GnuWin32\bin\ folder, you should have the following:
my-prvkey.pem - private certificate
my-pubcert.pem - public certificate
mycert.p12 - public certificate in PKCS#12 format.
You should also have your export password written down. It may be a good idea to save all this information in a secure location.
Uploading your Public Certificate to PayPal
To get started, login to your PayPal Merchant Account.
Click on the "Profile" link in the top-menu.
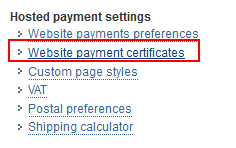
In the section named "Hosted payment settings", click on "Website Payment Certificates" link.

At the bottom of the page, in the "Your Public Certificates" section, click the ADD button.

From the next page, use the "Browse" button to select the my-pubcert.PEM public certificate created in the section above.
Click the ADD button to upload the certificate.

If the public certificate was valid and accepted by PayPal, then you will be returned to the prior page.

Make a note of the Cert ID. This value will need to be entered into the AbleCommerce PayPal configuration page.
Next, you will need to download the PayPal Public Certificate. Click the "Download" button and save the "paypal_cert_pem.txt"

Copy and rename the PayPal public certificate file "paypal_cert_pem" to the AbleCommerce ~/App_Data/ folder.
Copy the "mycert.p12" file to the AbleCommerce ~/App_Data/ folder as well.
Enable Encrypted Website Payments using Public Key Encryption
Login to AbleCommerce Merchant Administration, and go to Configure > Payments > Gateways.
Add or Edit the PayPal gateway option.
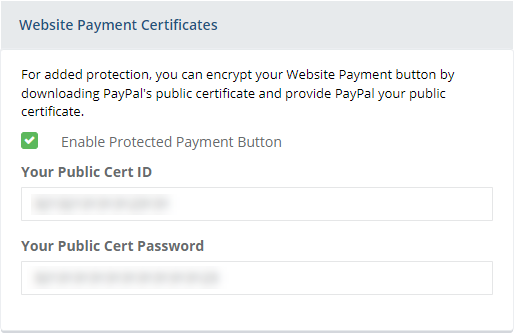
NOTE: If you are adding this as a new payment option, please see the Paypal configuration page and complete all necessary steps here before continuing.From the PayPal gateway configuration page, find the section called "Website Payments Certificates".

Enable Protected Payment Button: Check this option to send the order data in encrypted form.
Your Public Cert ID: The certificate ID will be required if you are using the encryption option. This information is available from your PayPal account.
Your Public Cert Password: This password is required. It is the password you created when exporting your public certificate to the PKCS#12 format.
Continue to "Miscellaneous Configuration Options" section documented within the Paypal configuration page.
Click the Save and Close button when finished.
Testing the Encrypted Website Payments feature
Because there are so many steps involved in creating the secure payment, it is critical that you test the feature after enabling it.
Use Paypal Standard (the Paypal button) with the Enable Encrypted Website Payments option active.
Place an item in the cart and proceed to checkout.
On the final payments page, select the "PayPal" option.
If you were successful in setting this up, then you will be directed to the receipt page or PayPal's website.
If you were not successful, then you will see an error message like this one:

If this should happen, check to make sure you have the required files in the AbleCommerce ~\App_Data\ folder.
- mycert.p12
- paypal_cert_pem
Also, make sure that you have entered the correct Public Certificate ID and Password.