Product Options and Variants
Table of Contents Show
What are the differences between options and variants?
Options and Variants are different in AbleCommerce depending on how you wish to use them.
OPTIONS - An option is a set of choices for the customer to select from. It may be something like Small, Medium, or Large. Options are the most simplistic variables of a product and do not have special inventory control or shipping requirements. An option may have its own price, weight, or SKU. An option may also have its own thumbnail and/or regular image to demonstrate different product styles or types to the customer.
VARIANTS - A variant is usually used when the product has more than one set of options. For example, the product may have sizes Small, Medium, and Large, and be available in colors Red, Blue, and Green. This example has '2 sets' of options with '3 choices' each, which in turn has created 9 different variations of the product. It is important to define all of your options and choices for a product before changing the variants.
Variants can be used by the merchant to establish the price and availability of a particular variant of the product. For example, let's say you are selling shoes. You have all variations of the shoe available except size 9 in the color white. You can uncheck the availability box for this particular variant, and it will no longer be available for purchase. The same thing applies for inventory. If a particular variant is out of stock, and you do not allow back-orders, then it cannot be sold to the customer. Variants also have support for model #, GTIN/UPC, dimensions, special handling charges, and inventory control where options do not.
NOTE: For the Square POS integration, you must be using the Variants feature to track inventory with the SKU match field.
Add Product Options
From the Product Editing page, click on the Options tab to manage and add new options.
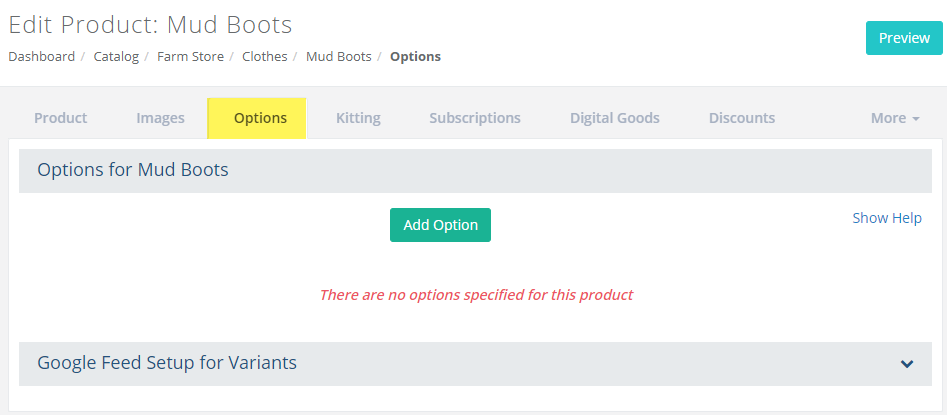
Click the Add Option button to view the Add Option pop-up dialog.
Enter an Option Name to describe the list of choices.
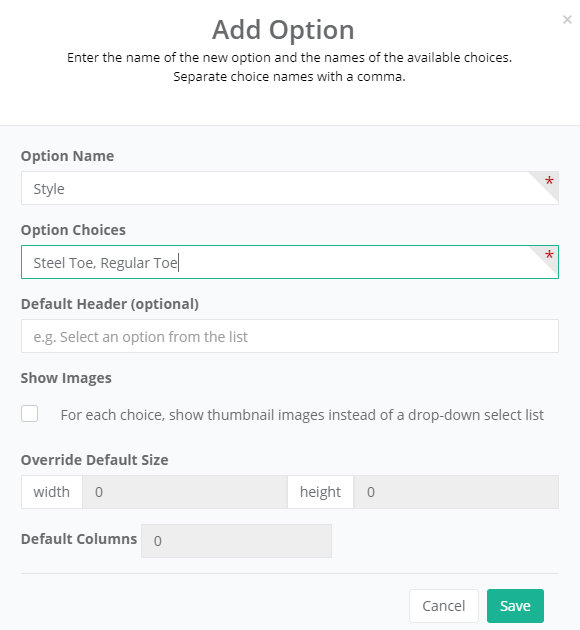
In the second field, enter the Option Choices. This is a list of choices for the option, with each one separated by comma. You can add more option choices later.
The Default Header is some text that will instruct the customer what to do with the list of choices. e.g. Select an option from the list
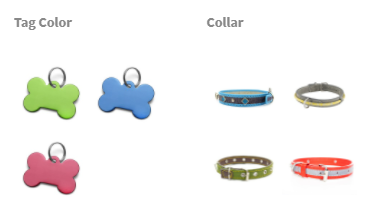
If there is no default header, the first choice will be the default selection list.There is a checkbox to Show Images. If this is checked, then each choice will display a small image instead of the text appearing in the select list.
The following example has this feature enabled. Instead a list to select from, the customer is presented with images that can be clicked.
When the Show Images option is enabled, there will be additional configuration settings to change the default size of the image, and to control the display of the images in columns. The default image sizes for option choices is a setting on the Image Settings page. Make changes for the individual product options only if you want to override the default sizes.
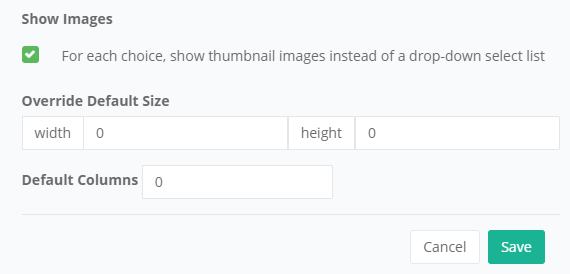
When finished adding the new option with its choices, click the Save button.
You will return to the Options page where the new option will be shown as seen in the following example.

Manage Multiple Options
To demonstrate the management of options, we will need to repeat the process above and use the Add Option button again to create a second option with a different set of choices.
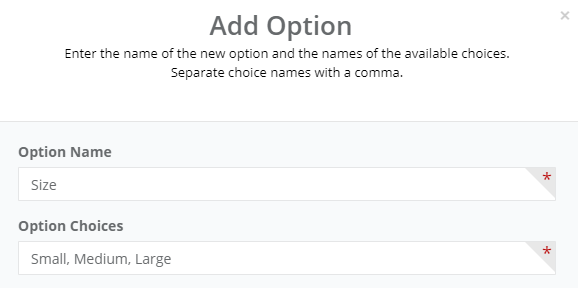
For this example, we will add an option named Size and three choices Small, Medium, and Large.
Click the Save button to create another set of options. You will return to the Options page where the new option will be shown demonstrated by the following example.

The Options page has the following management features:
Sort - The first column can be used to sort the options. This will determine the order they are presented to the customer on the product detail page. Use the up and down arrows to change the order as needed.
The Option Name can be easily changed at any time. Click the linked name to open the Edit Option pop-up dialog. You will not be able to change the choices from this screen.
The Header column indicates if the optional descriptive text will be provided to the customer.
The linked number counter in the Choices column will show you the total number of choices for the selected option. You can click the counter to manage, delete, or edit the choices.
The Thumbnail column will show a checkmark if these choices will be represented by images instead of text.
The Action column has a button to Manage Choices (same as clicking the number counter), Copy, Edit (same as clicking the linked option name), or Delete, which will remove the option and any attached choices. A warning will be displayed and the action cannot be undone.
The Copy action will show a new popup dialog where you can enter a new Option Name.
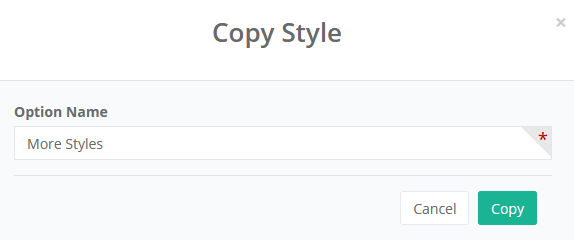
After entering the new Option Name, click the Copy button. This action will create a new option set using the same option choices from the originating option used to copy from.
NOTE: You should add all options and their choices before working with variants. Once the variants are being managed, any change to the option choices will affect the editing done from the Manage Variants page. The next sections describe the management of options or variants. Typically you will pick one or the other, and do any editing from the chosen management screen. The differences between these two features are described at the top of this page, but more detailed discussions will be indicated in the following two sections.
Editing Product Options
This is a continuation of the prior sections, so the example below includes two options that have already been created.

Click the blue Edit Options button.
NOTE: You should have a good understanding of the difference between Edit Options and Manage Variants before proceeding. If not, please keep reading through this section and the next.The page will display all options previously entered and their choices. This page has the fields previously described and available for management from one page. It is essentially a repeat of the Add/Edit Option and Add/Edit Choices in one convenient location.
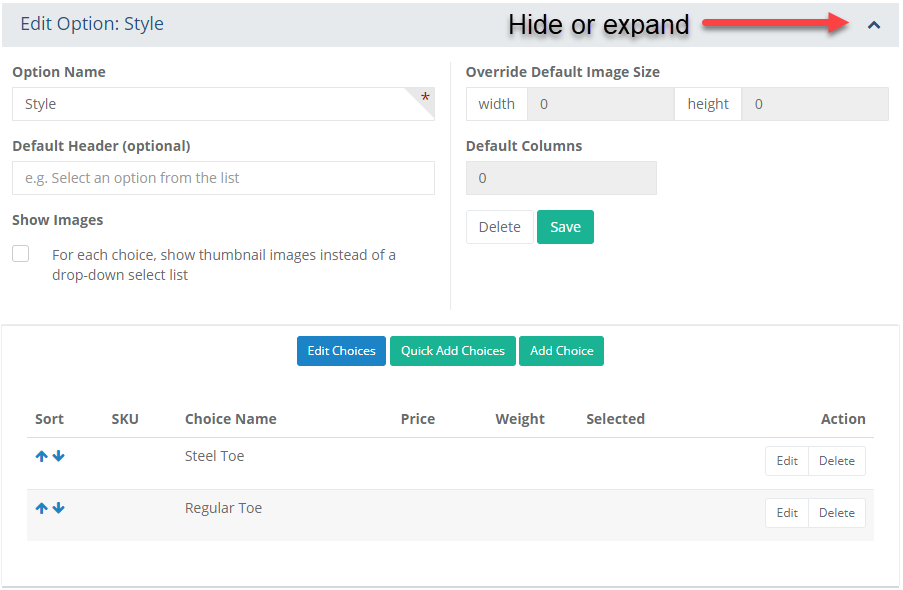
The top section shows Edit Option: {option name} and has the same settings available when the new option was added. To hide this section, click the carrot ^ symbol in the right side of the gray bar.
In the bottom section, you will find each of the option choices listed in the same order they were initially entered.
The Sort column is available to change the order of the options as they are presented to the customer.
The SKU column shows individual SKU for the option choice, if entered.
The Choice Name column which displays the name previously entered.
The Price and Weight fields are optional. If information for the specific choice is entered, it will be shown here.
The Selected column has a check to indicate if the choice will be the default selection by the customer, unless changed. This could also be the first choice in the list.
From the Action column, you can edit all the attributes of each choice, or delete the choice.
Edit Choices
If you want to edit or view all the attributes available for an option's choice, click the Edit Choices button.
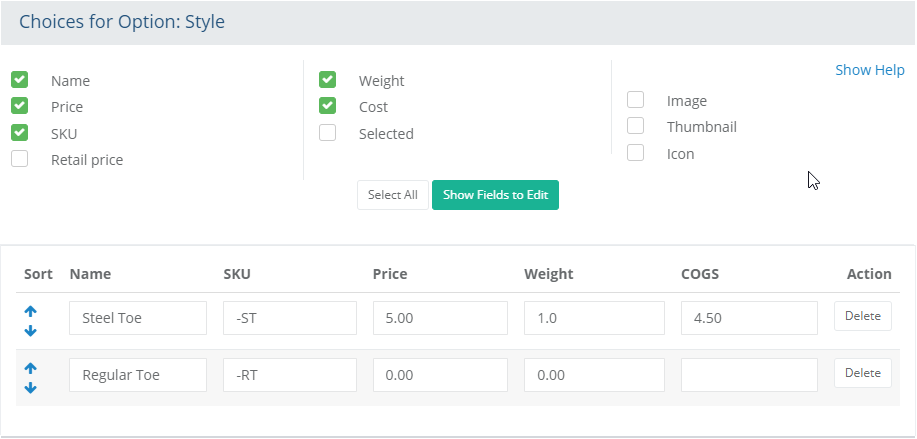
In the top section, all the available attributes are shown. Check the box next to the ones you wish to display and/or edit.
Then click the Show Fields to Edit button to display each choice and the fields you selected for editing.
In the first column, you can click the blue up or down arrows to sort your option choices.
Each option choice Name will be shown in a field that allows editing. A name is the only required field for an option choice.
The SKU of an option can either stand on its own, or it will be appended to the base product SKU.
A Price for each option choice can be entered in the fields provided. The option price you enter will modify the base product price of the product, if it is used.
The Retail price field is for display purposes only. If used, the retail price will be shown depending on the option selected.
The Cost is a price field that is used for calculating profits.
The Weight of an option choice will alter the base product weight.
The Selected checkbox can be used to designate which will be the default option choice shown to the customer. If none are selected, then the customer will be required to choose an option before purchasing the product. Only one option choice can be selected as the default value.
If you have the Show Thumbnails feature active, then you can use Image selector to select an Icon, Thumbnail and full size Image for each option choice.
You can remove a single option choice by clicking the Delete button from the Action column.
Click the Save or Save and Close button in the bottom admin footer after making any changes.
Click the Preview button from the upper-right corner of the page to view the product and its options.
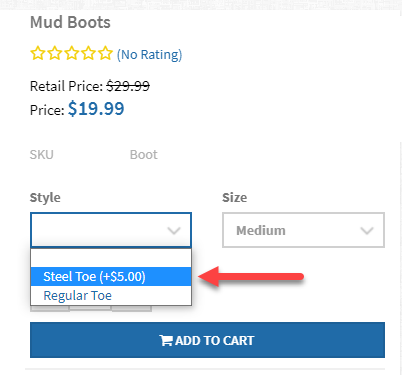
Notice the product has a base price, and one of the options shows an increase in price if selected. If the product has a base price or weight, then any price or weight for the option will increase the base price and/or weight. Likewise, if the product has 0 for price and/or weight, then the options themselves will determine the final price and/or weight.
Quick Add Choices
If you want to add multiple choices at once, then click the Quick Add Choices button. A pop-up dialog will appear as shown below.
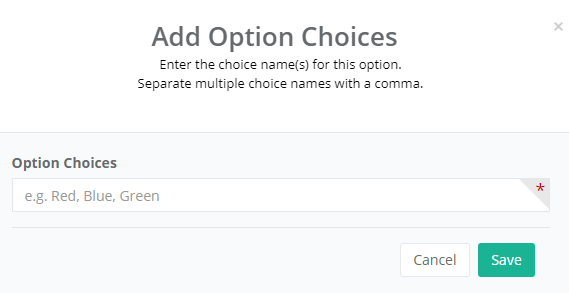
Enter the choice names in a comma delimited list.
Click the Save button.
Add Choice
If you want to add a single choice with all of its available attributes, click the Add Choice button. A pop-up dialog will appear as shown below.
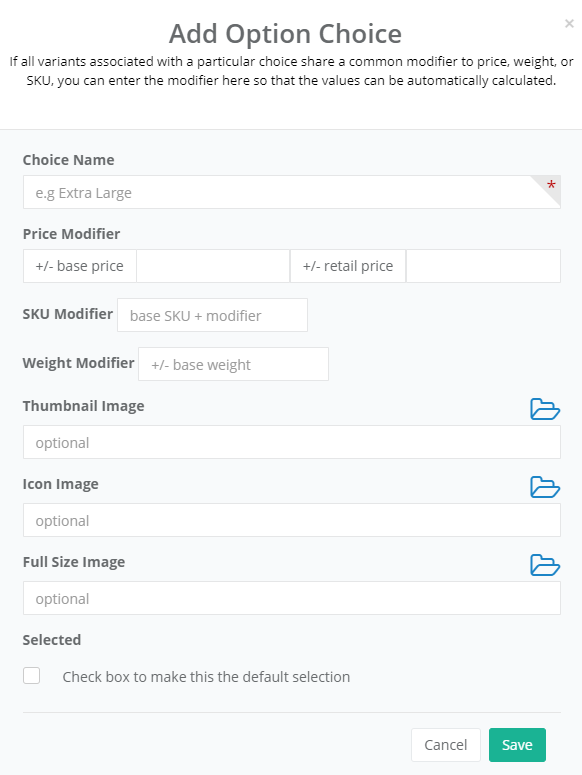
Enter the Choice Name in the first field. This is required.
Price Modifier - The option choice price you enter will modify the base product price of the product. If the base product price is 0, then enter the price for the product when this option choice is selected. Likewise, the retail price will adjust the product's base retail price unless it is 0.
SKU Modifier - The option choice SKU can either stand on its own, or it will be appended to the base product SKU if one exists.
Weight Modifier - The weight of an option choice will be added to the base product weight, or you can enter the full weight of the option choice in this field.
If you have the Show Thumbnails feature active for the option, then you can use Image selector to select an Icon, Thumbnail and full size Image for each option choice.
The Selected checkbox can be used to designate which will be the default option choice shown to the customer. If none are selected, then the customer will be required to choose an option before purchasing the product. Only one option choice can be selected as the default value.
Click the Save button when finished.
Manage Variants
NOTE: You should add all options and their choices before working with variants. Once the variants are being managed, any change to the option choices will affect the editing done from the Manage Variants page. The next sections describe the management of options or variants. Typically you will pick one or the other, and do any editing from the chosen management screen. The differences between these two features are described at the top of this page, but more detailed discussions will be indicated in the following two sections.
From the Product Editing page, click on the Options tab.
The example below includes two options that have already been created.

Click the Manage Variants button. This will bring you to page where you can manage the individual options created by combining all possible choices.
In the top section of the page, you can choose which variant parameters you wish to edit. This allows you to edit only the fields necessary and will maximize the amount of space you can use to enter information. Select the fields you want to edit and click the Show Fields to Edit button.

Your settings will be remembered and can be changed at any time. After updating, you will see only the fields selected above.
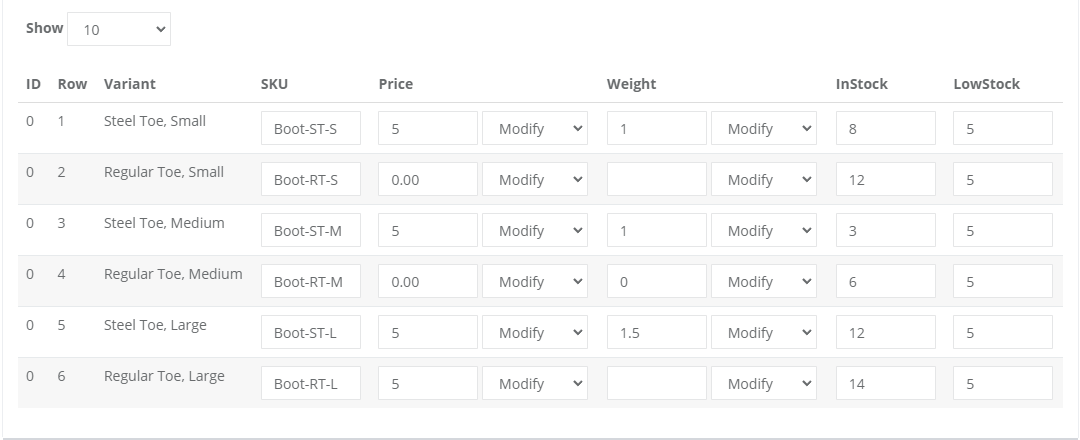
The total number of possible option choice variations are shown. If you have several variants, then you may see more than one page with navigation provided.
The SKU can be automatically generated, or you can enter a different SKU to override the calculated value.
The GTIN field can be used for additional identification of the variant. The field name can be relabeled to be ISBN, etc.
The Model # field can be used for additional identification as well. The field name can be relabeled as needed.If you enter a Price, (or Cost) then the selection to Modify or Override will be used. A Retail price does not have the modify or override option.
Modify - the amount entered will be added to the base price of the product. e.g. Product Price + Option Price
Override - the amount here will be set as the price of the product. Any price entered for the product will be ignored.Similar to price, the Weight can be used to Modify or Override the base product values. Any 0 values will be ignored during calculation.
Special Handling Charges is another field used for shipping purposes. If a value is entered, this amount will be added to the shipment charges.
Dimensions can be used if the variants are different is size. This will result in more accurate shipping calculations.
If inventory control is enabled for product variants, then you can access these fields:
Available to sell - checkbox setting is active by default. If you uncheck any variant(s), they will not be available for purchase, so the option selections will not be displayed in the storefront.
Availability Date - this is a date when an item that is out of stock is expected to be available again. This feature is conditional on the product setting for Allow item to be purchased if out of stock is deactivated.
Note: If you are using the Restock Notification feature where customers can signup to be notified when an item is not available, then it only works for variants when the availability date is entered. This is due to an existing behavior where a variant under strict inventory control simply does not appear on screen for the customer to see thus not being able to enter a notification.In Stock - the number of items available for purchase
Low Stock - when the in stock value reaches this value, it is considered low inventory and a trigger email can be sent. It will also appear on the Low inventory report.
If you have the Show Thumbnails feature active for the option, then you can use Image selector to select an Icon, Thumbnail and full size Image for each option choice.
Click the SAVE button after making any updates. One example of a product page is shown below.
Google Feed Setup for Variants
As per Google Feed Specifications, variants are a group of identical products that only differ by the options ‘color’, ‘material’, ‘pattern’, or ‘size’. Variant-level information is required only for products in the "Apparel & Accessories" category, and all related subcategories. By submitting variant products, you will help shoppers find what they are looking for more easily by either enabling them to navigate between the different product variations on a details page or helping them discover additional colors, sizes, patterns etc. for a given product.
To submit variants for your "Apparel & Accessories" products in Google feed:
Set the product's Google category to "Apparel & Accessories" or a subcategory.
Mark the product to publish it as variants by checking the checkbox "Publish Feed as Variants" at product edit page.
Create options with names "Color", "Size", "Material" or "Pattern" to match the respective Google attributes as required.
Google feed requires you to submit specific images corresponding to each of variant that differ in ‘color’, ‘pattern’, or ‘material’. You can specify image url's from manage variants page.
You can also specify other details like availability, price, weight, inventory details and GTIN for each variant from the manage variants page.
Please check the Google Feed Specifications for more details.