License Keys for AbleCommerce 7
Applies To: AbleCommerce 7.x (all versions)
Last Update: 12/31/10
|
Document Guide
|
Please take a moment to review this important information about AbleCommerce 7 licensing. An improperly requested license key can disable your installation.
-
Each AbleCommerce license key is bound to the name of a website or IP address. This information must be provided with each key request.
-
The AbleCommerce license keys are version specific. This means you must request a license key that matches the version of the software you are using.
-
You can install AbleCommerce software without having a license key. Simply choose the "30-day evaluation" option during installation.
-
A license key can be entered at any time during, or after, the evaluation period.
|
|
Requesting a License Key
|
|
Receiving your License Key
|
|
Installing a License Key
|
|
Frequently Asked Questions
|
-
Login to your Customer Account area.
-
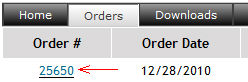
Click on the "Orders" tab.
-
Click the linked order number.
-
At the bottom of the order invoice, you will see the "Request License Key" form.
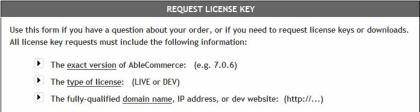
-
Enter one or more license key requests using the form instructions, or by following the detailed instructions below.
example request: 7.0.7 LIVE key for www.ablesite.com
7.0.7 DEV key for localhost
Type of License Key
There are two types of license keys that can be requested:
-
LIVE - This is a license key that is, or will be used, for a store going into production and taking live orders. It is typically associated to your public domain name.
-
DEVELOPMENT - This license is used for a store that is in a separate development or staging environment. It is limited by a random message that appears when you are using the software. This type of license is typically associated to an IP address, localhost, or development domain.
Version of License Key
The software version needs to be included in each request. The version can be obtained from several places including the file name of the download.
-
Login to your AbleCommerce Merchant Menu.
-
At the bottom of the page, you should see the exact version of AbleCommerce you are running. If not, then check these next locations:
-
For older installations, you may need to click on the HELP tab, then find the "About" page for version information.
-
If your installation is disabled, you can find the software version in the "VersionInfo.xml" file located in the \app_data\ folder.
Matching FQDN (Fully-Qualified Domain Name) or IP/localhost
The name of the website you are installing to must match the license key. If you are unsure of what information to provide in your request, simply look in the Address Bar of your browser to find the http address of your software installation.
e.g. http://www.ablesite.com
AbleCommerce license keys can respond to any website name or IP address that you give in your request. However, when installed, the license key will force a redirect to the name contained in your key data. Make sure you request the correct website name, or your installation may become disabled.
TIPS
-
Your live license request should specify the exact fully-qualified domain name. This typically matches your SSL certificate. (e.g. https://www.ablesite.com)
-
Port numbers must be included in the request, but only when your website is setup to use a non-standard port. This is typically for a development website.
-
We are unable to issue a license key that responds to wildcard domains, such as (*anything*).ablesite.com
-
After key installation, you may switch to DEMO mode. This allows the installation to respond to any website name. [read more]
How long will it take?
Most license key requests are fulfilled within a few hours or less. At this time, the license keys will be sent during our normal business hours, Monday through Friday, 8am to 5pm, Pacific time. This excludes weekends and holidays. Make sure to obtain your license keys in advance if necessary.
After making your request, please allow up to 6 hours before contacting us again. The license key(s) will be sent in an email to the current contact for the account. It is the software owner's responsibility to keep the account profile updated and distribute any license key(s) as needed.
Where can I see all my License keys?
If you login to your Customer Account area, click on the License Keys tab to view all keys that have been issued.

This feature is only available for new customers and existing customers who have undergone an account review. Account reviews may be made with each new key request, or at the account holder's request. Please allow up to 14 days for a review.
Why haven't I received my key yet?
- The most likely reason is the email we sent you has ended up in your spam folder. Check here first, and make sure to add "@ablecommerce.com" to your whitelist!
- The second most likely reason is that your request is incomplete, and this can delay processing. Your request needs to include three pieces of information:
-
Version
-
Key Type
-
Website name or IP.
- If you have requested more license keys than you are entitled to, without indicating cancelation of prior keys, then your request will be delayed.
The installation process requires that you access our website over a secure connection to validate the key. You must be able to access https://www.ablecommerce.com from the server that you are installing to, or you will need to manually register your license key.
When you install a license key, make sure the key you've requested is associated with the same domain or IP used to access the install screen of AbleCommerce. If the license key is not correctly associated, you may receive an error "HTTP 404 Not Found" or be redirected to the wrong website.
A license key can be installed with the software running or when it is no longer accessible through the browser.
To begin, select one of the key update methods below:
-
Installing a license during the initial installation - installing the software for the first time using your new key, or..
-
Updating a key after installation - updating a working installation with a new key, or..
-
Installing a license after the software has expired or is no longer accessible - installing a key manually.
-
Updating the Commercebuilder.lic file directly - when you can't validate a license in the normal way.
1) Install a License Key during the initial installation
For new installations -
If you are installing AbleCommerce software for the first time and have your license key, follow the instructions below to install your key.
-
From the Installation page, Step 1 of 2, find the section License Key.
-
Choose the option "Provide my license key".
-
Enter your license key into the field provided.
-
If you can proceed to the next page without an error, then your license key is valid.
If you receive an "HTTP 404 Not Found" error, or you are being redirected, then your license key does not match the name of the website you are installing to. If this happens, you will need to re-request your license key and follow key update method #3 instead.
2) Update a License Key after installation
For working installations -
If you already have AbleCommerce installed, and you are able to access the Merchant Administration, follow the instructions below to update your key.
-
From the Merchant Dashboard, go to Configure > Security > Licensing
-
This will bring you to the Store License page where you should now see an Update License section.
-
Enter your license key into the field provided.
-
Click the SAVE button. You will be prompted with an 'Are you sure...' dialog box, click OK to continue.
If you receive an "HTTP 404 Not Found" error, or you are being redirected, then your license key does not match the name of the website you are installing to. If this happens, you will need to re-request your license key and follow key update method #3 instead.
3) Install a License Key after AbleCommerce has expired or no longer accessible
For expired or disabled installations -
If you have installed AbleCommerce and the evaluation period has expired, you should automatically be prompted to enter a license key when accessing any page. However, if the "Key Update" page doesn't appear, then follow the instructions below.
These instructions assume that you have already removed your \Install\ folder. If you have not removed this folder yet, you should be able to directly access the Update Key page by going to your store's website address and adding /install/updatekey.aspx to the URL.
e.g. http://www.ablesite.com/install/updatekey.aspx
If the updatekey.aspx page is not available, then continue with the instructions below.
-
You will need to access your AbleCommerce program files, either by FTP or directly from the server.
-
Find the \App_Data\ folder.
-
Delete the existing commercebuilder.lic file.
-
Access your store (any page). You will be redirected to an Update Key page.
-
Enter your license key and update.
If you receive an "HTTP 404 Not Found" error, or you are being redirected, then your license key does not match the name of the website you are installing to. If this happens, you will need to re-request your license key and follow key update method #3.
* For versions 7.0.0 through 7.0.1 only: You will need to copy "updatekey.aspx" and "updatekey.aspx.cs" to an \install\ folder. If you have already removed your \install\ folder, you can retrieve the files from your original download which is attached to your order.
4) Updating the Commercebuilder.lic file directly
For installations that are not accessible to the internet -
This option would be used if your installation is unable to communicate with our server and validate the license key we provide you. If this happens, you will need to create and download your Commercebuilder.lic file.
-
Login to your Customer Account area.
-
Find your order and request a pre-registered license key with your request.
-
Provide the physical path to the root of this AbleCommerce installation. (e.g. c:\inetpub\wwwroot\ablecommerce\ )
-
To install the key, find the \App_Data\ folder.
-
Copy the new commercebuilder.lic file to this location.
-
Access any store page with a web browser to confirm your license key is updated properly.
If you receive an "HTTP 404 Not Found" error, or you are being redirected, then your license key does not match the name of the website you are installing to. If this happens, you will need to re-request your license key and follow this key update method again.
Frequently Asked Questions
FAQ #1 - I'm not ready to go live, what domain should I use in my key request?
For your convenience, you may request your LIVE production key with an alternate IP address. This allows you to install your production license, yet continue to access your future site by using it's future IP address.
When you request your license, just mention that you would like the LIVE license to respond to both your future production website name and an alternate IP (limit of one). The license key is valid for a single installation.
FAQ #2 - Can I manually install a License Key?
YES. In some cases, the validation process may fail if you are unable to connect to our secure server. In rare cases, permission may not be available to validate and register the license key in the normal way. If this should happen, you will need to register and update the Commercebuilder.lic file directly.
After installing a valid license key, there is a setting which allows you to put the installation into DEMO mode. In DEMO mode, any domain may be used to access the store site, but order billing and shipping addresses will not be recorded. This setting is especially useful if you are using a development IP which changes frequently or when the port number changes.
To Activate Demo Mode:
-
From the Merchant Dashboard, go to Configure > Security > Licensing
-
This will bring you to the Store License page where you should now see the Demo Mode section.
-
Click the button ENABLE DEMO MODE.
FAQ #4 - Can I exchange my License Key for a different one?
Yes. In your request, you must indicate which key is being replaced. The original license key will be disabled, and a new key code will be provided.
FAQ #5 - Can I request a License Key with more than one website?
Upon request, we can create a "dual" license key that is bound to your domain name and it's IP address. This is useful if you need time to work on your new AbleCommerce store before going live. This license key will still only work in a single installation but it will allow the software to respond to both IP and corresponding website name.
* You cannot have more than one production website running on a single live license unless you have purchased multiple copies of the software.